Clicking on the image will allow you to enlarge for bigger view.
Supplies
1 tube of choice - I’m using the artwork of Anna Marine at CILM
Font of Choice - I’m using Cardinal Alternate here
Monti Circular Mask here
Divine Intentionz Template 286 here
Eyecandy 4000 - Gradient Glow
Alien Skin Xenofex 2 - Burnt Edges
Greg’s Factory Output Vol. II - Pool Shadow
“Goth Princess” is a PTU tagger size scrap kit created by Rieka_Rafita and can be purchased at Scraps with Attitude. You can visit her blog here.
This tutorial was written assuming you have a working knowledge of PSP.
~♥~ Let’s get started ~♥~
Open up the template.
Shift +D.
Close out the original.
Delete the top 4 layers.
Image/Canvas Size
700 X 700
Flood fill the background layer white.
Highlight Raster 1 layer.
Click on it with your Magic Wand.
New Raster layer.
Copy and paste Paper 7 Into Selection.
Deselect.
Apply Greg’s Factory Output Vol. II - Pool Shadow:
Default Settings
OK
Delete the template layer.
Highlight Rectangle layer.
Click on it with your Magic Wand.
Copy and paste Paper 1 as a new layer.
Resize 65%
Move into position over the rectangle.
Selections/Invert
Tap the delete key.
Deselect.
Delete the template layer.
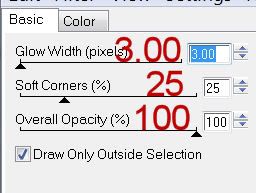
Apply Eyecandy 4000 - Gradient Glow:
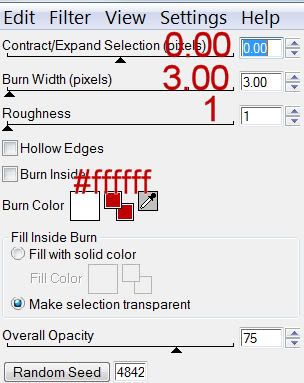
Highlight Copy of Rectangle layer.
Repeat the above step.
Highlight Circle layer.
Click on it with your Magic Wand.
New Raster layer.
Copy and paste Paper 8 Into Selection.
Deselect for now.
Copy and paste your tube as a new layer.
Move into position over the circle.
If you want the head of your tube to stick above the circle then duplicate your tube.
Highlight the template layer.
Click on it with your Magic Wand.
Selections/Invert
Highlight the original tube layer.
Tap the delete key.
Deselect.
Highlight the copy of your tube and erase the bottom portion that sticks out from the circle.
Duplicate this layer and close it out for now.
Merge Visible the circle layer, original tube layer, and the copy of the tube.
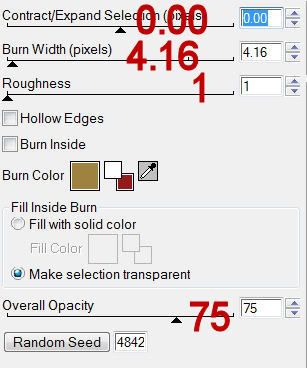
Apply Xenofex 2 - Burnt Edges:
Open up the closed tube layer.
Erase the very bottom edge of it so that the burned edge comes through.
Add your embellishments. I used:
Tree/Duplicate/Mirror
Ribbon 3: Resize 60%
Skull 3: Resize 40%/Free rotate left 10 degrees
Flower 2: Resize 50%/Free rotate left 90 degrees
Chalis: Resize 65%/Duplicate
Leaves 2: Erase parts you don’t want to see
Butterfly 3: Resize 30%/Free rotate left 30 degrees
Sparkle 2: Resize 90%
Highlight your white background.
New Raster layer.
Select All.
Copy and paste a paper of choice Into Selection.
Deselect.
Apply the Mask.
Merge Group.
Add your copyrights.
Add your name.
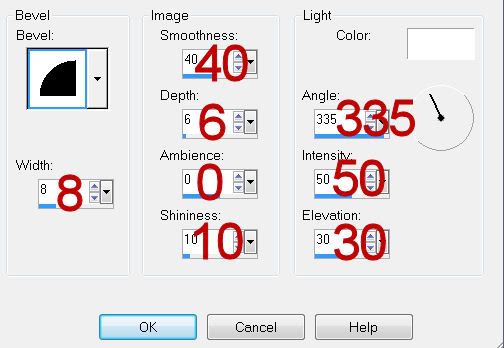
Give it a slight inner bevel:
I hope you enjoyed this tutorial.
I’d love to see your results and show it off in my gallery.
Email me!
Hugs,
Bev
Supplies
1 tube of choice - I’m using the artwork of Anna Marine at CILM
Font of Choice - I’m using Cardinal Alternate here
Monti Circular Mask here
Divine Intentionz Template 286 here
Eyecandy 4000 - Gradient Glow
Alien Skin Xenofex 2 - Burnt Edges
Greg’s Factory Output Vol. II - Pool Shadow
“Goth Princess” is a PTU tagger size scrap kit created by Rieka_Rafita and can be purchased at Scraps with Attitude. You can visit her blog here.
This tutorial was written assuming you have a working knowledge of PSP.
~♥~ Let’s get started ~♥~
Open up the template.
Shift +D.
Close out the original.
Delete the top 4 layers.
Image/Canvas Size
700 X 700
Flood fill the background layer white.
Highlight Raster 1 layer.
Click on it with your Magic Wand.
New Raster layer.
Copy and paste Paper 7 Into Selection.
Deselect.
Apply Greg’s Factory Output Vol. II - Pool Shadow:
Default Settings
OK
Delete the template layer.
Highlight Rectangle layer.
Click on it with your Magic Wand.
Copy and paste Paper 1 as a new layer.
Resize 65%
Move into position over the rectangle.
Selections/Invert
Tap the delete key.
Deselect.
Delete the template layer.
Apply Eyecandy 4000 - Gradient Glow:
Highlight Copy of Rectangle layer.
Repeat the above step.
Highlight Circle layer.
Click on it with your Magic Wand.
New Raster layer.
Copy and paste Paper 8 Into Selection.
Deselect for now.
Copy and paste your tube as a new layer.
Move into position over the circle.
If you want the head of your tube to stick above the circle then duplicate your tube.
Highlight the template layer.
Click on it with your Magic Wand.
Selections/Invert
Highlight the original tube layer.
Tap the delete key.
Deselect.
Highlight the copy of your tube and erase the bottom portion that sticks out from the circle.
Duplicate this layer and close it out for now.
Merge Visible the circle layer, original tube layer, and the copy of the tube.
Apply Xenofex 2 - Burnt Edges:
Open up the closed tube layer.
Erase the very bottom edge of it so that the burned edge comes through.
Add your embellishments. I used:
Tree/Duplicate/Mirror
Ribbon 3: Resize 60%
Skull 3: Resize 40%/Free rotate left 10 degrees
Flower 2: Resize 50%/Free rotate left 90 degrees
Chalis: Resize 65%/Duplicate
Leaves 2: Erase parts you don’t want to see
Butterfly 3: Resize 30%/Free rotate left 30 degrees
Sparkle 2: Resize 90%
Highlight your white background.
New Raster layer.
Select All.
Copy and paste a paper of choice Into Selection.
Deselect.
Apply the Mask.
Merge Group.
Add your copyrights.
Add your name.
Give it a slight inner bevel:
I hope you enjoyed this tutorial.
I’d love to see your results and show it off in my gallery.
Email me!
Hugs,
Bev