Clicking on the image will enlarge to full view.
Supplies
1 tube of choice - I used the wonderful artwork of Greg Horn at CILM
Font of Choice - I used 5AM Melfina here
Gem’s Mask 8 here
My Template 96 here
DSB Flux - Bright Noise
Greg’s Factory Output Vol. II - Pool Shadow and Radial Hilite
This tutorial was written assuming you have a working knowledge of PSP.
~♥~ Let’s get started ~♥~
If you’re using the tube I did and would like to use the same colors they are:
7fadc3 - it’s a lavender color
D7c7ef - it’s a blue tone
Open up the template.
Shift + D
Close out the Original.
Delete the credit layer and Corner Dots layer.
Highlight Large Rectangle Back layer.
Click on it with your Magic Wand.
New Raster layer.
Flood fill with a gradient set at
Angle: 0
Repeats: 0
Invert Checked
Style: Linear
Flood fill the layer.
Deselect.
Apple Greg’s Factory Output Vol. II - Pool Shaodw:
Default Settings
Give it a drop shadow
Apply Greg’s Factory Output Vol. II - Radial Hilite:
Default Settings
Delete the template layer.
Highlight Large Rectangle layer.
Select All/Float/Defloat
New Raster layer.
Uncheck Invert on your gradient and flood fill the layer.
DO NOT DESELECT.
Copy and paste your tube as a new layer.
Resize larger if needed - I resized mine 130%
Selections/Invert
Tap the delete key.
Deselect.
Merge Down.
Delete the template layer.
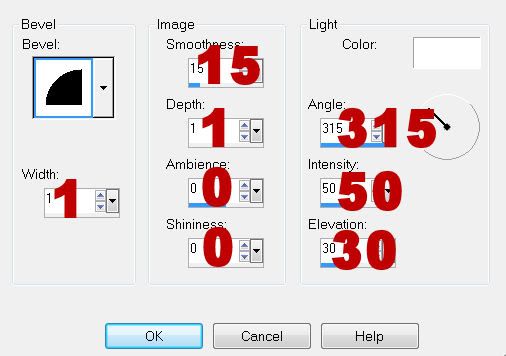
Apply an inner bevel:
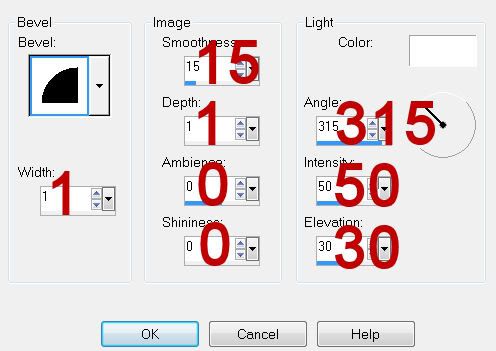
Highlight Small Rectangle Back.
Click on it with your Magic Wand.
New Raster layer.
Flood fill with the blue color.
Deselect.
Apply the Pool Shadow effect.
Give it the same inner bevel.
Highlight Small Rectangle layer.
Click on it with your Magic Wand.
New Raster layer.
Flood fill with the lavender color.
Deselect for now.
Copy and paste your tube again.
Resize - I resized mine 50%
Free rotate right 15 degrees
Position over the lavender rectangle.
Highlight the small rectangle layer template.
Click on it with your Magic Wand.
Highlight the tube layer.
Selections/Invert
Tap the delete key.
Deselect.
Merge Down.
Give it the same inner bevel.
Delete the template layer.
Highlight Thin Rectangles layer.
Click on them with your Magic Wand.
New Raster layer.
Flood fill with your gradient.
Apply Pool Shadow effect.
Give it the same drop shadow as you did for the large rectangle back.
Apply Radial Hilite.
Highlight Eternal Outlaw words layer.
Select All/Float/Defloat
New Raster layer.
Flood fill with the lavender color.
Deselect.
Delete the template layer.
Give it the same inner bevel.
Apply DSB Flux - Bright Noise:
Intensity: 12
Mix Checked
OK
Highlight Heart Arrow layer.
Click on it with your Magic Wand.
New Raster layer.
Flood fill with the lavender color.
New Raster layer.
Flood fill with the blue color.
Deselect.
Delete the template layer.
To each of the arrows do the following:
Give it the same inner bevel.
Apply DSB Flux Bright Noise
To the blue arrow:
Apply the Pool Shadow effect.
Move the blue arrow slightly to the right.
Highlight your white background.
New Raster layer.
Select All.
Copy and paste a paper of choice Into Selection.
Deselect.
Apply the mask.
Resize 110%
Merge Group.
Add your copyrights.
Add your name:
Type it out in the blue color.
Type it out again in the lavender color.
To each name layer give it the same inner bevel.
To the lavender layer apply the Pool Shadow effect and then move it slightly to the right.
Resize all layers 90%.
I hope you enjoyed this tutorial.
I’d love to see your results and show it off in my gallery.
Email me!
Hugs,
Bev