Wednesday, December 9, 2009

Yearning

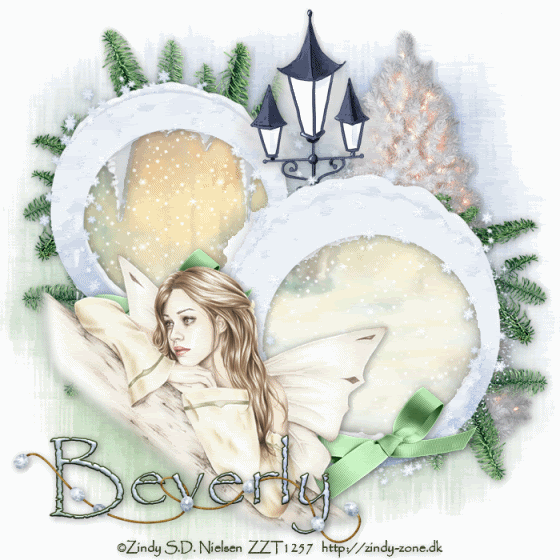
Clicking on the image will enlarge to full view.

Supplies
1 tube or image of choice - I used the beautiful artwork of Michael Calandra here
Font of choice - I used Stonehenge here
Weescotlass Mask 167 here
Babes Designz Template 10 here
“Natural” is a PTU tagger size scrap kit created by Lisa of Frosted Illusions and can be purchased at Aussie Scrap Designs. You can visit her blog here.
Thank you Lisa for such a beautiful kit!

This tutorial was written assuming you have a working knowledge of PSP.

~♥~ Let’s get started ~♥~

Open up the template.
Delete the credit layer.

Highlight Rectangle 1 layer.
Select All/Float/Defloat
New Raster Layer.
Copy and paste a paper of choice Into Selection.
Deselect.
Delete the template layer.

Highlight Rectangle 2 layer.
Select All/Float/Defloat
Copy and paste a paper of choice as a new layer.
Resize 65%
Selections/Invert
Tap the delete key.
Deselect.
Delete the template layer.
Highlight the Circle layer.
Select All/Float/Defloat
New Raster layer.
Copy and paste a paper of choice Into Selection.
DO NOT DESELECT.

Copy and paste your tube or image as a new layer.
Position it over the circle.
Selections/Modify/Feather
Number of Pixels:
53
Ok
Selections/Invert
Tap the delete key until you have the feathered look you want.
Deselect.
Delete the template layer.
Highlight the Stitches layer.
Select All/Float/Defloat
New Raster Layer.
Flood fill with a dark color that will match your tag.
Deselect.
Delete the template layer.
Repeat the above step with the Dot Circle layer.
Add your embellishments. I used:
Bow 4: Resize 35%
Tag 4: Resize 50%
Butterfly 3: Resize 25% Free rotate right 25 degrees
Flower 8: Resize 25%
Flower 5: Resize 25% and 75%
Glittered Heart: Resize 35% Free rotate left 10 degrees
Highlight your white background.
New Raster layer.
Select All.
Copy and paste a paper of choice Into Selection.
Deselect.
Apply the mask.
Resize 110%
Merge Group.
Crop you image.

Add your copyrights.
Add your name.
I hope you enjoyed this tutorial.
I’d love to see your results.
Email me!
Hugs,
Bev

Dreaming of a White Christmas


Supplies
1 tube of choice - I used the beautiful artwork of Zindy S.D. Nielsen here
Font of choice - I used Papyrus which came with my pc.
Weescotlass Mask 39 here
Snow which I’ve supplied here
Animation Shop
“Winter Day” is a PTU tagger size scrap kit created by Rikiche of Scrappin Dsigns and can be purchased at Scraps with Attitude. You can visit Rikiche’s blog here.
Thank you Rikiche for a very brrrrrr-illiant kit!

This tutorial was written assuming you have a working knowledge of PSP.

~♥~ Let’s get started ~♥~

Open up a 700 X 700 transparent image.
Flood Fill white.

Copy and paste Snow Frame as a new layer.
Resize 70%
Use your Magic Wand and click inside both of the frames. Be sure to click in between the icicles and the frame in spots as well.
New Raster layer below the frame. Rename Paper layer.
Copy and paste a paper of choice Into Selection.
Deselect.

Now using your Freehand Selection Tool outline both of the circles.


New Raster layer below the Paper layer. Rename flood fill.
Flood fill with the color white.
Deselect.

Copy and paste your tube as a new layer.

Add your embellishments. I used:
Mistletoe: Resize 50%
Street Lamp: Resize 70%
Xmas Tree 2: Resize 70%
Bow: Resize 40%

Highlight your white background.
New Raster layer.
Select All.
Copy and paste a paper of choice Into Selection.
Deselect.
Apply the mask.
Resize 130%
I used my Pick Tool to pull the sides out a bit.
Merge Group.

Add your copyrights.

Add your name.
Give it a slight inner bevel:


Highlight your Paper layer.
Open up the snow that I’ve supplied.
Be sure Frame 10 is highlighted.
Copy.


Now make your working canvas active.
Paste as a new layer.
Rename Snow 10

Go back to the Snow Frame.
Copy Frame 9.

Make your working canvas active again.
Paste as a new layer.
Rename Snow 9.

Repeat the above steps until you have all 10 snow layers pasted onto your working canvas.

Highlight the Flood Fill layer.
Select All/Float/Defloat
Selections/Invert
Highlight each of the snow layers and tap the delete key.
Deselect.

Close out all the snow layers accept for Snow 1.
Copy Merge

~ Time to Animate ~

Open up Animation Shop.
Edit/Paste/as a New Animation

Go back into PSP
Close out Snow 1
Open up Snow 2
Copy Merge

Go back into AS
Edit/Paste/After Current Frame.

Go back into PSP
Close out Snow 2
Open up Snow 3.
Copy Merge.

Go back into AS
Edit/Paste After Current Frame.

Go back into PSP
Close out Snow 3
Open up Snow 4.
Copy Merge.

Go back into AS
Edit/Paste After Current Frame.

Go back into PSP
Close out Snow 4
Open up Snow 5.
Copy Merge.

Go back into AS
Edit/Paste After Current Frame

Go back into PSP
Close out Snow 5
Open up Snow 6.
Copy Merge.

Go back into AS
Edit/Paste After Current Frame

Go back into PSP
Close out Snow 6
Open up Snow 7.
Copy Merge.

Go back into AS
Edit/Paste After Current Frame

Go back into PSP
Close out Snow 7
Open up Snow 8.
Copy Merge.

Go back into AS
Edit/Paste After Current Frame

Go back into PSP
Close out Snow 8
Open up Snow 9.
Copy Merge.

Go back into AS
Edit/Paste After Current Frame

Go back into PSP
Close out Snow 9
Open up Snow 10.
Copy Merge.

Go back into AS
Edit/Paste After Current Frame.

View your animation.
If you’re happy then save.

I hope you enjoyed this tutorial.
I’d love to see your results.
Email me!
Hugs,
Bev