
Supplies Needed
1 tube of choice – I
used the adorable artwork of Sherri Baldy which can be purchased from My Tubed Art.
Font of choice – I
used Broadway (I'm sorry, I couldn't find a link) but Ritz should work just as nice here
Animation Shop
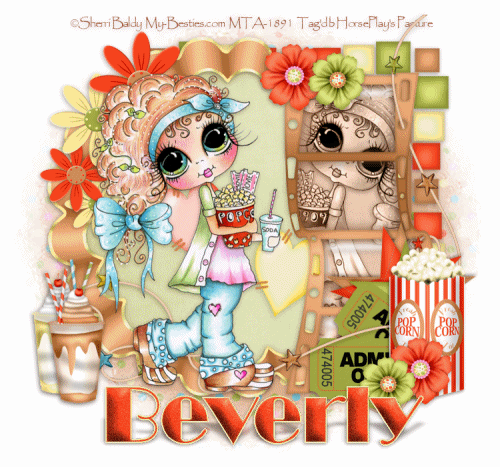
“Movie Night” is a FTU scrap kit created by me, Bev,
HorsePlay’s Pasture Designs. You can
download it from my blog here.
This tutorial was
written assuming you have working knowledge of PSP.
~♥~ Let’s get started ~♥~
Open up a 750 x 700 blank canvas.
Flood fill white.
Copy and paste the following
elements as new layers:
El 4: Resize 85%
El 5: Resize 90%
El 12: Free rotate Left 90 degrees
Move the elements into exact
position – see my tag for reference.
Highlight the Circle frame.
Click inside of it with your Magic
Wand.
Selections/Modify/Expand by 4.
New Raster layer below the frame.
Copy and paste Paper 5 Into
Selection.
Deselect.
Highlight the Film Strip layer.
Make your Freehand Selection Tool
active set on Point to Point.
Carefully section off the frame
windows like this:

New Raster layer below the film
strip.
Copy and paste Paper 6 Into
Selection.
Deselect.
Copy and paste your tube as a new
layer.
Position it to the left of the film
strip – see my tag for reference.
Once it’s in exact position,
duplicate/Mirror
Move into position below the film
strip element in your layers pallet.
Highlight the Paper layer that
belongs to the film strip.
Click anywhere outside of it with
your Magic Wand.
Highlight the tube layer that’s
below the film strip.
Tap the delete key.
Deselect.
Change the Properties of this tube
to Luminance (Legacy)
Add your elements. I used:
El50: Duplicate/Free rotate Left 90 degrees
El 44: Resize 60%/Free rotate Right 15 degrees
El 43: Resize 60%/ Free rotate Left 15 degrees
El 12: Resize 70%
El 40: Resize 45%/Duplicate/Free rotate Right 35
degrees
El 14: Resize 60%
El 20: Resize 60%
El 19: Resize 60%/Mirror
El 36: Resize 35%
El 37: Resize 30%
El 33: Resize 45%/Duplicate/Resize 70%
El 32: Resize 40%/Duplicate/Resize 70%
Add your name:
Foreground: #e5a26c
Background: #f8441f
Make your Text Tool active
Set the Stroke Width to 2.
Type your name at the bottom of the
tag.
Convert to Raster layer.
Duplicate the name layer 2 times for
a total of 3.
Rename each layer – Name 1, Name 2,
and Name 3.
Highlight Name 1 layer.
Select All/Float/Defloat
Selections/Modify/Contract by 2.
Give it a slight Inner Bevel:

Adjust/Add Remove Noise/Add Noise:
Gaussian and Monochrome checked
Noise: 15%
OK
DO NOT DESELECT.
Highlight Name 2 layer.
Apply the same bevel.
Apply the same noise effect accept
change Noise level to 25%
Highlight Name 3 layer.
Apply the same bevel.
Apply the same noise effect accept
change Noise level to 35%
Selections/Invert
Effects/Edge Effects/Enhance.
Close this layer out.
Highlight Name 2
Effects/Edge Effects/Enhance.
Close this layer out.
Highlight Name 1.
Effects/Edge Effects/Enhance.
Highlight your white background.
New Raster layer.
Select All.
Copy and paste Paper 3 Into
Selection.
Deselect.
Duplicate/Change the Properties to
Multiply.
Merge Down.
Apply the mask.
Merge Group.
Add your copyrights.
Copy Merged.
~Time to Animate~
Open up Animation Shop.
Edit/Paste as New Animation.
Back in PSP.
Close out Name 1 layer.
Open up Name 2 layer.
Copy Merged.
Carry into AS.
Edit/Paste After Current Frame
Back in PSP.
Close out Name 2 layer.
Open up Name 3 layer.
Copy Merged.
Carry into AS.
Edit/Paste After Current Frame
View your animation.
If you like it then resize -
Animation/Resize Animation:
Click Pixel Size:
Width: 500
OK
Save your animation.
I hope you enjoyed this tutorial as
much as I did creating it.
I’d love to see your results.
Hugs,
Bev
Awesome tutorial-thank you!
ReplyDelete