Supplies Needed
1 tube of choice – I
used the wonderful artwork of Joanna Bromley which can be purchased from PSPTube Stop. You must have a license to use.
Gem Mask 192 here
My template 89 here
My Supplies here –
Only use for this tutorial and Do Not Share
Plug Ins used:
Brush Strokes – Crosshatch
Eyecandy 5 – Textures: Swirl
This tutorial was
written assuming you have working knowledge of PSP.
~♥~ Let’s get started ~♥~
Open up the template.
Shift + D.
Close out the original.
Delete the top 2 layers.
From the tube -
Highlight layer “BlueBlossomEasterFaeOriginal”
Use your Selection Tool set on
Rectangle and section out the image area only.
Copy.
Make your template active.
Highlight Square Back layer.
Click on it with your Magic Wand.
New Raster layer.
Pate (the image you copied) Into
Selection.
Apply Brush Strokes – Crosshatch:
Stroke Length: 45
Sharpness: 6
Strength: 1
OK
Deselect.
Delete the template layer.
Highlight Diamond Back layer.
Click on it with your Magic Wand.
New Raster layer.
Paste (the image) Into Selection.
Flip.
Apply Brush Strokes – Crosshatch:
Use same settings.
Deselect.
Delete the template layer.
Highlight Circle layer.
Click on it with your Magic Wand.
New Raster layer.
Paste (the image) Into Selection.
Adjust/Blur/Gaussian Blur:
Radius: 4
OK
New Raster layer.
Paste (the Image) Into Selection.
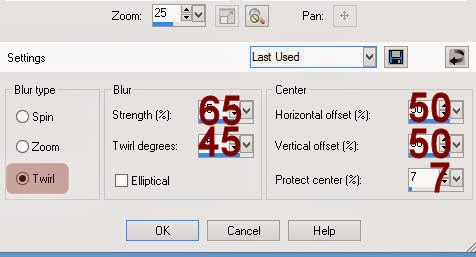
Adjust/Blur/Radial Blur:
New Raster layer.
Paste (the image) Into Selection.
Adjust/Blur/Motion Blur:
Angle: 56%
Strength: 100%
OK
Lower the Opacity to 57.
Deselect for now.
Highlight Scalloped Circle layer.
Apply Eyecandy 5 – Textures – Swirl:
Use Default settings accept change
the color to #aca2bd.
Click anywhere outside of the layer
with your Magic Wand.
New Raster layer above the swirl
layer.
Paste (the image) Into Selection.
Apply Brush Strokes – Crosshatch:
Use same settings.
Change the Properties to Soft Light.
Deselect.
Color Pallet:
Foreground: #ffc0ff
Background: #74583e
Highlight Circle Frame layer.
Make your Color Replacer Tool active
and double right click on the Circle Frame.
It should turn brown.
Adjust/Add Remove Noise/Add Noise:
Random and Monochrome chec ked
Noise: 30%
OK
Deselect.
Color Pallet:
Foreground: #ffffff
Background: #536d90
Highlight Square Back Strip layer.
Double right click your Color
Replacer Tool on the strip.
It should turn blue.
Apply the same noise effect.
Repeat the above step with Diamond
Back Strip layer.
Copy and paste your tube as a new
layer.
Duplicate the tube layer and resize
a bit larger.
Move it into position over just
below the circle frame layer.
Highlight the circle frame layer.
Click your mouse inside of it.
Selections/Modify/Expand by 4.
Highlight the tube layer that’s just
below it and tap the delete key.
Change the Properties of this tube
to Soft Light.
Deselect.
Add the elements I supplied – see my
tag for placement:
Duplicate the flowers
Duplicate the ring of flowers
Grass – duplicate as many times as
you like, resize as you like
Resize the eggs as you like. Use your Pick Tool to turn some this way and
that. Add noise if you like to some or
all. It’s your tag – do as you like!!
Highlight your white background.
New Raster layer.
Apply Eyecandy 5 – Texture – Swirl:
Use same settings.
Apply the mask.
Merge Group.
Add your copyrights.
Add your name.
Color Pallet:
Foreground: #54332a
Background: #a298b2
Stroke: .80
Type your name.
Give it a slight Inner Bevel:
Change the foreground in your color
pallet to #4b88c4
Run your Target Tool along the
bottom half of your name.
Decorate your name with eggs and
grass.
Resize all layers 85%.
I’d love to see your results.
Hugs,
Bev


No comments:
Post a Comment