Supplies
Plug Ins used:
Brush Strokes – Sprayed Strokes
“Elegant Spring” is a tagger size scrap kit (also available in full
size) created by Becky of Becky’s Creations and can be purchased from TKO Scraps. You can visit her designing blog here.
Thank you Becky for an incredibly wonderful spring kit!
~♥~ Let’s get started ~♥~
Open up the template.
Shift + D.
Close out the original.
Delete the top 3 layers.
Highlight Raster 2 layer.
Click on it with your Magic Wand.
New Raster layer.
Copy and paste Paper 4 Into Selection.
Deselect.
Delete the template layer.
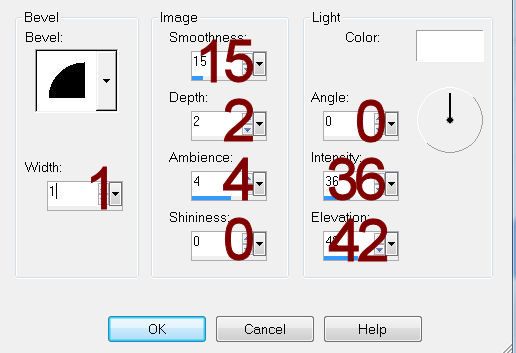
Give the paper layer a slight Inner Bevel:
Highlight Raster 3 layer.
Click on it with your Magic Wand.
New Raster layer.
Copy and paste Paper 8 Into Selection.
Deselect.
Delete the template layer.
Give the paper the same slight Inner Bevel.
Highlight Raster 4 layer.
Click on it with your Magic Wand.
New Raster layer.
Copy and paste Paper 4 Into Selection.
Lock the layer by clicking on the lock icon at the top of your layers
pallet.
Apply Brush Strokes – Sprayed Strokes:
Stroke Length: 10
Spray Radius: 22
Stroke Direction – Right Diag
OK
Deselect.
Delete the template layer.
Give the paper the same slight Inner Bevel.
Highlight Raster 5 layer.
Click on it with your Magic Wand.
New Raster layer.
Copy and paste Frame Into Selection.
Deselect.
Delete the template layer.
Highlight Raster 6 layer.
Repeat the above step.
Highlight Raster 7 layer.
Click on it with your Magic Wand.
New Raster layer.
Copy and paste Paper 10 Into Selection.
Deselect
Copy and paste Flower Girl as a new layer.
Resize 55%
Mirror
Change the Properties to Soft Light.
Move into position over the paper layer – see my tag for reference.
Highlight Raster 7 layer.
Click anywhere outside of it with your Magic Wand.
Highlight the Flower Girl layer and tap the delete key.
Deselect.
Delete the template layer.
Highlight Raster 8 layer.
Click on it with your Magic Wand.
New Raster layer.
Copy and paste Paper 10 Into Selection.
Copy and paste Owl as a new layer.
Resize 30%
Change the Properties to Soft Light.
Move into position – see my tag for reference.
Selections/Invert
Tap the delete key.
Deselect.
Delete the template layer.
Duplicate the Owl layer.
Change the Properties to Normal.
Resize 70%
Move into position – see my tag for reference.
Add your elements. I used:
Stitches: Resize
50%/Duplicate/Erase what overhangs the edges of the paper
Stitches 2: Resize 50%/Free
rotate Right 83 degrees/Duplicate/Erase what overhangs the paper
Bow 6: Resize 15%/Duplicate
Apple Tree: Resize 60%
Flower Girl: Resize 40%/Mirror
Daisy 3: Resize 15%/Duplicate
Daisy 2: Resize
15%/Duplicate/Duplicate/Resize 70%/Duplicate
Highlight your white canvas.
New Raster layer.
Select All.
Copy and paste Paper 1 Into Selection.
Deselect.
Apply the mask.
Resize 115%
Merge Group.
Add your credits.
Add your name:
Foreground: #250906
Background: #386002
Stroke: 2
Type your name.
Convert to Raster layer.
Select All/Float/Defloat
Selections/Modify/Contract by 2
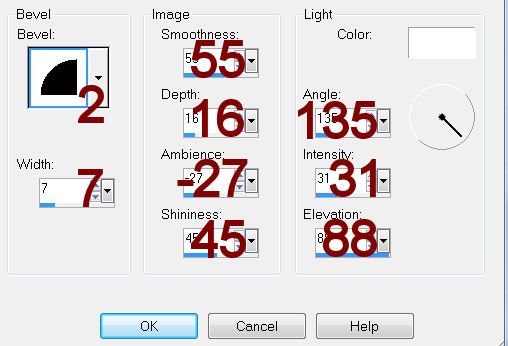
Give it a slight Inner Bevel:
Deselect.
Resize all layers 80%.


No comments:
Post a Comment