Supplies
1 tube of choice - I used the adorable artwork of Ching-Chou Kuik which can be purchased from Up Your Art. You must have a license to use.
Font of choice - I used Wretched here
Vix mask 452 here
Dangerously Delicious Christmas_Template_1_Merry_Christmas here
You can find it below Sunday December 1, 2013
Plug-Ins used:
Brush Strokes - Crosshatch
"Christmas Cheer" is a tagger size scrap kit created by Becca of Baby Dragon's Designs and can be purchased from Scraps from the Heart. You can visit her blog here.
This tutorial assumes you have a working knowledge of PSP.
~♥~ Let's get started ~♥~
Open up the template.
Shift + D.
Close out the original.
Resize all layers 90%
Image/Canvas Size:
700 x 600
Highlight the background layer.
Flood fill white.
Delete Raster 14, Raster 2, Ribbon Top Layer d/s, Ribbon Backs layer.
Highlight Brown Circle layer.
Click on it with your Magic Wand.
New Raster layer.
Copy and paste Paper 4 Into Selection.
Apply Brush Strokes - Crosshatch:
Stroke Length: 32
Sharpness: 6
Strength: 1
OK
Highlight White Square layer.
Click on it with your Magic Wand.
New Raster layer.
Copy and paste Paper 3 Into Selection.
Apply the same Brush Strokes effect.
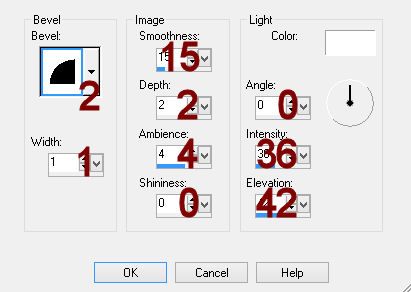
Give it a slight Inner Bevel:

Deselect.
Delete the template layer.
Highlight Dark Green Rectangle layer.
Click anywhere outside of it with your Magic Wand.
Copy and paste Paper 6 as a new layer.
Resize 75%
Position it over the template layer.
Tap the delete key.
Deselect.
Delete the template layer.
Give the paper the same slight Inner Bevel.
Color Pallet:
Foreground: #fdfbfb
Background: #ebd5ac
Highlight Dashed Shapes layer.
Make your Color Replacer Tool active and double right click on the dotted lines.
It should have changed to your background color.
Highlight Red Strip 2 layer.
Click on it with your Magic Wand.
New Raster layer.
Copy and paste Paper 9 Into Selection.
Apply the same Brush Strokes effect.
Deselect.
Delete the template layer.
Make your Lighten/Darken tool active choosing the default shape and match your settings to mine:
Size: 29
Hardness: 7
Step: 10
Density and Thickness: 100
Rotation: 0
Opacity: 80
Run the tool along each end of the ribbon just to darken it slightly so that it appears the ribbon is wrapped around the package.
Highlight Red Strip 1 layer.
Repeat the above step.
Highlight Light Green Shape.
Click on it with your Magic Wand.
New Raster layer.
Copy and paste Paper 9 Into Selection.
Apply the same Brush Strokes effect.
Give it the same slight Inner Bevel.
Highlight White Circle layer.
Click anywhere outside of it with your Magic Wand.
Copy and paste Paper 7 as a new layer.
Move into a position you like.
Tap the delete key.
Copy and paste your tube as a new layer.
Move into a position you like.
Tap the delete key.
Deselect.
Delete the white circle layer.
Highlight Ring Recolor layer.
Copy and paste Frame 1 as a new layer.
Resize 65%
Positon it over the Ring Recolor layer.
Delete Ring Recolor layer.
Highlight Raster 9 layer.
Copy and paste Ele 02 as a new layer.
Resize 25%
Position it over the template layer.
Delete the template layer.
Add your elements. I used:
El 29: Resize 75%/Mirror
El 11: Resize 50%
El 25: Resize 40%/Mirror
El 16: Resize 40%
El 20: Resize 30%
El 8: Resize 20% and 80%/Duplicate
Highlight your white background.
New Raster layer.
Select All.
Copy and paste Paper 6 Into Selection.
Deselect.
Merge Group.
Add your copyrights.
Add your name:
Color Pallet:
Foreground and Background: #202020
Type your name.
Convert to Raster layer.
Save your tag.
I hope you enjoyed this tutorial as much as I did creating it for you.
I'd really love to see your results.
Email me!
Hugs,
Bev


No comments:
Post a Comment