Supplies
1 tube of choice – I used the beautiful artwork of Katerina Koukiotis which
can be purchased from PSP Tube Stop. You must have
a license to use.
Font of choice – I used Stonehenge
here
Weescotlass Mask 236 here
Plug Ins used:
Brush Strokes - Crosshatch
“Journey Through the Lot” is a
tagger size scrap kit created by Conchi of DnScraps and can be purchased Lollipops n Gumdrops. You can visit her blog here.
Thank you Conchi for another fabulous kit!
~♥~ Let’s get started ~♥~
Open up a 700 x 700 blank canvas.
Flood fill white.
Copy and paste your tube on the left side of your canvas.
See my tag for reference.
Open up Paper 1.
In your Color Pallet:
Foreground: Null
Background: Pattern/Paper 1
Angle: 0
Scale: 25
Make your Rectangle Tool active.
Create a rectangle approximately 500 x 325 pixels.
Move it into position – see my tag for reference.
Objects/Align/Vertical Center in Canvas
Convert to Raster layer.
Apply Brush Strokes – Crosshatch:
Use Default Settings
Use your Magic Wand and click anywhere outside of the glitter
rectangle.
Selections/Invert
Selections/Modify/Contract by 7
New Raster layer.
Copy and paste Paper 3 Into Selection.
Deselect.
Copy and paste the following elements as new layers – see my tag for
placement:
Lucky Horseshoes 2: Resize 30%/Duplicate/Free rotate Left 10
degrees
Gold Pot DnScraps: Resize 45%
After you have moved the elements into position be sure to give each a
drop shadow.
Merge Visible all 3 elements.
Highlight the paper layer.
Click anywhere outside of it with your Magic Wand.
Highlight the merged elements layer.
Tap the delete key.
Deselect.
Change the Properties to Soft Light.
Copy and paste Bow as a new layer.
Resize 20%
Move into position – see my tag for reference.
Copy and paste Lucky Key as a new layer.
Resize 15%/ Duplicate
Free Rotate one of the keys Left 90 degrees.
Free Rotate the other key Left 78 degrees.
Zoom in and move both keys into position so that the inside rounded
edge is over the knot of the bow.
Duplicate the bow and move it above both keys in your layers pallet.
Make your Freehand Selection Tool active set on Point to Point and
section out the knot of the bow.
Selections/Invert
Tap the delete key.
Deselect.
Add your elements. I used:
Shamrock 2: Resize 15%/Free
Rotate Left 10 degrees/Duplicate/Mirror/Resize 70%
Lucky Horseshoes 2: Resize
15%/Free rotate Left 25 degrees/Duplicate/Mirror
Barrel Dnscraps: Resize 25%
Beer: Resize 15%
Gold Pot 2: Resize 65%
Party dnscraps
Crop your canvas.
Highlight your white canvas.
Select All.
New Raster layer.
Copy and paste Paper 2 Into Selection.
Deselect.
Apply the mask.
Merge Group.
Add your credits.
Add your name.
Foreground and Background: #000000
Type your name.
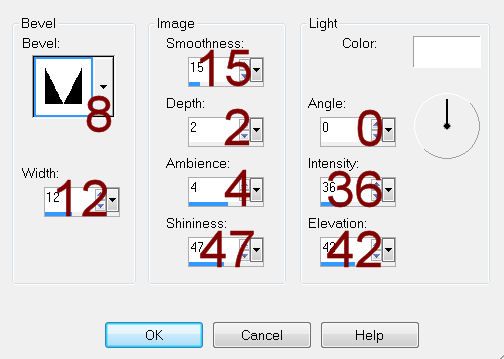
Give it a slight Inner Bevel:

Resize all layers 80%.


No comments:
Post a Comment