Supplies
Font of choice - I used Bubble 1 which came with my PSP program
Scrap Rebellion Template 62 here
“Snips & Snails & Tall Cattails” is a tagger size scrap kit
created by me, Bev of HorsePlay’s Pasture Designs and can be purchased from
either of my stores – Lollipops‘n Gumdrops or ButterflyBlush Designs. You can visit my
designing blog here.
This tutorial was written assuming you have a working knowledge of PSP.
~♥~ Let’s get started ~♥~
Open up the template.
Shift + D.
Close out the original.
Image/Canvas Size:
700 x 700
OK
Highlight the background layer.
Flood fill white.
Delete the top layer, Dotted Circle, and 3 lines layer.
Highlight Small Circle layer.
Click on it with your Magic Wand.
New Raster layer.
Copy and paste Paper 13 Into Selection.
Deselect.
Delete the template layer.
Highlight the other Small Circle layer.
Repeat the above step.
Highlight Top Rectangle layer.
Click anywhere outside of it with your Magic Wand.
Selections/Invert
New Raster layer.
Copy and paste 12 Into Selection.
Copy and paste element 40 as a new layer.
Move into position over the rectangle – see my tag for reference.
Selections/Invert
Tap the delete key.
Deselect.
Highlight Btm Rectangle layer.
Click anywhere outside of it with your Magic Wand.
Selections/Invert
New Raster layer.
Copy and paste Paper 12 Into Selection.
Deselect.
Delete the template layer.
Highlight Frame layer (choose the bottom one in your layers pallet).
Select All/Float/Defloat
New Raster layer.
Copy and paste Paper 14 Into Selection.
Adjust/Add Remove Noise/Add Noise:
Uniform and Monochrome checked
Noise: 55%
OK
Deselect.
Delete the template layer.
Repeat the above step with:
Remaining Frame layers
Circle 1 layer
Noise Circle
Highlight Gradient Circle layer.
Click anywhere outside of it with your Magic Wand.
Selections/Invert
New Raster layer.
Copy and paste Paper 4 Into Selection.
Copy and paste 88 as a new layer above the paper.
Resize 80%
Move into position – see my tag for reference.
Selections/Invert
Tap the delete key.
Copy and paste 73 as a new layer.
Resize 40%
Tap the delete key.
Deselect.
Add your elements. I used:
78: Resize 70%/Duplicate
87: Resize 70%/Duplicate/Erase
what you don’t want to overhang the rectangle
40
4: Resize 30%
4 again: Resize 25%
26: Resize 30%
61: Resize 35%
28: Resize 65%
35: Resize 12%
41: Resize 40%
31: Resize 30%
16: Resize 10%
66: Resize 30%
Highlight your white background.
New Raster layer.
Select All.
Copy and paste Paper 14 Into Selection.
Deselect.
Apply the mask.
Merge Group.
Add your credits.
Add your name.
Color Pallet:
Foreground: #28110b
Background: #fb8715
Stroke Width: .80
Type your name.
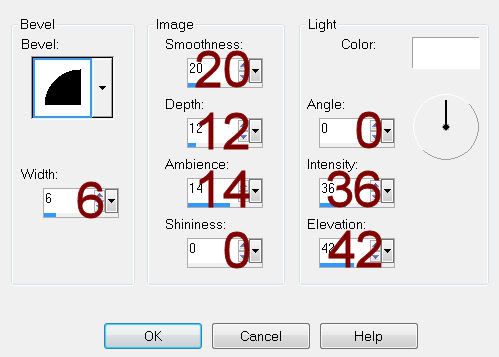
Give it a slight Inner Bevel:

Resize all layers 80%.


No comments:
Post a Comment