Supplies
1 tube of choice – I used the wonderful artwork of Ken Morton which can
be purchased from CDO. You must have a license to
use.
Font of choice - I used Dizzy Bitch here
Dee’s Sign Post “Tortue Template” here
It can be found under Monday September 3, 2012.
Weescotlass Mask 208 here
“Boo Hoo Too” is a tagger size scrap kit
created by Sue Ellen of Wicked Creationz Scraps and can be purchased from Lollipopsn Gumdrops. You can visit her blog here.
Thank you Sue Ellen for a really fun Halloween kit.
Thank you Sue Ellen for a really fun Halloween kit.
This tutorial was written assuming you have a working knowledge of PSP.
~♥~ Let’s get started ~♥~
Open up the template.
Shift + D.
Close out the original.
Delete the top 8 layers, Word Art Overlay, and Word Art Mask.
Highlight Orange Circle layer.
Click on it with your Magic Wand.
New Raster layer.
Copy and paste Paper 6 Into Selection.
Deselect.
Delete the template layer.
Highlight Purple Square layer.
Click on it with your Magic Wand.
New Raster layer.
Copy and paste Paper 10 Into Selection.
Deselect.
Delete the template layer.
Highlight Left Orange Circle layer.
Click on it with your Magic Wand.
New Raster layer.
Copy and paste Paper 13 Into Selection.
New Raster layer.
Copy and paste Element 15 Into Selection.
Change the Properties to Hard Light.
Deselect.
Delete the template layer.
Highlight Right Orange Circle layer.
Repeat the above step.
Highlight White Strip layer.
Click on it with your Magic Wand.
New Raster layer.
Copy and paste Paper 9 Into Selection.
Adjust/Add Remove Noise/Add Noise:
Uniform and Monochrome checked
Noise: 16%
OK
Deselect.
Delete the template layer.
Highlight White Rims layer.
Click on it with your Magic Wand.
New Raster layer.
Copy and paste Paper 8 Into Selection.
Give it the same Noise effect.
Deselect.
Delete the template layer.
Highlight Blue Strip layer.
Click on it with your Magic Wand.
New Raster layer.
Copy and paste Paper 8 Into Selection.
Deselect.
Delete the template layer.
Highlight Center Green Rectangle.
Click on it with your Magic Wand.
New Raster layer.
Copy and paste Paper 13 Into Selection.
Deselect.
Delete the template layer.
Repeat the above step with Left and Right Green Rectangle layers.
Copy and paste your tube as a new layer.
Move it into position over the Left Rectangle paper.
Change the Properties to Soft Light.
Duplicate/Mirror/should be position over the right Rectangle paper.
Highlight the Right Rectangle paper layer.
Click anywhere outside of it with your Magic Wand.
Highlight the tube above it.
Tap the delete key.
Deselect.
Repeat the above step with the tube that’s on the left side.
Copy and paste your tube as a new layer.
Position in front of the center Rectangle.
Color Pallet:
Foreground: #000000
Background: #447243
Highlight Dotted Frames layer.
Make your Color Replacer Tool active.
Zoom in and hover over one of the dots.
Double Right Click your mouse.
All the dots should now be a green color.
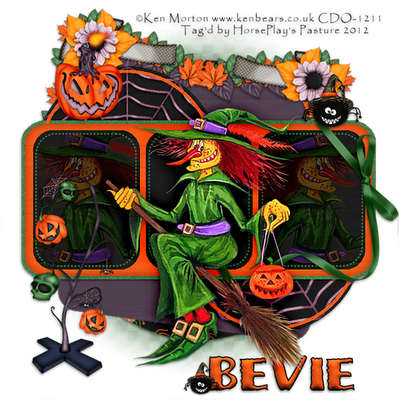
Add your elements. I used:
Element 3: Resize 50%
Element 4: Resize 40%
Element 21: Resize 30%
Element 10: Resize 90%/Free
rotate Right 10 degrees
Element 28: Mirror
Highlight your white background.
New Raster layer.
Select All.
Copy and paste Paper 9 Into Selection.
Deselect.
Apply the mask.
Merge Group.
Add your credits.
Add your name.
Color Pallet:
Foreground: #000000
Background: Pattern/Paper 8
Stroke: 2.0
Type your name.
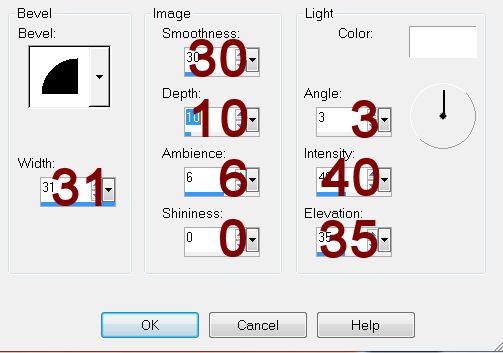
Give it a slight Inner Bevel:

Duplicate the little spider that’s wearing the hat.
Resize 60%
Position near your name.
Resize all layers 80%.


No comments:
Post a Comment