Supplies
1 tube of choice – I used the beautiful artwork of Anna Marine which
can be purchased from CDO. You must have a license to
use.
Font of choice - I used Bambino here
Weescotlass mask 236 here
Plug Ins used:
Xero - Porcelain
“Dark Side of the Moon” is a tagger size scrap kit created by Jessica
of Gothic Inspirations and can be purchased from her store, Gothic Inspirations. You can visit her blog here.
Thank you Jessica for a really beautiful kit.
This tutorial was written assuming you have a working knowledge of PSP.
~♥~ Let’s get started ~♥~
Open up a 700 x 700 blank canvas.
Flood fill white.
New Raster layer.
Make your Selection Tool active set on Ellipse – it’s alright if it’s
not centered on your canvas.
Make an Oval approximately 550 x 650 pixels.
Copy and paste Paper 1 Into Selection.
Deselect.
Center the oval on your canvas.
Adjust/Add Remove Noise/Add Noise:
Gaussian and Monochrome checked
Noise: 35%
OK
Click anywhere outside of the oval with your Magic Wand.
Selections/Invert
Selections/Modify/Contract by 7.
New Raster layer.
Copy and paste Paper 8 Into Selection.
Deselect.
Copy and paste Frame 5 as a new layer.
Resize 60%
Free rotate Left 5 degrees.
Move into position – see my tag for reference.
Click inside of it with your Magic Wand.
Selections/Modify/Expand by 4.
New Raster layer below the frame.
Copy and paste Paper 9 Into Selection.
Deselect for now.
Copy and paste your tube as a new layer.
Position in front of the frame.
Paste your tube again as a new layer below the frame.
Change the Properties to Soft Light and move into position.
Highlight the frame paper layer.
Click anywhere outside of it with your Magic Wand.
Highlight the tube just above the paper.
Tap the delete key.
Deselect.
Apply Xero – Porcelain:
Use Default Settings.
Copy and paste Frame 2 as a new layer.
Resize 70%
Free rotate Right 10 degrees.
Move into position – see my tag for reference.
Use your Magic Wand and click inside each film frame (that you can see)
Selections/Modify/Expand by 1.
New Raster layer below the frame.
Copy and paste 3 Into Selection.
Copy and paste your tube as a new layer below the frame.
Selections/Invert
Tap the delete key.
Deselect.
Change the Properties to Difference.
Lower the Opacity to about 47.
Apply Xero – Porcelain:
Use default settings
Add your elements. I used:
Parchment: Resize 50%
Pentagon: Resize 40%
Heart: Resize 50%
Frame 3: Resize 50%/Duplicate
Tag Back: Resize 60%
Bow 2: Resize 40%
Butterfly: Resize 20%/Free
rotate Right 25 degrees
Pin: Resize 40%
Twig: Resize 60%
Bling
Crop your canvas.
Highlight your white canvas.
New Raster layer.
Select All.
Copy and paste Paper 4 Into Selection.
Deselect.
Apply the mask.
Merge Group.
Add your credits.
Add your name.
Color Pallet:
Foreground: #000000
Background: #7b5c77
Stroke Width: 1
Type your name.
Convert to Raster layer.
Select All/Float/Defloat
Selections/Modify/Contract by 1
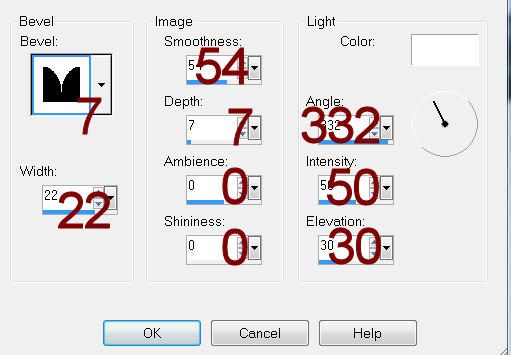
Give it a slight Inner Bevel:

Apply the same noise effect.
Deselect.
Resize all layers 80%


No comments:
Post a Comment