Supplies
1 tube of choice – I used the beautiful artwork of Carrie Hall which
can be purchased from Up Your Art. You must have
a license to use.
Font of choice - I used Stonehenge here
My mask 8 here
Plug Ins used:
Brush Strokes – Sprayed Strokes
“Erin’s Blessing” is a tagger size scrap kit created by Joy of Mystic
Creations and can be purchased from Exquisite Scraps. You can visit her blog here.
Thank you Joy for a really gorgeous St. Patty’s kit!
This tutorial was written assuming you have a working knowledge of PSP.
~♥~ Let’s get started ~♥~
Open up a 700 x 700 blank canvas.
Flood fill white.
Copy and paste Shamrock Frame as a new layer.
Resize 60%
Click inside of it with your Magic Wand.
Selections/Modify/Expand by 4.
New Raster layer below the frame.
Copy and paste Paper 5 Into Selection.
Deselect.
Duplicate the paper layer.
Effects/Texture Effects/Mosaic Antique:
Use Default settings.
OK
Close out your white canvas.
Merge Visible.
Reopen your white canvas.
Don’t worry about placement of the merged layer.
We’ll take care of that in a bit.
Copy and paste Ribbon Frame as a new layer.
Resize 50%
Click inside of it with your Magic Wand.
Selections/Modify/Expand by 4.
New Raster layer below the frame.
Copy and paste Paper 9 Into Selection.
Deselect.
Duplicate the paper layer.
Effects/Texture Effects/Mosaic Antique:
Use Default settings.
OK
Apply Brush Strokes – Sprayed Strokes:
Stroke Length: 12
Spray Radius: 21
Stroke Directions: Right
Diagonal
OK
Close out your white canvas and merged layer.
Merge Visible.
Reopen all layers.
Don’t worry about placement of anything yet.
Copy and paste Frame 1 as a new layer.
Resize 25%
Duplicate
Move all layers into position – see my tag for reference.
Merge Visible both little square frames once they’re in position.
Highlight and click inside of both little square frames.
Selections/Modify/Expand by 4.
New Raster layer below the frame.
Copy and paste Paper 10 Into Selection.
Deselect.
Copy and paste your tube as a new layer.
Position it to the left of the little square frames.
Duplicate/Mirror
In your layers pallet move the duplicated tube layer below the little
square frames.
Highlight and click on the duplicate tube layer and using the Right
arrow key on your key pad move the duplicated tube layer to the right until it’s
in a position you like below the frames.
Highlight and click on the paper layer below the duplicated tube layer.
Click anywhere outside of it with your Magic Wand.
Highlight the tube layer just above it.
Tap the delete key.
Deselect.
Change the Properties to Overlay.
Add your elements. I used:
Bow 2: Resize 35%
Horseshoe Trail: Resize 85%/Duplicate/Mirror
Shamrock Chain 1: Resize 70%
Cross: Resize 40%
Shamrock: Resize 20%
Anemone 2: Resize 50%
Anemone 1: Resize
50%/Duplicate/Mirror/Resize 70%
Four Leaf Clover 2: Resize 15%
Highlight your white canvas.
New Raster layer.
Select All.
Copy and paste Paper 12 Into Selection.
Deselect.
Apply the mask
Merge Group.
Add your name.
Color Pallet:
Foreground: Gradient/Metal Brass
Angle: 52
Repeats: 2
Invert checked
Background: #073c1c
Stroke Width: 1.0
Type your name.
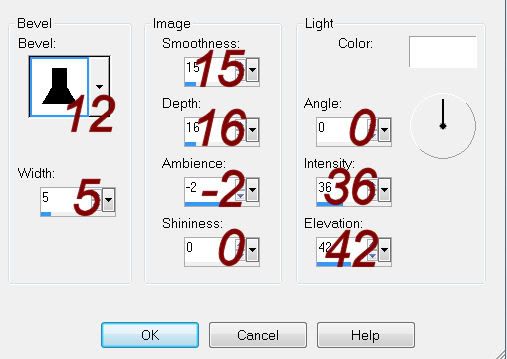
Give it a slight Inner Bevel:

Crop your image.
Resize all layers 80%.


No comments:
Post a Comment