Supplies
1 tube of choice – I used the amazing artwork of Zindy S.D. Nielsen which
can be purchased from her store here. You must have a license to
use.
Font of choice - I used Jellyka Delicious Cake here
Gem Mask 8 here
Freebie Friends and More - Tracey’s Autumn Template 7 here.
Scroll down, on the right side you’ll find it under Tracey’s Bulk
Templates – Autumn Templates 1 – 7.
“Grandma’s Treasures” is a tagger
size scrap kit, also available in full size creted by Kissed by and can be purchased from TKO Scraps. You can visit her here.
Thank you Cari for a really beautiful kit.
This tutorial was written assuming you have a working knowledge of PSP.
~♥~ Let’s get started ~♥~
Open up the template.
Shift + D.
Close out the original.
Image/Canvas Size:
700 x 600
New Raster layer.
Send to bottom.
Flood fill white.
Delete the top 2 layers.
Color Pallet:
Foreground: #000000
Background: #3b2538
Make your Color Replacer Tool active.
Highlight Dotted Circle layer (the layer just above your white canvas
in your layers pallet).
Zoom in.
Double click the right button on your mouse.
The dotted line should have turned to the purple color.
Highlight Circle layer.
Click on it with your Magic Wand.
New Raster layer.
Copy and paste Paper 13 Into Selection.
Copy and paste your tube as a new layer.
Selections/Invert
Tap the delete key.
Deselect.
Delete the template layer.
Change the Properties to Soft Light.
Highlight Dotted Circle layer – it’s actually the black frame to the
circle.
Click on it with your Magic Wand.
New Raster layer.
Copy and paste Paper 12 Into Selection.
Deselect.
Delete the template layer.
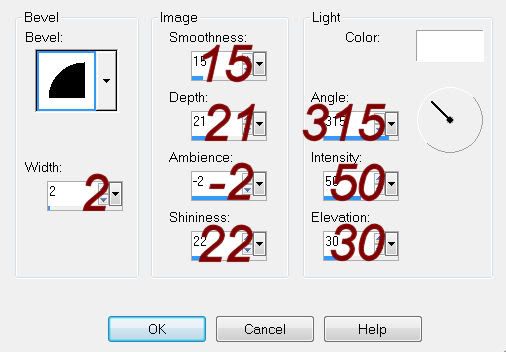
Give it a slight Inner Bevel:

Repeat the above step with Frame layer.
Highlight Rectangle layer.
Click on it with your Magic Wand.
New Raster layer.
Copy and paste Paper 14 Into Selection.
Copy and paste your tube as a new layer.
Selections/Invert
Tap the delete key.
Deselect.
Delete the template layer.
Change the Properties to Multiply.
Highlight Strip 1 layer.
Click on it with your Magic Wand.
New Raster layer.
Copy and paste Paper 15 Into Selection.
Deselect.
Delete the template layer.
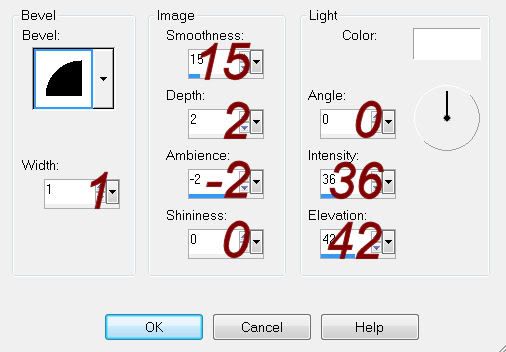
Give it a slight Inner Bevel:

Highlight Strip 2 layer.
Click on it with your Magic Wand.
New Raster layer.
Copy and paste Paper 3 Into Selection.
Deselect.
Delete the template layer.
Give it the same slight Inner Bevel.
Copy and paste Flowers 3 as a new layer.
Move into position – see my tag for reference.
It’s long enough to reach the bottom of the rectangle so duplicate the
flower layer.
Move it down so that the bottom of the stem is even with the rectangle.
Using your Eraser Tool and erase what you can see overlaps the other
flower layer.
Add your elements. I used:
Beads 2: Resize 92%
Pansies: Resize 40%/Free rotate
Left 35 degrees
Fern: Resize
70%/Duplicate/Mirror
Spilled Pearls: Resize
60%/Duplicate
Feather 2: Resize 60%
Highlight your white canvas.
New Raster layer.
Select All.
Copy and paste Paper 15 Into Selection.
Deselect.
Apply the mask.
Merge Group.
Add your credits.
Add your name.
Foreground: #000000
Background: #9d8851
Stroke Width: 1
Type your name.
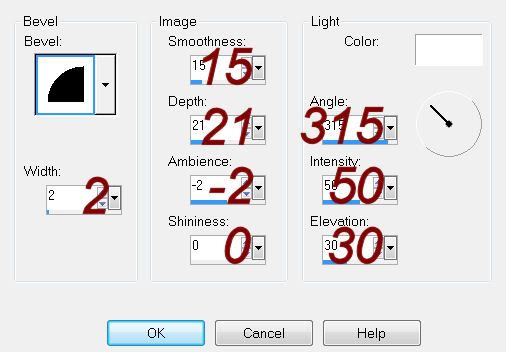
Give it a slight Inner Bevel:

Resize all layers 80%


No comments:
Post a Comment