

Supplies
1 tube of choice - I used the beautiful artwork of Alena Lazareva and can be purchased from Up Your Art. You must have a license to use.
Font of choice - I used Inspiration here
Weescotlass Mask 297 here
Toxic Desires Template 159 here
“Arsenic and Old Lace” is a tagger size scrap kit created by Dianna of Digit cats (& Dogs) and can be purchased from Inspirations of Scrap Friends. You can visit her blog here.
Thank you Dianna for a truly wicked kit!
This tutorial was written assuming you have a working knowledge of PSP.
~♥~ Let’s get started ~♥~
Open up the template.
Shift + D.
Close out the original.
Delete the top 7 layers.
Resize all layers 85%
Image/Canvas Size
700 x 550
OK
Highlight and open the Background layer.
Flood fill white.
Highlight Right Circle 1 layer.
Click on it with your Magic Wand.
New Raster layer.
Copy and paste Cog 02 Into Selection.
Deselect.
Delete the template layer.
Highlight Left Circle 1 layer.
Click on it with your Magic Wand.
New Raster layer.
Copy and paste Cog 03 Into Selection.
Deselect.
Delete the template layer.
Highlight Right Circle 2 layer.
Click on it with your Magic Wand.
New Raster layer.
Copy and paste Deco Into Selection.
Deselect.
Delete the template layer.
Highlight Left Circle 2 layer.
Click on it with your Magic Wand.
New Raster layer.
Copy and paste Cog 01 Into Selection.
Deselect.
Delete the template layer.
Highlight Large Circle 1 layer.
Click on it with your Magic Wand.
New Raster layer.
Copy and paste Paper 1 Into Selection.
Deselect.
Delete the template layer.
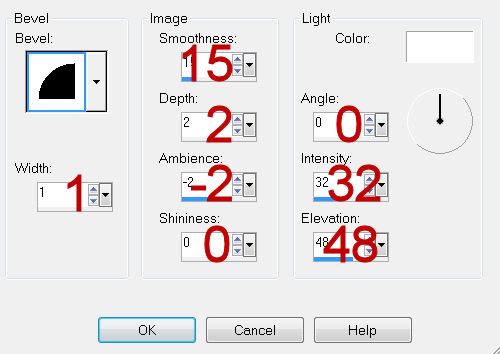
Give it a slight Inner Bevel:
Highlight Dotted Square 1 layer.
Select All/Float/Defloat
New Raster layer.
Copy and paste Paper 6 Into Selection.
Deselect.
Delete the template layer.
Repeat the above steps with Dotted Square 2, 3, and 4 layers.
Highlight the top layer in your layers pallet.
Paste Paper 4 as a new layer.
Resize 40%
Free rotate Right 55 degrees
Copy
Close the layer out.
Highlight Left Square 1 layer.
Click on it with your Magic Wand.
New Raster layer.
Paste Paper 4 Into Selection.
Deselect.
Delete the template layer.
Reopen Paper 4 layer at the top of your layers pallet.
Mirror/Flip/Copy
You can delete this layer because you no longer need it.
Highlight Right Square 1 layer.
Click on it with your Magic Wand.
New Raster layer.
Paste Paper 4 Into Selection.
Deselect.
Delete the template layer.
Give it the same slight Inner Bevel.
Highlight the top layer in your layers pallet again.
Paste Paper 11 as a new layer.
Resize 40%
Free rotate Right 35 degrees
Copy
Close the layer out.
Highlight Left Square 1 layer.
Click on it with your Magic Wand.
New Raster layer.
Paste Paper 11 Into Selection.
Copy and paste Arsenic as a new layer.
Resize 70%
Move into position over the paper - see my tag for reference.
Selection/Invert
Tap the delete key.
Deselect.
Delete the template layer.
Give the paper the same slight Inner Bevel.
Reopen Paper 11 layer as the top of your layer pallet again.
Mirror/Flip
Copy
Delete this layer because you won’t be using it again.
Highlight Right Square 2 layer.
Click on it with your Magic Wand.
New Raster layer.
Paste Paper 11 Into Selection.
Deselect.
Delete the template layer.
Give it the same slight Inner Bevel.
Highlight Glitter Circle 1 layer.
Click anywhere outside of it with your Magic Wand.
New Raster layer.
Copy and paste Paper 6 Into Selection.
Adjust/Add Remove Noise/Add Noise:
Gaussian and Monochrome checked
Noise: 40%
OK
Deselect.
Delete the template layer.
Highlight Large Circle 2 layer.
Click on it with your Magic Wand.
New Raster layer.
Open up Paper 16
Mirror/Copy
Highlight your working canvas.
Paste the paper Into Selection.
Copy and paste your tube as a new layer over the paper.
Selections/Invert
Use your Eraser Tool and erase the part of the tube you don’t want to stick outside of the circle.
Deselect.
Delete the template layer.
Add your embellishments. I used:
Leaves: Resize 70%
Flower 3: Resize 25% and 80%/Duplicate/Flip/Resize 70%
Hourglass
Hat: Resize 50%
Highlight your white canvas.
New Raster layer.
Select All.
Copy and paste Paper 7 Into Selection.
Deselect.
Apply the mask.
Merge Group.
Add your copyrights.
Add your name.
Color Pallet:
Foreground: Black
Background: Pattern/Paper 13
Stroke: .80
Type your name.
Give it a slight Inner Bevel:
Resize all layers 80%.
I hope you enjoyed this tutorial.
I’d love to see your results and show it off in my gallery.
Email me!
Hugs,
Bev
No comments:
Post a Comment