Supplies
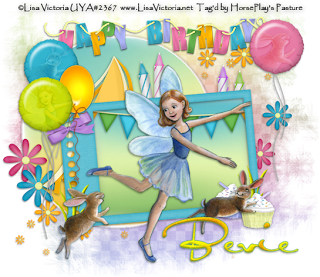
1 tube of choice - I used the adorable artwork of Lisa Victoria which can be purchased from Up Your Art. You must have a license to use.
Font of choice - I used Al Sandra here
Weescotlass mask 297 here
Eyecandy 3.1 - Glow
“That Special Day” is a tagger size scrap kit created by me, HorsePlay’s Pasture and can be purchased from my store at Lollipops n Gumdrops. You can visit my designing blog here.
This tutorial was written assuming you have a working knowledge of PSP.
~♥~ Let’s get started ~♥~
Open up a 700 x 700 blank canvas.
Flood fill white.
Copy and paste 38 as a new layer.
Resize 70%
Free rotate Left 15 degrees.
Click inside of it with your Magic Wand.
Selections/Modify/Expand by 4.
New Raster layer below the frame.
Copy and paste Paper 7 Into Selection.
Copy and paste 48 as a new layer below the frame.
Resize 80%
Move into position.
Selections/Invert
Tap the delete key.
Deselect.
Make your Selection Tool active set on Circle.
Make a circle approximately 400 pixels.
New Raster layer.
Copy and paste Paper 9 Into Selection.
Deselect.
Apply Eyecandy 3.1 - Glow:
Width: 3
Opacity: 100
Opacity Drop off: Fat
Color: White
OK
Move into position - see my tag for reference.
Copy and paste your tube as a new layer.
Copy and paste 3 as a new layer.
Copy and paste your tube over the balloon.
Resize as needed.
Highlight the balloon layer.
Use your Magic Wand and click anywhere outside of it.
Highlight the tube layer.
Tap the delete key.
Selections/Modify/Inside Outside Feather:
Both checked
Feather Amount: 43
OK
Tap the delete key until you have a nice feathered effect to the tube.
Deselect.
Change the Properties to Soft Light
Merge Down.
Resize 60%
Repeat the above step with balloons 1 and 2.
Add your embellishments. I used:
57: Resize 85%
46: Resize 50%
31: Resize 40% and 90%/Duplicate/Resize 70%
32: Resize 35%
21: Resize 40%/Free rotate Left 15 degrees
11: Resize 40%
10: Resize 40%/Mirror
5: Resize 60%
25, 26, 27: Resize 40%
24; Resize 40%/Free rotate Left 10 degrees
35: Resize 85%
Copy and paste 45 as a new layer.
Resize 70%
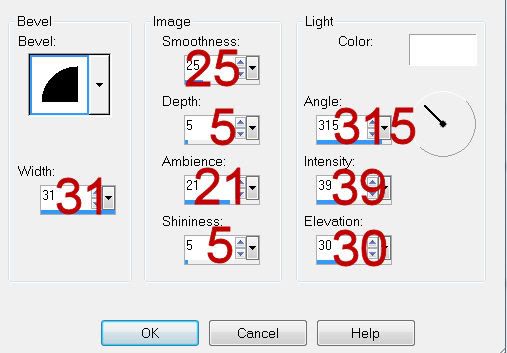
Give it a slight Inner Bevel:

Highlight your white canvas.
New Raster layer.
Select All.
Copy and paste Paper 3 Into Selection.
Deselect.
Apply the mask.
Merge Group.
Duplicate/Flip
Use your Selection Tool set on Rectangle and section off the bottom half of the mask.
Tap the delete key.
Deselect.
Look closely at the sides of the mask and you’ll see a sharp cutoff to the mask where it was sectioned off. Make your Eraser Tool active and click your mouse over the blunt edge to make the layers blend.
Add your copyrights.
Add your name.
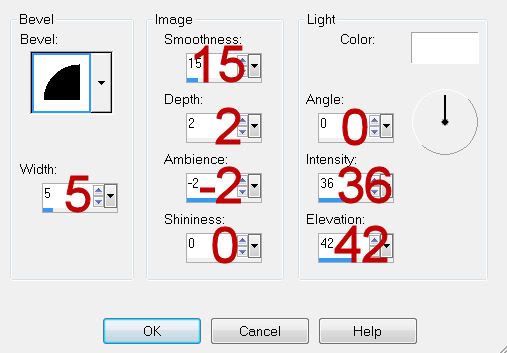
Give it a slight Inner Bevel:

Resize all layers 80%.
I hope you enjoyed this tutorial.
I’d love to see your results and show it off in my gallery.
Email me!
Hugs,
Bev

No comments:
Post a Comment