

Supplies
1 tube of choice - I used the artwork of Elias Chatzoudis which can be purchased from PSP Tubes Emporium. You must have a license to use.
Font of choice - I used Snow Blue which is a pay font. Papyrus font which comes with the PSP program will work just as nice.
Weescotlass Mask 208 here
Blissfully Beth’s template 188 here
Plug Ins:
Eyecandy 3.1 - Glow
“Christmas Gems” is a tagger size scrap kit created by Cindy of Scrappin with Lil Ole Me and can be purchased from Aussie Scrap Designs. You can visit her blog here.
Thank you Cindy for such a terrific kit!
This tutorial was written assuming you have a working knowledge of PSP.
~♥~ Let’s get started ~♥~
Open up the template.
Shift + D.
Close out the original.
Resize all layers 85%
Image/Canvas Size
700 x 600
OK
Highlight Raster 1 layer.
Flood fill white.
Delete the following layers:
Raster 2, Word Art, and Stars layers
Highlight Black Oval 2 layer.
Click on it with your Magic Wand.
New Raster layer.
Copy and paste Paper 5 Into Selection.
Deselect.
Delete the template layer.
Apply Eyecandy 3.1 - Glow:
Width: 3
Opacity: 100
Opacity Drop Off: Fat
Color: white
Highlight Blue Oval layer.
Click on it with our Magic Wand.
New Raster layer.
Copy and paste Paper 30 Into Selection.
Deselect.
Delete the template layer.
Apply the same Glow effect.
Highlight Blue Rect 2 layer.
Click on it with your Magic Wand.
New Raster layer.
Copy and paste Paper 26 Into Selection.
Deselect.
Delete the template layer.
Highlight Blue Rect 1 layer.
Repeat the above step.
Highlight Pink Frame 2 layer.
Select All/Float/Defloat
New Raster layer.
Copy and paste 24 Into Selection.
Adjust/Add Remove Noise/Add Noise;
Monochrome and Gaussian checked
Noise: 43%
OK
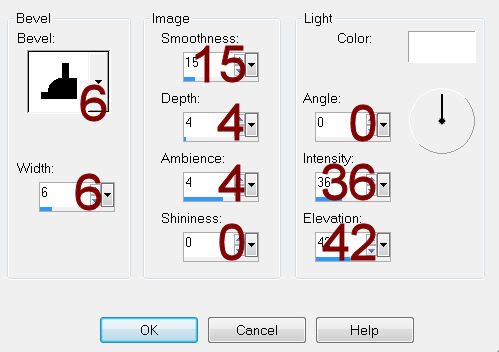
Give it a slight Inner Bevel:
Deselect.
Delete the template layer.
Highlight Pink Frame 1 layer.
Repeat the above step.
Highlight Black Oval 1 layer.
Click anywhere outside of it with your Magic Wand.
Copy and paste Paper 13 as a new layer.
Position it so that the top left area of the paper covers the oval.
Tap the delete key.
Deselect.
Delete the template layer.
We’re going to add the elements that go below the frame of the top rectangle. Don’t worry about what overhangs the frame. We’ll clean that up in a bit. I used:
Trees 4: Resize 25%
Santa Sleigh: Resize 25%/Mirror
Reindeer: Resize 25% and 50%/Duplicate/Mirror
Highlight the paper that’s below the elements.
Click anywhere outside of it with your Magic Wand.
Highlight each element that overhangs the frame and tap the delete key.
Deselect.
Merge Visible only the elements that are below the frame.
Duplicate
Mirror
Position this duplicated merged layer over the paper of the rectangle that’s behind the large Oval.
Copy and paste Ornament 3 as a new layer.
Resize 25% and 60%
Copy and paste Ornament 2 as a new layer.
Resize 25% and 50%
In your color pallet change set the foreground to Gradient and choose Metal Brass.
Angle and Repeat set at 0.
Linear style.
Make your Pen Tool active.
Mode: Draw Lines and Pollylines
Line Style: Solid
Width: 2
Anti Alias checked
Move the ornaments into their positions - see my tag for reference.
Draw a line down to the ornament to make a hanging line.
Convert to Raster layer.
Give it an inner bevel - same settings
Duplicate
Position over the other ornament.
Copy and paste your tube as a new layer.
Copy and paste Pine bough as a new layer.
Resize 30%
Free rotate Right 5 degrees
Position it at the bottom of the rectangle frame.
Use your Freehand Selection Tool and section off the right side:
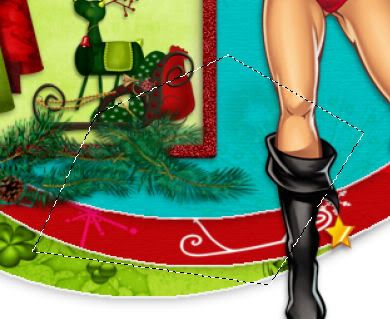
Tap the delete key.
Deselect.
Duplicate/Mirror
Piece together both pine bough layers to create one pine bough.
Merge Visible both pine boughs.
Add your elements. I used:
Christmas Cookies: Resize 25%
Bow 5: Resize 25%
Candy Cane: Resize 25% and 70%/Duplicate/Mirror
Crop your image - I just took a little off the top.
Highlight your white canvas.
New Raster layer.
Select All.
Copy and paste Paper 11 Into Selection.
Deselect.
Adjust/Blue/Gaussian Blur:
Radius: 8
OK
Apply the mask.
Use your Pick tool and pull all sides out slightly.
Merge Group.
Add your copyrights.
Add your name.
Foreground: #000000
Background: #9a0000
Set the stroke to 1.0
Type your name - If you're using Papyrus font then type each letter on its own layer and turn them this way and that and then Merge Visible all the letters.
Give it the same Inner Bevel.
Resize all layers 80%.
I hope you enjoyed this tutorial.
I’d love to see your results.
Email me!
Hugs,
Bev
No comments:
Post a Comment