

Clicking on the image will allow you to enlarge.
Supplies
1 tube of your choice - I used the artwork of Michael Calandra at MPT
Font of Choice - I used Burton’s Nightmare here
Gem’s Mask 161 here
“Misty Night” is a PTU scrap kit created by Conchi of Disenando Scraps and can be purchased from Butterfly Blush Designs. You can visit her blog here.
Thank you Conchi for a really wicked kit!
~♥~ Let’s get started ~♥~
Open up a 700 X 700 blank canvas.
Flood fill white.
Copy and paste Frame 7 as a new layer.
Resize 80%.
Move it to the left side of your canvas - see my tag for reference.
Use your Freehand Selection Tool and outline the frame.
New Raster layer below the frame.
Copy and paste Paper 11 Into Selection.
Deselect for now.
Copy and paste your tube as a new layer.
Move it into position on the right side of the frame.
Duplicate/Mirror
Change the Properties to Difference
Lower the Opacity to about 65 or so.
I realize the tube is overhanging the side of the frame. It’s ok. We’ll take care of that in a bit.
Copy and paste Moon as a new layer.
Resize 30%
Move into position below the frame.
Highlight the paper layer.
Click anywhere outside of the paper.
Highlight the moon layer - tap the delete key.
Highlight the tube layer that’s just below the frame - tap the delete key.
DO NOT DESELECT.
New Raster layer just below the frame layer.
Effects/3D Effects/Cutout
Vertical: -10
Horizontal: -10
Opacity: 15
Blur: 35
Color: #ffffff
Repeat the above step accept change the Vertical and Horizontal numbers to 10.
Deselect.
I’ll tell you how to get the tube reflection in the ball in just a bit.
Add your embellishments. I used:
Support: Resize 70%
Book 3: Resize 40%
Light 3: Resize 30%
Owl 4: Resize 40%
Black Rose: Resize 60%
Ball: Resize 50%
Tree: Duplicate/Mirror
Duplicate your tube.
Mirror
Move it over the ball in your layers pallet.
Change the Properties to Soft Light
Highlight the ball layer.
Use your Freehand Selection Tool and outline the globe part only.
Selections/Invert
Highlight the tube layer.
Tap the delete key.
Deselect.
Highlight your white background.
Select All
New Raster layer.
Copy and paste a paper of choice Into Selection.
Deselect.
Apply the mask.
Merge Group.
Add your credits.
Add your name.
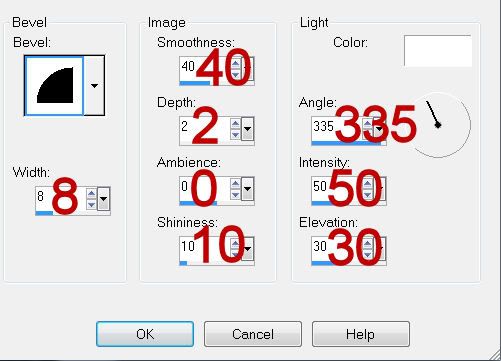
Give it a slight inner bevel:
Add a touch of Noise.
Resize all layers 80%.
I hope you enjoyed this tutorial.
I’d love to see your results and show it off in my gallery.
Email me!
Hugs,
Bev
Supplies
1 tube of your choice - I used the artwork of Michael Calandra at MPT
Font of Choice - I used Burton’s Nightmare here
Gem’s Mask 161 here
“Misty Night” is a PTU scrap kit created by Conchi of Disenando Scraps and can be purchased from Butterfly Blush Designs. You can visit her blog here.
Thank you Conchi for a really wicked kit!
~♥~ Let’s get started ~♥~
Open up a 700 X 700 blank canvas.
Flood fill white.
Copy and paste Frame 7 as a new layer.
Resize 80%.
Move it to the left side of your canvas - see my tag for reference.
Use your Freehand Selection Tool and outline the frame.
New Raster layer below the frame.
Copy and paste Paper 11 Into Selection.
Deselect for now.
Copy and paste your tube as a new layer.
Move it into position on the right side of the frame.
Duplicate/Mirror
Change the Properties to Difference
Lower the Opacity to about 65 or so.
I realize the tube is overhanging the side of the frame. It’s ok. We’ll take care of that in a bit.
Copy and paste Moon as a new layer.
Resize 30%
Move into position below the frame.
Highlight the paper layer.
Click anywhere outside of the paper.
Highlight the moon layer - tap the delete key.
Highlight the tube layer that’s just below the frame - tap the delete key.
DO NOT DESELECT.
New Raster layer just below the frame layer.
Effects/3D Effects/Cutout
Vertical: -10
Horizontal: -10
Opacity: 15
Blur: 35
Color: #ffffff
Repeat the above step accept change the Vertical and Horizontal numbers to 10.
Deselect.
I’ll tell you how to get the tube reflection in the ball in just a bit.
Add your embellishments. I used:
Support: Resize 70%
Book 3: Resize 40%
Light 3: Resize 30%
Owl 4: Resize 40%
Black Rose: Resize 60%
Ball: Resize 50%
Tree: Duplicate/Mirror
Duplicate your tube.
Mirror
Move it over the ball in your layers pallet.
Change the Properties to Soft Light
Highlight the ball layer.
Use your Freehand Selection Tool and outline the globe part only.
Selections/Invert
Highlight the tube layer.
Tap the delete key.
Deselect.
Highlight your white background.
Select All
New Raster layer.
Copy and paste a paper of choice Into Selection.
Deselect.
Apply the mask.
Merge Group.
Add your credits.
Add your name.
Give it a slight inner bevel:
Add a touch of Noise.
Resize all layers 80%.
I hope you enjoyed this tutorial.
I’d love to see your results and show it off in my gallery.
Email me!
Hugs,
Bev
No comments:
Post a Comment