Supplies
1 tube of choice - I’m using the artwork of Gennadiy Koufay which you can purchase here
Font of Choice - I’m using AdriaDB here
Weescotlass Mask 84 here
Divine Intentionz Template 18 here
“Glamour Dust” is a PTU tagger size scrap kit created by Terry of Treasures by Terry. It can be purchased at Butterfly Blush Designs here. You can visit Terry’s blog here.
Thank you Terry for another stunningly beautiful kit!!
This tutorial was written assuming you have a working knowledge of PSP.
~♥~ Let’s get started ~♥~
Open up the template.
Shift + D.
Close out the original.
Delete the Missy layer.
Highlight the background layer.
Image/Canvas Size
700 X 700
Flood Fill white.
Highlight the Circle Layer.
Select All/Float/Defloat
New Raster Layer.
Copy and paste Into Selection Ball 1 of the element.
Deselect.
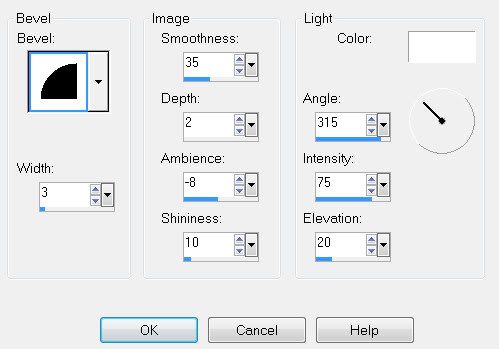
Give it a slight inner bevel:

Delete the template layer.
Highlight the Large Rectangle layer.
Select All/Float/Defloat
Copy and paste a paper of choice as a new layer.
Select/Invert
Tap the delete key.
Deselect.
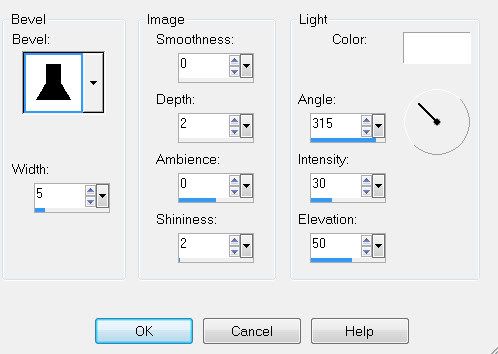
Give it a slight inner bevel:

Delete the template layer.
Highlight the Scalloped Edge Circle.
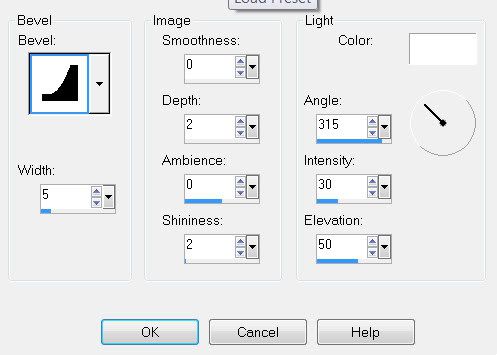
Repeat the above step accept give it this inner bevel:

Delete the template layer.
Highlight the Small Rectangle layer.
Select All/Float/Defloat
Copy and paste a paper of choice as a new layer.
Selections/Invert
Hit the delete key.
Deselect.
Give it the same inner bevel as the Large Rectangle layer.
Delete the template layer.
Select All/Float/Defloat
Selections/Modify/Contract by 3
New Raster Layer.
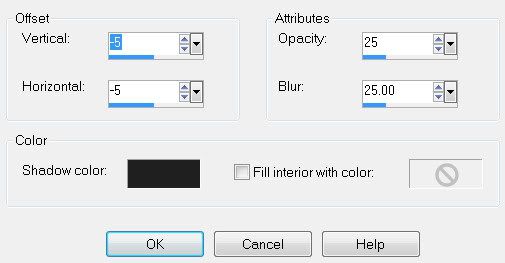
Effect/3DEffects/Cutout

Repeat the above step accept change the horizontal and vertical numbers to -5.
DO NOT DESELECT.
Copy and paste your tube as a new layer below the cutout layers.
Resize larger.
I resized mine 175%.
Selections/Invert
Tap the delete key.
Deselect.
Change Properties to “Lighten”.
Copy and paste Frame 6 as a new layer.
Resize 95%
Place it behind the scalloped circle.
Duplicate.
Free rotate right 45 degrees.
Add your embellishments. I used:
Heart 9: Resize 40%
Heart 1: Resize 50%
Bow 10: Resize 50% Free rotate Left 25 degrees
Blow 9: Resize 40% Free rotate Left 25 degrees
Butterfly 3: Resize 30%
Swirl 2: Resize 75%
Copy and paste your tube as a new layer.
Highlight your white canvas.
New Raster Layer.
Select All.
Copy and paste a paper of choice Into Selection.
Deselect.
Apply the Mask.
Merge Group.
Add your copyrights.
Add your name.
Crop your image.
Resize all layers 85%.
I hope you enjoyed this tutorial.
I’d love to see your results and show it off in my Show Arena.
Email me!
Hugs,
Bev


No comments:
Post a Comment