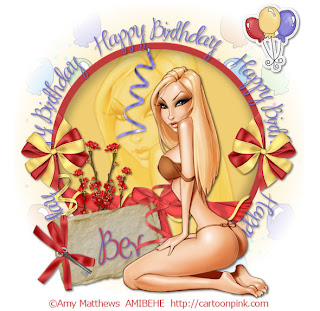
Clicking on the image will enlarge to full view.
Supplies
1 tube of choice - I’m using the artwork of Amy Matthews which you can purchase here
Font of Choice - Ma Sexy here
20-20 Mask here
“Happy Birthday” is a tagger size scrap kit created by Julie of Bits and Bobs and can be purchased here. You can visit her blog here.
Thank you Julie for such a fabulous kit that screams party!!
This tutorial was written assuming you have working knowledge of PSP.
~♥~ Let’s get started ~♥~
Open up a 700 X 700 blank canvas.
Flood fill white.
Close off your foreground pallet.
Change your background pallet color to #cb4141.
Using your Ellipse tool make a circle in the center of your canvas - approximately 500 X 500.
Objects/Align/Center of Canvas
Give it a slight inner bevel:
Bevel: 2
Width: 1
Smoothness: 15
Depth: 2
Ambience: -2
Shininess: 0
Color: white
Angel: 0
Intensity: 36
Elevation: 42
OK
DO NOT DESELECT YET
Selections/Modify/Contract by 15
New Raster Layer
Flood fill with #f0ce73
DO NOT DESELECT YET.
Copy and paste your tube as a new layer.
Resize to make it larger. I had to resize mine 200%/
Selections/Invert
Hit the delete key.
Change the Properties to Soft Light.
DO NOT DESELECT YET.
New Raster Layer.
Selections/Invert
Effects/3D Effects/Cutout
Vertical & Horizontal: 10
Opacity & Blur: 25.00
Shadow color: black
OK
Repeat the entire step above accept no need to invert again.
NOW you can deselect.
Now we’re going to write Happy Birthday all the way around the circle.
Choose black for your foreground color in your color pallet. Stroke Width set at 2. Close out the background.
Using your Ellipse Tool, make a circle bigger than the circle on your canvas.
Don’t worry if it’s much too big…you can always resize and make it smallerJ
Objects/Align/Center in Canvas.
Close out your foreground. Open up your background and change to color #766fcf. Set your font to one of your liking.
Click on your text tool and move your cursor over the top part of the circle you just drew. When you see a Rocking A, click the mouse. A text box will appear.
Type Happy Birthday.
Highlight it, copy.
Ctl +V as many times as it takes until you see the words written all the way around the circle.
In your layers pallet, click on the + sign next to Happy Birthday.
Click on the eye on the New Ellipse layer.
Right click on the Vector Layer.
Convert to Raster layer.
Add your embellishments. I used:
(the amount that I resized these embellishments were according to the size of the circle I made. Adjust your accordingly)
Ribbon Bow 3: Resize 48%
Bow 1: Resize
Bow 3: Resize 50%
Journal 3: Resize 60%
Cherry Blossom 1: Resize 40%
Ribbons 4, 5 & 6: Resize 60% and smaller
Sticker 1: Resize 40%. Free rotate left 10 degrees
Highlight your white canvas.
Select All
Copy and paste a paper of choice Into Selection.
Deselect.
Apply the mask.
Merge Group.
I then resized my mask by 90%.
If you’re going to do this, again, resize accordingly.
Add your copyrights.
Add your name.
Resize all layers 85%.
I hope you enjoyed this tutorial.
I’d love to see your results.
Email me!
Hugs,
Bev

No comments:
Post a Comment