Supplies Needed
1 tube of choice – I
used the wonderful artwork of Mitzi Suto-Wiuff which can be purchased from PSPTube Stop. You must have a license to use.
This template
shows on her blog as Template 28, but when downloaded
It will show up in a folder that says Template 107
and the template is named the same as well.
“Pastel” is a FTU tagger size scrap kit
created by Digi Mania Scraps and can be downloaded from her blog here. Please leave a thank you after
downloading. Kind, appreciative words go
a long way.
This tutorial was
written assuming you have working knowledge of PSP.
~♥~ Let’s get started ~♥~
Open up the template.
Shift + D.
Close out the original.
Delete the credit layer and Autumn
layer.
Color Pallet:
Foreground: #000000
Background: #737738
Highlight Dots layer.
Make your Color Replacer Tool active
and double click on the dots on your working canvas.
The dots should have changed to a
green shade.
Copy and paste Brad 3 as a new
layer.
Resize 10%
Duplicate 8 times for a total of 9
and place a brad over every third dot – see my tag for reference.
Highlight Gray Rect layer.
Click on it with your Magic Wand.
New Raster layer.
Copy and paste Paper 5 Into
Selection.
Deselect.
Delete the template layer.
Highlight Blk Circle layer.
Repeat the above step.
Highlight Sml Rect layer.
Click on it with your Magic Wand.
New Raster layer.
Copy and paste Paper 10 Into
Selection.
Copy and paste Flower Ribbon 2 as a
new layer.
Center it at the bottom of the paper
– see my tag for reference.
Selections/Invert
Use your Eraser Tool and erase what
overhangs on the left and right edges.
Deselect.
DO NOT DELETE the template layer.
Highlight Small Circle layer.
Click on it with your Magic Wand.
New Raster layer.
Copy and paste Paper 10 Into
Selection.
Copy and paste your tube as a new
layer. If you’re using the same tube as
I did, Resize 65%.
Selections/Invert
Use your Eraser Tool and erase the area
of the tube you don’t want to stick outside of the circle.
Deselect.
Delete the template layer.
Copy and paste Ribbon Heart 1 as a
new layer.
Resize 65%
Move into position over your tube at
the bottom of the circle – see my tag for reference.
Give the ribbon a drop shadow.
Highlight Blk Circle template layer.
Click anywhere outside of it with
your Magic Wand.
Highlight the Ribbon Heart layer.
Tap the delete key.
Deselect.
Make your Lighten/Darken Brush
active. Choose the Default brush.
Move the brush over each edge of the
ribbon to darken it just a tad – see my tag as reference.
Add your elements. I used:
Bow Diamond 4
Bead 1: Duplicate/Mirror/Flip
Flower 2: Resize 50%
Flower 4: Resize 40%/Duplicate/Mirror
Butterfly 2: Resize 50%/Free rotate Right 25 degrees
Butterfly 5: Resize 25%/Free rotate Left 25 degrees
Highlight your white background.
New Raster layer.
Select All.
Copy and paste Paper 1 Into
Selection.
Deselect.
Adjust/Blur/Gaussian Blur:
Radius: 5
OK
Apply the mask.
Use your Pick Tool to pull the sides
out a little.
Merge Group.
Add your copyrights.
Add your name.
Color Pallet:
Foreground: #000000
Background: #737738
Stroke: 1.0
Type your name.
Slant your name slightly.
Convert to Raster layer.
Tip:
If you slant your name BEFORE converting it to a Raster layer it will
stay clear and not blur.
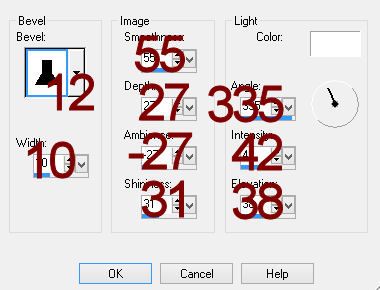
Give it a slight Inner Bevel:

Resize all layers 85%.
I’d love to see your results.
Hugs,
Bev