

Supplies
1 tube of choice – I used the wonderful artwork of J.W. Baker which can
be purchased from My Tubed Arthttp://www.mytubedart.com/. You must generate
a license to use.
“Sweet Beverly” is a tagger size scrap kit created by Jessica of Gothic
Inspirations and can be purchased from her store Gothic Inspirations. You can visit her blog here.
Thank you Jess for such a beautiful kit. You have touched the corners of my heart, my
friend♥
~♥~ Let’s get started ~♥~
Open up the template.
Shift + D.
Close out the original.
New Raster layer.
Send to bottom.
Image/Canvas Size:
700 x 600
OK
Flood fill white.
Delete the top 2 layers, Stars, Strip 2, and Strip 1 layers.
Highlight Circle 1 layer.
Click anywhere outside of it with your Magic Wand.
Selections/Invert
New Raster layer.
Copy and paste Paper 2 Into Selection.
Deselect.
DO NOT delete the template layer.
Highlight Oval Layer.
Click anywhere outside of it with your Magic Wand.
Selections/Invert
New Raster layer.
Copy and paste Paper 3 Into Selection.
Deselect.
Delete the template layer.
Highlight Circle 2 Layer.
Click anywhere outside of it with your Magic Wand.
Selections/Invert
New Raster layer.
Copy and paste Paper 6 Into Selection.
Deselect for now.
Copy and paste the following elements over the paper layer – see my tag
for placement. Don’t worry about what
overhangs the paper. We’ll clean that up
in a bit.
Bud Tree: Resize 50%
Fence: Resize 50%
Flowers: Resize 30%
Grass: Duplicate/Move one grass
layer behind the fence
Highlight Circle 2 template layer.
Click anywhere outside of it with your Magic Wand.
Selections/Invert
Highlight each element layer and tap the delete key.
Deselect.
Delete Circle 2 template layer.
Highlight Square layer.
Click anywhere outside of it with your Magic Wand.
Selections/Invert
New Raster layer.
Copy and paste Paper 6 Into Selection.
Copy and paste Mesh as a new layer.
Resize 80%
Move into position – see my tag for reference.
Selections/Invert
Tap the delete key.
Copy and paste Tree as a new layer.
Move into position – see my tag for reference.
Tap the delete key.
Deselect.
Delete the template layer.
Copy and paste your tube as a new layer.
Move it into a position that you like.
Highlight Circle 1 template layer.
Click anywhere outside of it with your Magic Wand.
Highlight your tube layer.
Use your Eraser Tool and erase the part of the tube you don’t want to
overhang the circle layer.
Add your elements. I used:
Lantern: Resize 55%/Mirror
Daisies: Resize 70%/Duplicate
Leaves 1: Resize 60% - position
at the bottom of the circle
Leaves 1 again: Resize 50%/Flip
Leaves 1 again: Resize 80%/Free
rotate Right 80 degrees – position behind the circle – see my tag for
reference. Erase what you don’t want.
Duplicate/Mirror/Flip
Bow 1: Resize 40%/Mirror
Bling: Resize 70%/Erase what you
don’t want
Highlight your white canvas.
New Raster layer.
Select All.
Copy and paste Paper 1 Into Selection.
Deselect.
Apply the mask.
Merge Group.
Add your credits.
Add your name.
Foreground: #728aaf
Background: #181a1a
Stroke: 0.8
Type your name.
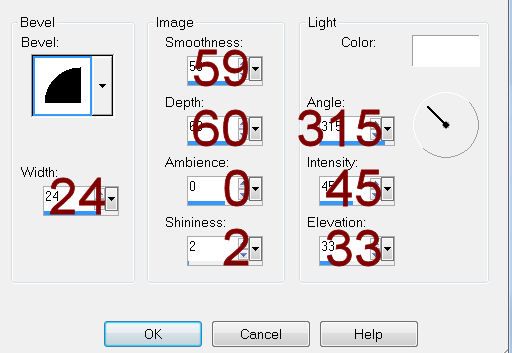
Give it a slight Inner Bevel:
Resize all layers 80%.

