Saturday, October 2, 2010

Cemetery Nights


Supplies

1 tube of your choice and 1 close up - I used the artwork of Michael Calandra at MPT
Font of Choice - I used Black Adder II here
Monti Circular Mask here
Greg’s Factory Output Vol. II - Pool Shadow
“Cemetery Nights” is a PTU tagger size scrap kit created by Jessica of Gothic Inspirations and can be purchased from her store Gothic Inspirations. You can visit her blog here.
Thank you Jessica for another wicked kit!

This tutorial was written assuming you have a working knowledge of PSP.

~♥~ Let’s get started ~♥~

Open up a blank 700 x 700 canvas.
Flood fill white.

Copy and paste Frame 2 as a new layer.
Resize 50%
Free rotate left 90 degrees - Rename Frame 1
Duplicate/Free rotate right 15 degrees - Rename Frame 2
Move them into position - see my tag for reference.

Highlight Frame 1.
Click inside with your Magic Wand.
Selections/Modify/Expand by 4.
New Raster layer below the frame.
Copy and Paper 9 Into Selection.
Copy and paste your tube as a new layer.
Selections/Invert
Tap the delete key.
Deselect for now.

Highlight Frame 2.
Click inside with your Magic Wand.
Selections/Modify/Expand by 4.
New Raster layer.
Make Paper 9 active
Flip
Make your working canvas active.
Paste Into Selection.
Copy and paste your close up image as a new layer.
Move into position.
Selections/Invert
Tap the delete key.
Deselect.
Change the Properties to Lighten.
Duplicate/Change the Properties to Multiply.

Add your embellishments. I used:
Grass: Resize 60%/Duplicate and position behind the frame
Candles: Position behind the frame/Erase the part of the base that shows
Bush: Resize 70%/Duplicate/Mirror
Charm: Resize 60%
Spider: Resize 30%
Bat 1: Resize 40%/Duplicate/Resize 80%
Crow 1: Resize 50%/Mirror

Highlight your white background.
Select All.
Copy and paste Paper 2 Into Selection.
Deselect.
Copy and paste Fence as a new layer.
Resize 80%/Duplicate/Mirror
Merge Down - both fence layers should be on one layer.
Merge Down.
Merged Fence layer and the paper should now be on one layer.
Apply the mask.
Merge Group.

Copy and paste Witch as a new layer just above the paper - see my tag for reference…if you look at my tag closely you’ll see a faint image of this element (behind the frames)
Apply the mask to this element layer.
Merge Group.
Lower the Opacity to about 28 or so.

Add your credits.

Add your name.
Choose your foreground and background colors. I used:
Foreground: Pattern/Paper 2
Background: Pattern/Paper 9
Stroke: 2
Type out your name.
Convert to Raster layer.
Selections/Modify/Contract by 2
Apply Greg’s Factory Output Vol. II - Pool Shadow
Default Settings.
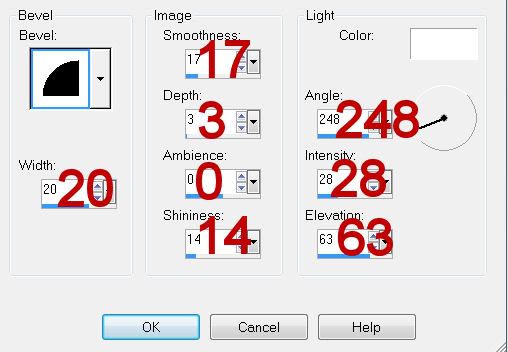
Give it an inner bevel:


Deselect.

Resize all layers 80%.

I hope you enjoyed this tutorial.
I’d love to see your results and show it off in my gallery.
Email me!
Hugs,
Bev

Shorter Days, Longer Nights


Supplies

1 tube of your choice - I used the artwork of Keith Garvey which can be purchased at MPT
Font of Choice - I used Just Act Casual here
Toxic Desirez Template 133 here
Creative Desires Mask 31 here- if you know who the author of this mask is please email me….thanks!
Xerox - Porcelain
“The Days Grow Short” is a FTU tagger size scrap kit created by Artmama Made and can be found on her blog here.
Please leave a thank you when downloading as it’s a small gesture for hard work given freely.

This tutorial was written assuming you have a working knowledge of PSP.

~♥~ Let’s get started ~♥~

Open up the template.
Shift + D.
Close out the original.
Image/Canvas Size
700 X 650
Highlight Raster 7 layer.
Flood fill white.
Delete the top 6 layers and Pixel Words layer.

Highlight Glittered Square layer.
Use your Magic Wand and click on it.
Copy and paste Paper 4 Into Selection.
Deselect.
Delete the template layer.
Adjust/Add Remove Nosie/Add Nosie:
Gaussian and Monochrom checked
Noise: 33%
OK

Highlight Black Circle layer.
Repeat the above step.

Highlight Frames layer.
Click on it with your Magic Wand.
New Raster layer.
Copy and paste the same paper (4) Into Selection.
Deselect.
Delete the template layer.
Give it a slight inner bevel:


Add Noise effect.

Highlight Pink Circle layer.
Click on it with your Magic Wand.
New Raster layer.
Copy and paste Paper 1 Into Selection.
Deselect.
Delete the template layer.

Highlight Frames Back layer.
Click on it with your Magic Wand.
New Raster layer.
Copy and paste Paper 6 Into Selection.
Deselect.
Copy and paste your tube as a new layer.
Move into position under either side of the frame.
Duplicate/Mirror
Copy and paste Embellie 17 as a new layer - position in the center frame.
Highlight the template layer.
Click anywhere outside of the template.
Highlight each of the tube layers and embellie layer and tap the delete key.
Deselect.
Delete the template layer.
To each tube layer apply Xero -Porcelain:
Default Settings accept move the Blue Channel all the way to 0.

Highlight Rectangle layer.
Click on it with your Magic Wand.
New Raster layer.
Copy and paste Paper 7 Into Selection.
Deselect.
Delete the template layer.

Highlight Square layer.
Click on it with your Magic Wand.
New Raster layer.
Copy and paste Paper 9 as a new layer.
Tap the delete key.
Deselect.
Delete the template layer.

Highlight Dotted Rectangles layer.
Select All/Float/Defloat
New Raster layer.
Copy and paste Paper 4 Into Selection.
Deselect.
Delete the template layer.

Copy and paste Embellie 2 s a new layer.
Resize 50%
Duplicate/Mirror
Move them both together so that it makes the length of the thin rectangle.
Use your Eraser Tool and erase the overlap.
Merge down.

Copy and paste your tube as a new layer.

Add your embellishments. I used:
Embellie 3: Resize 50%
Embellie 15: Resize 50%
Embellie 21: Resize 60%/Duplciate/Mirror
Embellie 13: Resize 40%

Highlight your white background.
Select All.
Copy and paste Paper 2 Into Selection.
Deselect.
Apply the mask.
Merge Group.

Add your credits.

Add your name.

Resize all layers 80%.

I hope you enjoyed this tutorial.
I’d love to see your results and show it off in my gallery.
Email me!
Hugs,
Bev