Supplies
1 tube of choice - I used the fabulous artwork of Cris de Lara at My PSP Tubes
Font of choice - I used JI-Pelter here.
Weescotlass mask 249 here
Scapity Scrap and More Template 40 here
Twinks which I’ve supplied here
DSB Flux - Bright Noise
Animation Shop
“Pretty and Playful” is a PTU tagger size scrap kit created by Terry of Treasure’s by Terry and can be purchased exclusively at MPT. You can visit Terry’s blog here.
Thank you Terry for such a beautiful kit!
This tutorial was written assuming you have a working knowledge of PSP.
~♥~ Let’s get started ~♥~
Open up the template.
Image/Canvas Size
700 X 700
OK
Highlight the background layer and flood fill white.
Highlight Big Circle layer.
Select All/Float/Defloat
New Raster Layer.
Copy and paste a paper of choice Into Selection.
Deselect.
Delete the template layer.
Highlight Border Big Circle layer.
Select All/Float/Defloat
New Raster Layer.
Copy and paste a paper of choice Into Selection.
Deselect.
Delete the template layer.
Highlight Small Circle layer.
Select All/Float/Defloat
New Raster Layer.
Copy and paste a paper of choice Into Selection.
Deselect.
Delete the template layer.
Highlight Border Smaller Circle.
Repeat the same as you did for Border Large Circle layer.
Highlight Big Rectangle layer.
Select All/Float/Defloat
New Raster Layer.
Copy and paste a paper of choice Into Selection.
Deselect.
Delete the template layer.
Repeat the above step with Square layer and Line Square layer.
Merge Visible Top, Mid, and Bottom Rectangle layer.
Select All/Float/Defloat
New Raster Layer.
Flood fill with a gradient of choice.
Deselect.
Delete the template layer.
Merge Visible Border Top, Border Mid, and Border Bottom Rectangle layers.
Arrange them so they’re over the rectangle layers in your layers pallet.
Select All/Float/Defloat
New Raster Layer.
Copy and paste a paper of choice Into Selection.
Deselect.
Delete the template layer.
Highlight Long Dotted Line layer.
Merge down.
New Raster layer above the merged dotted layer.
Flood fill with a dark color that will match your tag.
Highlight the merged dotted layer.
Select All/Float/Defloat
Highlight the flood fill layer.
Selections/Invert
Tap the delete key.
Deselect.
Delete the template layer.
Highlight the 3 merged rectangle layer.
Select All/Float/Defloat
Copy and paste your tube as a new layer.
Position it over the rectangles - resizing the tube to your liking.
Selections/Invert
Tap the delete key.
Deselect.
Delete the template layer.
Change the Properties to Multiply.
Add your embellishments. I used:
Flower Tree 2
Bow 2: Resize 50%
Bead String 1: Resize 70% Free rotate left 90 degrees.
Butterfly 3: Resize 40% Free rotate right 25 degrees
Butterfly 4: Resize 40% Free rotate left 25 degrees
Cat 1: Resize 45%
Basket 1: Resize 40%
Copy and paste your tube as a new layer.
Highlight your white canvas.
New Raster layer.
Select All.
Copy and paste a paper of choice as a new layer.
Deselect.
Copy and paste Torn paper of your choice. Position so that the torn part of the paper is in the center of your canvas.
Use your Pick Tool and pull the side out so that there are no gaps on the sides of the paper.
Merge visible the two paper layers.
Apply the mask.
Resize 125%
Merge Group.
Highlight the Basket layer.
Duplicate 4 times for a total of 5 layers.
Rename them Basket 1, 2, 3, 4, and 5.
Highlight Basket one.
Use your Freehand Selection Tool and outline the inside portion of the basket.
Apply the DSB Flux - Bright Noise:
Highlight Basket layer 2.
Apply Bright Noise again accept hit the mix button twice.
Highlight Basket layer 3.
Apply Bright Noise again accept hit the mix button 3 times.
Highlight Basket layer 4.
Apply Bright Noise again accept hit the mix button 4 times.
Highlight Basket layer 5.
Apply Bright Noise again accept hit the mix button 5 times.
Close all the basket layers out accept Basket layer 1.
Add your copyrights.
Add your name.
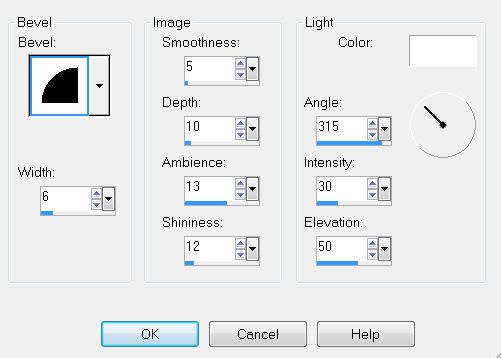
Give it a slight inner bevel:
Duplicate your name 4 times for a total of 5 name layers.
Rename them Name 1, 2, 3, 4, and 5.
Highlight Name 1 layer.
Adjust/Add Remove Noise/Add Noise
Random Checked
Noise: 33%
OK
Highlight Name 2 layer.
Apply the noise effect again accept change the Noise to 43%
Highlight Name 3 layer.
Apply the noise effect again accept change the Noise to 53%
Highlight Name 4 layer.
Apply the noise effect again accept change the Noise to 63%
Highlight Name 5 layer.
Apply the noise effect again accept change the Noise to 73%
Close out all your name layers accept Name layer 1.
That one should be left open.
Copy Merge
~Now we’re ready to animate~
Carry Into Animation Shop.
Edit/Paste/As New Animation.
Back into PSP.
Close out Name 1 and open up Name 2.
Close out Basket 1 and open up Basket 2.
Copy Merge.
Carry into AS.
Edit/Paste/After Current Frame.
Back into PSP.
Close out Name 2 and open up Name 3.
Close out Basket 2 and open up Basket 3.
Copy Merge.
Carry into AS.
Edit/Paste/After Current Frame.
Back into PSP.
Close out Name 3 and open up Name 4.
Close out Basket 3 and open up Basket 4.
Copy Merge.
Carry into AS.
Edit/Paste/After Current Frame.
Back into PSP.
Close out Name 4 and open up Name 5.
Close out Basket 4 and open up Basket 5.
Copy Merge.
Carry into AS.
Edit/Paste/After Current Frame.
If you want to use the twinks that I provided then open them up.
Ctrl + A to highlight all the frames.
Edit/Copy.
Highlight your tag frames.
Ctrl + A to highlight all the frames.
Ctrl + E and paste the twinks wherever you choose.
Animation/Frame Properties
Change the display time to 20.
OK.
View your animation.
If you’re happy then resize:
Animation/Resize Animation
Percentage of Original checked.
80
OK.
Save your tag.
I hope you enjoyed this tutorial.
I’d love to see your results.
Email me!
Hugs,
Bev