Supplies
1 tube of choice - I used the wonderful artwork of Mitzi- Sato-Wiuff which can be purchased from PSP Tube Stop. You must have a license to use.
Font of choice - I used Parseltongue here
Melissaz Creationz Mask 14 here
Dangerously Delicious template "Template - 2 - Sunshine" here
It can be found under Thursday, August 1, 2013
Plug Ins used:
Brush Strokes - Crosshatch
"Autumn Beauty" is a tagger size scrap kit created by Lysira of Lysira's Graphic World and can be purchased from Heartbeatz Creationz. You can visit her blog here. Thank you Lysira for an incredibly beautiful scrap kit!
This tutorial assumes you have a working knowledge of PSP.
~♥~ Let's get started ~♥~
Open up the template.
Shift + D.
Close out the original.
Image/Resize all layers 90%
Image/Canvas Size:
700 x 600
Highlight the bg layer.
Flood fill white.
Delete the following layers:
Info, Love Me or Hate, Me, me d/s, I'm still ganna, Shine teal, shile white, shine d/s, dotted star, and gray star
Highlight Teal Square layer.
Click on it with your Magic Wand.
New Raster layer.
Copy and paste Paper 9 Into Selection.
Deselect.
Delete the template layer.
Highlight Rust Rectangle layer.
Click on it with your Magic Wand.
New Raster layer.
Copy and paste Paper 1 Into Selection.
Apply Brush Strokes - Crosshatch:
Stroke Length: 27
Sharpness: 6
Strength: 1
OK
Deselect.
Delete the template layer.
Highlight Brown Square layer.
Click on it with your Magic Wand.
New Raster layer.
Copy and paste Paper 8 Into Selection.
Deselect.
Delete the template layer.
Highlight White Circle layer.
Click anywhere outside of it with your Magic Wand.
Selections/Invert
New Raster layer.
Copy and paste Paper 9 Into Selection.
Adjust/Add Remove Noise/Add Noise:
Uniform and Monochrome checked
Noise: 35%
OK
Deselect.
Delete the template layer.
Highlight Creame Circle layer.
Click on it with your Magic Wand.
New Raster layer.
Copy and paste Paper 7 Into Selection.
Copy and paste your tube as a new layer.
Change the Properties to Overlay.
Selections/Invert
Tap the delete key.
Deselect.
Delete the template layer.
Highlight Dotted Circle layer.
Select All/Float/Defloat
New Raster layer.
Flood fill with #3b0000.
Duplicate the layer.
Merge Down.
Deselect.
Delete the template layer.
Repeat the above step with Dotted Square layer.
Highlight Gray Square layer.
Click on it with your Magic Wand.
New Raster layer.
Copy and paste Paper 7 Into Selection.
Copy and paste your tube as a new layer.
Change the Properties to Overlay.
Move into a position you like over the paper.
Selections/Invert
Tap the delete key.
Deselect.
Delete the template layer.
Copy and paste your tube as a new layer.
Move into position in front of the circle - see my tag for reference.
Add your elements. I used:
Ivy 03: Duplicate/Mirror/Flip
Floral Gazing Ball: Resize 35%/Duplicate
Fall Cluster: Resize 70%
Daisy 01: Resize 25%/Duplicate
Daisy 02: Resize 20%/Duplicate
Daisy 03: Resize 15%/Duplicate
Fall Leaf 02: Resize 55%/Free rotate Right 30 degrees/Duplicate/Duplicate/Mirror/Duplicate/Resize 70%/Duplicate/Mirror/Duplicate/Resize 70% 2x's/Duplicate
Crop your image.
Highlight your white background.
New Raster layer.
Select All.
Copy and paste Paper 10 Into Selection.
Deselect.
Apply the mask.
Merge Group.
Add your copyrights.
Add your name:
Color Pallet -
Foreground: #3b0000
Background: #ebb876
Stroke: 1.0
Type your name.
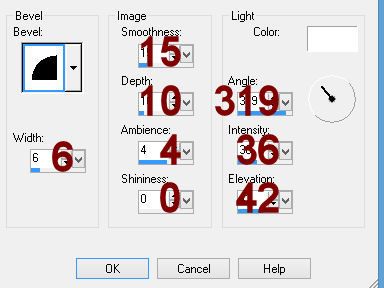
Give it a slight Inner Bevel:

Merge Visible all layers.
Save.
I hope you enjoyed this tutorial.
Hugs,
Bev