Tuesday, March 12, 2013

Season's Beginning


Supplies

1 tube of choice – I used the artwork of Ellie Milk and can be purchased from Pics for Design.  You must generate a license to use.

 Font of choice –  I used Rat Infested Mailbox here

Weescotlass Mask 208 here

My template 159 here

“Love” is a FTU tagger size scrap kit created by Rose of Rose’s Tuts n Tags Creations and can be downloaded from here.  Be sure to stop by her blog here for other freebie kits she has created.  Don’t forget to leave a thank you for hard work given freely.

~~ Lets get started ~~

Open up the template.
Shift + D.
Close out the original.
Delete the top 2 layers.
Image/Canvas Size:
700 x 700
OK
Highlight Raster 2 layer.
Flood fill white.

Highlight Raster 2 layer.
Click on it with your Magic Wand.
New Raster layer.
Copy and paste Paper 5 Into Selection.
Deselect.
Delete the template layer.
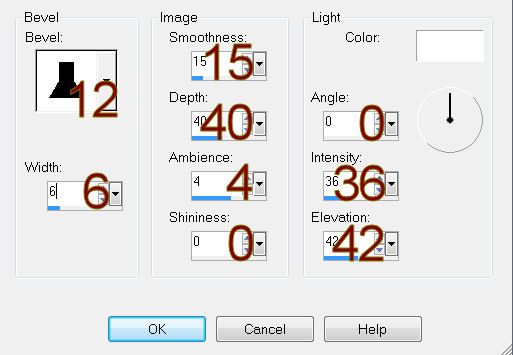
Give it a slight Inner Bevel:
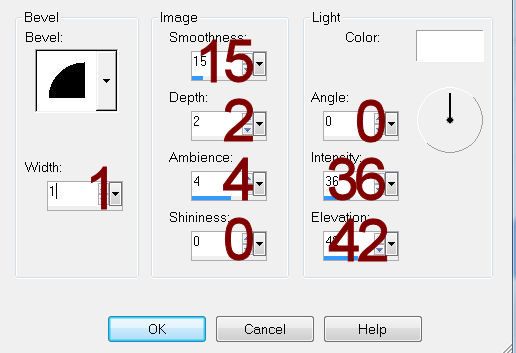
 photo redinnerbevel_zps089a307c.jpg

Highlight Paper 5 (from the kit, NOT the paper you just gave an inner bevel to).
Flip
Copy

Highlight Raster 3 layer.
Click on it with your Magic Wand.
New Raster layer.
Paste the paper Into Selection.
Deselect.
Give it the same slight Inner Bevel.

Highlight Raster 4 layer.
Click inside of each frame with your Magic Wand.
Selections/Modify/Expand by 2.
New Raster layer below the frame.
Copy and paste Paper 15 Into Selection.
Copy and paste your tube as a new layer just above the paper layer.
Move into position – see my tag for reference.
Selections/Invert
Tap the delete key.
Change the Properties of the tube layer to Overlay.
Deselect.

Add your elements.  I used:
Flowers 3 & 4:  Resize 10%
Cupcake Pop:  Resize 30%/Free rotate Left 15 degrees
Candy Kisses:  Resize 50%/Duplicate/Mirror
Flower Branch 4:  Resize 10%/Duplicate
Bow 2:  Resize 30%/Duplicate
Butterfly 2:  Resize 20%/Mirror/Duplicate/Mirror/Resize 70%
Leaves 2:  Resize 80%/Duplicate

Highlight your white background.
Select All.
New Raster layer.
Copy and paste Paper 8 Into Selection.
Deselect.
Apply the mask.
Resize 115%
Merge Group.

Add your credits.

Add your name.
Color Pallet:
Foreground:  #000000
Background:  #202020
Stroke: 0.8
Type your name.
Convert to Raster layer.
Select All/Float/Defloat
Selections/Modify/Expand by 2.
New Raster layer below the name layer.
Flood fill with #ffffff
Deselect.
Highlight the black colored name layer.
Merge Down.

I’d love to see your results.
Email me!
Hugs,
Bev


Sunday, March 10, 2013

Luck


Supplies

1 tube of choice – I used the wonderful artwork of Lisa Cree and can be purchased from her store PSP TubeStop.  You must have a license to use.

 Font of choice –  I used Celtic Garamond here

Weescotlass Mask 208 here

“Lucky Enough” is a FTU tagger size scrap kit created by me, Bev of HorsePlay’s Pasture Designs and can be from my blog here.

~~ Lets get started ~~

Open up a 725 x 700 blank canvas.
Flood fill white.

Copy and paste Frame 1 as a new layer.
Resize 65%
Free rotate Right 80 degrees
Duplicate
Mirror
Move both frames into position – see my tag for reference.

To each frame:
Click inside of it with your Magic Wand – be sure to click inside the gap where the ribbon is.
Selections/Modify/Expand by 4.
New Raster layer below the frame.
Copy and paste Paper 3 Into Selection.
Deselect.

Copy and paste Gold as a new layer.
Move into position below the right frame – see my tag for reference.
Highlight the paper layer of the right frame.
Click anywhere outside of the paper with your Magic Wand.
Highlight the Gold layer.
Tap the delete key.
Deselect.

Copy and paste Wire as a new layer.
Resize 50%
Duplicate/Mirror
Move the wire layers so they’re side by side, match them up.
Merge Visible both wire layers.
Close this layer out for now.

New Raster layer.
Make your Selection Tool active set on Rectangle.
Create a rectangle approximately 90 x 525 pixels.
Copy and paste Paper 10 Into Selection.
DO NOT DESELECT.
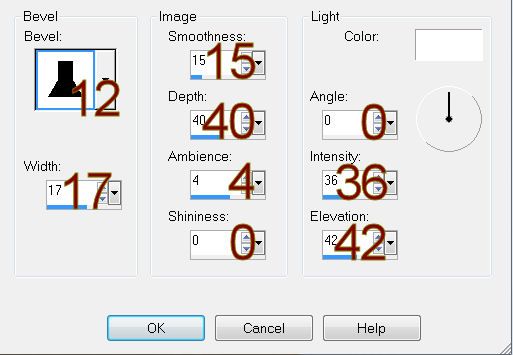
Give it a slight Inner Bevel:
 photo RECTANGLEINNERBEVEL_zps57933cae.jpg

Selections/Modify/Contract by 6
Open up the merged wire layer.
Move it above the rectangle paper layer.
Selections/Invert
Tap the delete key.

Merge Visible the wire layer and paper layer.
Move into position – see my tag for reference.

Copy and paste your tube as a new layer.
Leave it on the large side and into position just below the right frame.
Lower the Opacity of the tube layer to about 73.
Highlight the paper that’s just below the tube.
Click anywhere outside of it with your Magic Wand.
Highlight the tube layer.
Tap the delete key.
Deselect.

Paste your tube again as a new layer.
Resize and move into position in front of the right frame – see my tag for reference.

Copy and paste Frame 6 as a new layer.
Resize 60%
Move into position – see my tag for reference.
Click inside of it with your Magic Wand.
Selections/Modify/Expand by 4.
New Raster layer below the frame.
Copy and paste Paper 1 Into Selection.
Deselect.

Add your elements.  I used:
Horseshoe:  Resize 40%/Duplicate/Mirror
Frame 5:  Resize 90%
Bow 3:  Resize 25%/Duplicate/Mirror
Clover Spray 1:  Resize 70%/Duplicate
Dragonfly:  Resize 35%/Duplicate/Mirror
Flower 2:  Resize 60%/Duplicate/Mirror
Chain:  Free rotate Right 90 degrees/Duplicate
Bird:  Resize 30%

Highlight your white background.
Select All.
New Raster layer.
Copy and paste Paper 4 Into Selection.
Deselect.
Apply the mask.
Resize 105%
Merge Group.

Crop your image.

Add your credits.

Add your name.
Color Pallet:
Foreground:  #2e2513
Background:  Pattern/Paper 5
Stroke: 0.8
Type your name.
Give it a slight Inner Bevel:
 photo NAMEINNERBEVEL_zpsa5302350.jpg

Effects/Edge Effects/Enhance

Resize all layers 75%.

I’d love to see your results.
Email me!
Hugs,
Bev