Monday, October 22, 2012

Autumn Breath


Supplies

1 tube of choice – I used the artwork of Maxine Gadd which can be purchased from CDO.  You must have a license to use.

Font of choice - I used Before the Rain here

Weescotlass Mask 138 here

Plug Ins used:
Eyecandy 3.1 – Glow

“Autumn Breath” is a tagger size scrap kit also available in full size created by Kathi of Kissed by Cari and can be purchased from TKO Scraps.  You can visit her blog here.
Thank you Kathi for a most beautiful autumn themed kit!

This tutorial was written assuming you have a working knowledge of PSP.

~♥~ Let’s get started ~♥~

Open up a 700 x 700 blank canvas.
Flood fill white.

Make your Selection Tool active set on Circle.
Make a circle approximately 425 pixels.
New Raster layer.
Copy and paste Paper 4 Into Selection.
Apply Eyecandy 3.1 – Glow:
Width: 3
Opacity: 100%
Opacity Drop Off: Fat
Color: #532b29
OK
Don’t worry about placement of this layer just yet.

New Raster layer.
Make your Selection Tool active again, this time set on square.
Create a square approximately 360 x 350 pixels.
Copy and paste Paper 4 Into Selection.
Deselect.

Move both paper layers into position – see my tag for reference.

Copy and paste your tube as a new layer.
Move it into a position that will look nice in front of both paper layers.
Highlight the rectangle paper layer.
Click anywhere outside of it with your Magic Wand.
Highlight the tube layer.
Use your Eraser Tool and erase the areas of the tube you don’t want to overhang the rectangle paper.
Deselect.

Add you elements.  I used:
Daisy 1:  Resize 30%
Daisy Daisy 3:  Resize 30% and 70%/Duplicate
Doodle 3
Cornucopia:  Resize 70%
Wheat Stalk:  Resize 705/Duplicate/Mirror
Branch:  Free rotate Right 30 degrees
Pinecone:  Resize 20%/Duplicate/Mirror
Pinecone again:  Resize 15%/Free Rotate R 35 degrees/Duplicate
Acorn 1:  Resize 10%/Duplicate as many times as you like/Use your Pick Tool to turn this way and that.
Leaf 3:  Resize 25%
Leaf 2:  Resize 25%/Free rotate Left 35 degrees
Leaf 1:  Resize 25%/Free rotate Right 35 degrees

Highlight your white background.
New Raster layer.
Select All.
Copy and paste Paper 2 Into Selection.
Deselect.
Apply the mask.
Merge Group.
Move behind the circle paper layer.
Duplicate
Move below the square paper layer.

Add your credits.

Add your name.
Foreground and Background: #000000

Resize all layers 80%.

I’d love to see your results.
Email me!
Hugs,
Bev
 

Sunday, October 21, 2012

Witch Way to Halloween


Supplies

Font of choice - I used Buffied here

Mask here

Tracy’s Halloween template 2 here
Scroll down on right side you’ll see her Halloween Templates listed under her name “Tracy’s Halloween Templates 1-10”.

Plug Ins used:
Eyecandy 3.1 – Glow

“Witch Way to Halloween” is a tagger size scrap kit also available in Full Size created by Kesha of KnC Scrapz and can be purchased from her store Lollipopsn Gumdrops.  You can visit her blog here.
Thank you Kesha for a fantastic kit!

This tutorial was written assuming you have a working knowledge of PSP.

~♥~ Let’s get started ~♥~

Open up the template.
Shift + D.
Close out the original.
Image/Canvas Size 650 x 650
OK
Delete the top 3 layers and Rectangle 2 layer.
New Raster layer.
Flood fill white.
Send to bottom.

Highlight Circle layer.
Click on it with your Magic Wand.
New Raster layer.
Copy and paste Paper 8 Into Selection.
Deselect.
Apply Eyecandy 3.1 – Glow:
Width: 3
Opacity: 100
Opacity Drop Off: Fat
Color: #ddd9a3
OK
Delete the template layer.

Highlight Rectangle 1 layer.
Click on it with your Magic Wand.
New Raster layer.
Copy and paste Paper 9 Into Selection.
Deselect.
Delete the template layer.
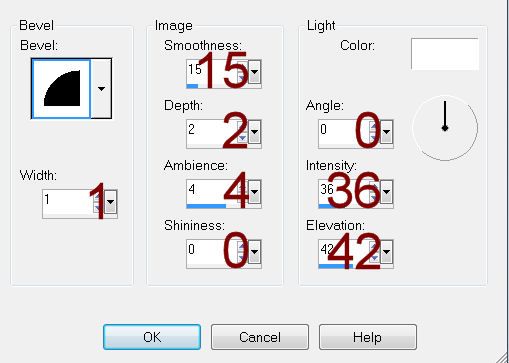
Give it a slight Inner Bevel:

Color Pallet:
Foreground: #ffffff
Background: #131110

Highlight Text layer.
Make your Color Replacer Tool active.
Hold your mouse over the text and double right click.
The text should now be black.

Highlight Shape layer.
Click on it with your Magic Wand.
New Raster layer.
Copy and paste Paper 7 Into Selection.
Deselect.
Apply Eyecandy 3.1 – Glow:
Use Same settings.
Delete the template layer.

Highlight Square layer.
Click on it with your Magic Wand.
New Raster layer.
Copy and paste Paper 2 Into Selection.
Copy and paste Moon 2 as a new layer.
Resize 25%
Change the Properties to Hard Light.
Lower the Opacity to about 77
Move into position – see my tag for reference.
Selections/Invert
Tap the delete key.
Deselect.
Delete the template layer.
Apply the same Glow effect to the paper  layer.

Add you elements.  I used:
House:  Resize 40%
Shelf:  Resize 35%
Books:  Resize 15%
Candle 2: Resize 10%
Tree:  Resize 45%
Brew:  Resize 20%
Gray Pump:  Resize 12%
Treat ele:  Resize 15%
Crow & Crow 2:  Resize 12%
Bat:  Resize 15%
Bat 2:  Resize 10%
Witch:  Resize 25%/Mirror
Ghost:  Resize 30%/Free rotate Left 30 degrees
Stars:  Resize 25%
Flower 1:  Resize 15%/Duplicate
Flower 2:  Resize 20%
Swirl:  Resize 60%

Highlight your white background.
New Raster layer.
Select All.
Copy and paste Paper 1 Into Selection.
Deselect.
Apply the mask.
Resize 105%
Merge Group.

Add your credits.

Add your name.
Foreground and Background: #000000
Apply Eyecandy 3.1 – Glow:
Use same settings

Resize all layers 80%.

I’d love to see your results.
Email me!
Hugs,
Bev