Monday, June 25, 2012

The Red White & Blue

Supplies

1 tube of choice – I used the beautiful artwork of Elizabeth Austin which can be purchased from Up Your Art.  You must have a license to use.

Font of choice - I used  Mardian here

My Mask 8 here

Plug Ins used:
Brush Strokes – Cross Hatch

“The Red White and Blue” is a tagger size scrap kit created by Tasha  of Tasha’s Playground and is free for a limited time at Pics for Design.  You can visit her blog here.
Thank you Tasha for such an awesome kit.

This tutorial was written assuming you have a working knowledge of PSP.

~~ Lets get started ~~

Open up a 700 x 700 blank canvas.
Flood fill white.

Copy and paste Frame 4 as a new layer.
Resize 90%.
Click inside of it with your Magic Wand.
Selections/Modify/Expand by 4.
New Raster layer below the frame.
Copy and patse Paper 8 Into Selection.
Apply Brush Strokes – Crosshatch:
Stroke Length: 22
Sharpness: 6
Strength: 1
OK

Close out your white background.
Merge Visible.
Reopen your white background.
Move the merged layer slight to the left and up a little.

New Raster layer.
Make your Selection Tool active set on Rectangle.
Create a rectangle approximately 350 x 300 pixels.
Copy and paste Paper 11 Into Selection.
Selections/Modify/Contract by 7.
Tap the delete key.
Deselect.

Move both the merged layer and the new frame you just made into exact position on your canvas – see my tag for reference.

Highlight the “frame” layer.
Click inside of it with your Magic Wand.
Selections/Modify/Expand by 2.
New Raster layer below the “frame”.
Copy and paste Paper 10 Into Selection.
Duplicate
Adjust/Blur/Gaussian Blur:
Radius: 5
OK
Deselect.

Copy and patse your tube as a new layer.

Add your elements.  I used:
Fireworks 3:  Resize 40%
Fireworks 2:  Resize 30%
Stars:  Resize 60%/Duplicate
Jewel 2:  Resize 15%/Duplciate 3x’s
Lips 2:  Resize 50%/Mirror
Bow 3:  Resize 40%/Duplicate/Mirror
Flags
Butterfly 2:  Resize 30%/Duplicate/Mirror
Sparkle

Highlight your white background.
New Raster layer.
Select All.
Copy and paste Paper 2 Into Selection.
Apply the mask.
Resize 95%
Merge Group.
Move it up slightly on your canvas.

Add your credits.

Add your name.
Foreground: #932c2c
Background: #315792
Stroke: 2.0
Type your name.
Give it a slight Inner Bevel:
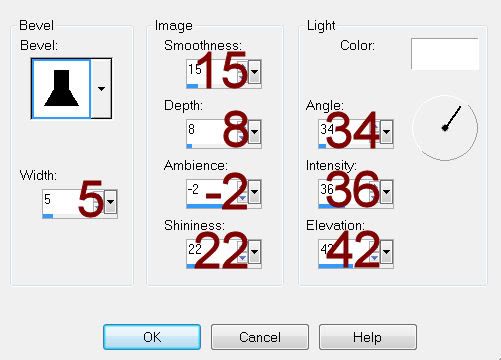
Resize all layers 80%.

I’d love to see your results.
Email me!
Hugs,
Bev

Sunday, June 24, 2012

Tropical Summer

Supplies

1 tube of choice – I used the artwork of Elias Chatzoudis which can be purchased from PSP Tubes Emporium.  You must have a license to use.

Font of choice - I used Things We Said here

Weescotlass Mask 208 here

Plug Ins used:
Mura’s Meister – Cloud

“Tropical Summer” is a tagger size scrap kit created by Delicate Pearl and be purchased from Scrappin’ withFriends.  You can visit her blog here.
Thank you Pearl for such a beautiful kit.

This tutorial was written assuming you have a working knowledge of PSP.

~~ Lets get started ~~

Open up a 700 x 700 blank canvas.
Flood fill white.

Color Pallet:
Foreground: #add3d7
Background: #ffffff

Copy and paste el28 as a new layer.
Resize 70%
Free rotate Left 90 degrees.
Click inside of it with your Magic Wand.
Selections/Modify/Expand by 2.
New Raster layer below the frame.
Apply Mura’s Meister – Cloud:
Click the reset button.
OK
Deselect.
Rename “Water”.

Copy and paste the following elements below the frame – see my tag for placement.  Don’t worry about what overhangs the frame.  We’ll clean that up in a bit.
el01:  Resize 30%/Duplicate
el12:  Resize 25%
el11:  Resize 25%
el36 & 37:  Resize 20%/Duplicate as many times as you like and resize as you like.  Mirror some of the fish and lower the opacity on a few.

Highlight the “Water” layer.
Click anywhere outside of it with your Magic Wand.
Highlight any elements that overhang the frame and tap the delete key.
Deselect.

Copy and paste your tube as a new layer.
Position in front of the frame.

Color Pallet:
Foreground: #a93959

Open up el08
Shift + D.
Close out the original.
Use your Target Tool and colorize the flower using the foreground color.
Resize 30%
Move into position – see my tag for reference.

Add your elements.  I used:
el07:  Resize 25%
el19
el46:  Resize 40%/Position behind the frame/Duplicate/Mirror
el03:  Resize 40%/Duplicate
el46 again:  Resize 25%/Duplicate/Mirror/position in front of the frame
el42:  Resize 40%/Duplicate

Crop your image.

Highlight your white background.
New Raster layer.
Select All.
Copy and paste Paper 14 Into Selection.
Deselect.
Adjust/Blur/Gaussian Blur:
Radius: 10
OK
Apply the mask.
Use your Pick Tool to pull the sides out a little.
Merge Group.
Duplicate

Add your credits.

Add your name.
Foreground: #a93959
Background: #879a27
Stroke: 1.0
Type your name.
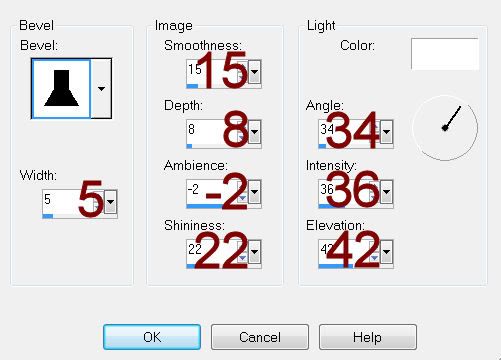
Give it a slight Inner Bevel:

Resize all layers 80%.
I’d love to see your results.
Email me!
Hugs,
Bev