Sunday, September 18, 2011

Black Swan


Supplies

1 tube of choice - I used the elegant artwork of Gary George which can be purchased from Up Your Art.  You must have a license to use.

Font of choice - I used Jellyka Delicious Cake here

Weescotlass Mask 208 here

Artmama’s template 14 - Valentines here

“A Summer That Never Was” is a full size scrap kit created by Heppy of HF Projekte and can be purchased from his store Inspirations of Scrap Friends.  You can visit his blog here
Thank you Heppy for such a classy and elegant kit!

This tutorial was written assuming you have a working knowledge of PSP.

~♥~ Let’s get started ~♥~

Open up the template
Shift + D.
Close out the original.
Image/Canvas Size:
700 x 700
OK
New Raster layer
Send to bottom.
Flood fill white.
Delete layer, Strip, Word, and Tiny Words layer.

Highlight Rectangle layer.
Click anywhere outside of it with your Magic Wand.
Selections/Invert
New Raster layer.
Copy and paste Paper 5 Into Selection.
Deselect.
Delete the template layer.
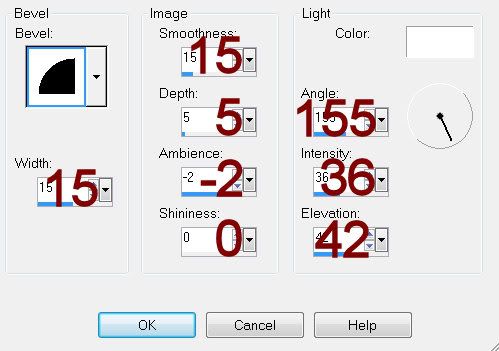
Give it a slight Inner Bevel:

Highlight C. Back layer (just above the rectangle layer).
Click on it with your Magic Wand.
New Raster layer.
Copy and paste Paper 4 Into Selection.
Deselect.
Delete the template layer.
Adjust/Add Remove Noise/Add Noise
Monochrome and Gaussian checked
Noise: 43%
OK

Highlight Circle layer.
Click on it with your Magic Wand.
New Raster layer.
Copy and paste Paper 6 Into Selection.
Copy and paste your tube as a new layer.
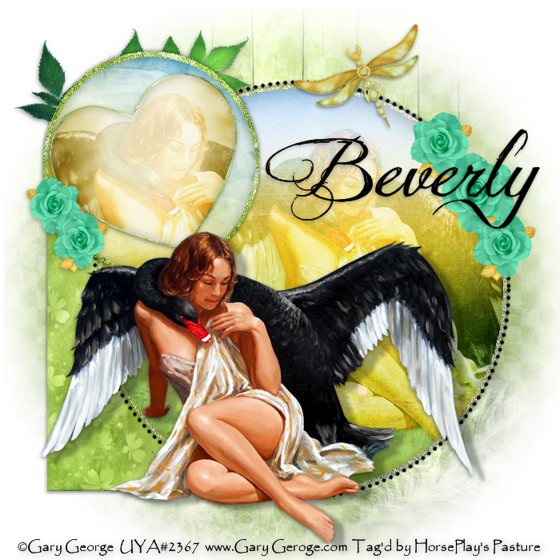
Move into position over the circle - see my tag for reference.
Selections/Invert
Tap the delete key.
Deselect.
Delete the template layer.
Change the Properties to Soft Light.
Duplicate

Highlight C. Back layer (just above the circle layer).
Click on it with your Magic Wand.
New Raster layer.
Copy and paste Paper 12 Into Selection.
Deselect.
Delete the template layer.
Apply the same Noise Effect.

Highlight Circle layer.
Click anywhere outside of it with your Magic Wand.
Selections/Invert
New Raster layer.
Copy and paste Paper 7
Deselect.
Delete the template layer.

Highlight H. Back layer.
Click anywhere outside of it with your Magic Wand.
Selections/Invert
New Raster layer.
Copy and paste Paper 10 Into Selection.
Copy and paste your tube as a new layer.
Move into position over the heart - see my tag for reference.
Selections/Invert
Tap the delete key.
Deselect.
Delete the template layer.
Change the Properties to Soft Light.
Duplicate.

Copy and paste your tube as a new layer.

Add your embellishments.  I used:
23:  Resize 25%
10:  Resize 25% and 60%/Free rotate Left 25 degrees
24:  Resize 25% and 40%/Free rotate Right 90 degrees/Duplciate/Resize 80%/Duplicate/Duplicate original rose/Resize 70%/Mirror/Duplicate

Highlight your white canvas.
New Raster layer.
Select All.
Copy and paste Paper 9 Into Selection.
Deselect.
Apply the mask.
Resize 120%
Merge Group.

Add your copyrights.

Add your name.

Resize all layers 80%.

I hope you enjoyed this tutorial.
I’d love to see your results and show it off in my gallery.
Email me!
Hugs,
Bev

Thursday, September 15, 2011

Bewitching 2


Supplies

1 tube of choice - I used the artwork of Elias Chatzoudis which can be purchased from PSP Tubes Emporium.  You must have a license to use.

Font of choice - I used Magic School here

Weescotlass Mask 208 here

My template 113 here

Plugs Ins:
Xero-Porcelain
DSB Flux - Bright Noise

“Bewitching” is a tagger size scrap kit created by Krissy of Krissy’s Scraps and can be purchased from her store Exquisite Scraps.  You can visit her blog here. 
Thank you Krissy for such a fun Halloween kit!

This tutorial was written assuming you have a working knowledge of PSP.

~♥~ Let’s get started ~♥~

Open up the template
Shift + D.
Close out the original.
Delete the credit layer.

Highlight Bottom Rectangle layer.
Click on it with your Magic Wand.
New Raster layer.
Copy and paste Paper 9 Into Selection.
Deselect.
Delete the template layer.
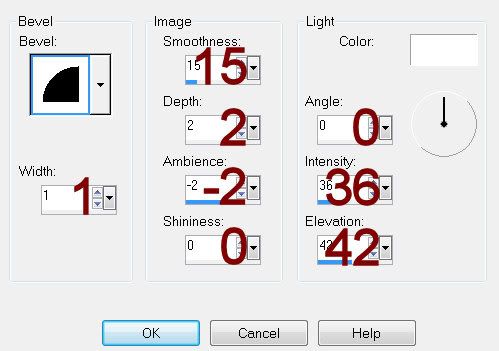
Give it a slight Inner Bevel:

 
Highlight Middle Rectangle layer.
Click on it with your Magic Wand.
New Raster layer.
Copy and paste Paper 3 Into Selection.
Deselect.
Delete the template layer.
Give it the same slight Inner Bevel.

Highlight Top Rectangle layer.
Click on it with your Magic Wand.
New Raster layer.
Copy and paste Paper 12 Into Selection.
Copy and paste Spider Web 1 as a new layer.
Move into position over the paper - see my tag for reference.
Selections/Invert
Tap the delete key.
Change the Properties to Overlay.
Lower the Opacity to about 55.
Deselect.
Delete the template layer.
Give the paper layer the same slight Inner Bevel.

Highlight Bottom Photo Frame layer.
Click on it with your Magic Wand.
New Raster layer.
Copy and paste Paper 3 Into Selection.
Deselect.
Delete the template layer.
Give it the same slight Inner Bevel.

Repeat the above step with Top and Middle Photo Frame layers.

Highlight the top Photo frame.
Click inside of it with your Magic Wand.
Selections/Modify/Expand by 4.
New Raster layer below the frame.
Copy and paste Paper 10 Into Selection.
Deselect.

Repeat the above step with the remaining 2 photo frames.

Copy and paste your tube as a new layer.
Position in front of the spider web.
Duplicate/Positon this tube layer in front of the 3 photo frames.  Once you have it in the exact position you want duplicate it two times for a total of 3 tube layers.
Move each tube layer below a frame in your layers pallet.

Highlight the paper of the top frame.
Click anywhere outside of it with your Magic Wand.
Highlight the tube layer above it.
Tap the delete key.
Deselect.
Highlight the tube layer.
Merge Down.
Apply Xero-Porcelain:
Use Default settings.

Repeat the above step with the remaining tubes.

Add your embellishments.  I used:
Spooky Tree 1
Ghost 1:  Resize 25% and 50%/Free rotate Left 15 degrees
Witchy Cat 1:  Resize 40%
Corn 2 & 4:  Resize 25% and 50%/Use your pick tool to turn this way and that

Highlight your white canvas.
New Raster layer.
Select All.
Copy and paste Paper 10 Into Selection.
Deselect.
Apply the mask.
Resize 120%
Merge Group.

Add your copyrights.

Add your name:
Color Pallet:
Foreground and Background:  Pattern/Paper 3

Type your name.
Convert to Raster layer.
Select All/Float/Defloat
Selections/Modify/Contract by 2
New Raster layer.
Copy and paste Paper 10 Into Selection.
Give it a slight Inner Bevel:
 
Apply DSB Flux - Bright Noise:
Intensity 30
Mix checked
OK
Deselect.
Merge Down.

Resize all layers 90%.

I hope you enjoyed this tutorial.
I’d love to see your results and show it off in my gallery.
Email me!
Hugs,
Bev