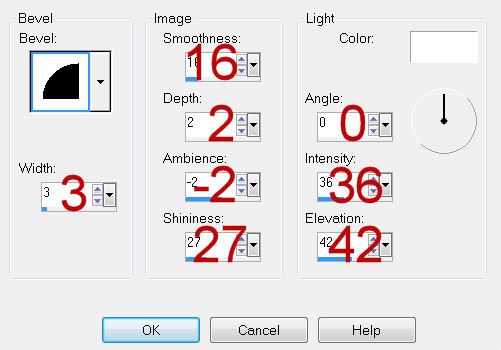
Supplies
1 tube of choice - I used the artwork of Dean Yeagle which can now be purchased from CDO. You must have a license to use.
Weescotlass mask 297 here
Eyecandy 3.1 - Glow
“Honeysuckle & Roses ” is a scrap kit collaboration in both tagger and full size available at TKO Scraps. This entire collaboration has 468 elements, 3 Alpha’s, and 160 Papers. Tagger size is $3. Full size is $10 or free with an $8. This is one sweet deal the store is having and I would highly recommend taking advantage of it. Each designer’s portion is gorgeous! For this tutorial I’m using the portion of Krissy‘s Scraps. You can visit her blog here. Thank you Krissy for your wonderful portion of this collab!
This tutorial was written assuming you have a working knowledge of PSP.
~♥~ Let’s get started ~♥~
Open up a 700 x 700 blank canvas.
Flood fill white.
Make your Selection Tool active and make a rectangle approximately 250 x 450 pixels.
Copy and paste Paper 3 as a new layer.
Resize 75%
Selections/Invert
Tap the delete key.
Deselect.
Apply Eyecandy 3.1 - Glow:
Width: 5
Opacity: 100%
Dropoff: Fat
Color: White
OK
Copy and paste Paper 2 as a new layer.
Resize 25%
Free rotate Left 45 degrees.
Apply the same Glow effect.
Duplicate 3 times for a total of 3.
Move them into position - see my tag for reference.
Copy and paste Tag 2 as a new layer.
Resize 25%
Free rotate Left 90 degrees.
Move into position behind the right side of the rectangle leaving just a slight bump showing.
Duplicate/Move up (or down, depending on where you placed the first one)
See my tag for placement reference.
Use your Selection Tool to select the area that overhangs the top of the rectangle:
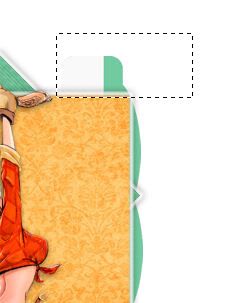
Tap the delete key.
Deselect.
Repeat the above step placing the tags near the bottom left side of the rectangle.
Copy and paste your tube as a new layer.
Add your embellishments. I used:
Bloom 2 and 3: Resize 25% and 70%
Crop your image.
Highlight your white canvas.
New Raster layer.
Select All.
Copy and paste Paper 5 Into Selection.
Deselect.
Apply the mask.
Merge Group.
Add your copyrights.
Add your name:
Choose an alpha color of your choice.
The first letter of your name resize 25% and 60%
All other letters resize 25% and 40%
Resize all layers 85%
I hope you enjoyed this tutorial.
I’d love to see your results and show it off in my gallery.
Email me!
Hugs,
Bev