Tuesday, April 26, 2011

Honeysuckle & Roses 3


Supplies

Font of choice - I used Chicken Basket - a pay font

My mask 27 here

“Honeysuckle & Roses ” is a scrap kit collaboration in both tagger and full size available at TKO Scraps. This entire collaboration has 468 elements, 3 Alpha’s, and 160 Papers. Tagger size is $3. Full size is $10 or free with an $8. This is one sweet deal the store is having and I would highly recommend taking advantage of it. Each designer’s portion is gorgeous! For this tutorial I’m using the portion of Digicats (& Dogs). You can visit her blog here. Thank you Dianna for a beachy kit! Love it!


This tutorial was written assuming you have a working knowledge of PSP.

~♥~ Let’s get started ~♥~

Open up a 700 x 700 blank canvas.
Flood fill white.

Copy and paste Frame as a new layer.
Free rotate Left 5 degrees.
Click inside of it with your Magic Wand.
Selections/Modify/Expand by 4.
New Raster layer below the frame.
Copy and paste Paper 5 Into Selection.
Deselect.

Copy and paste Sand Dune as a new layer.
Resize 60%
Duplicate/Mirror
Move both dunes into position.
Give each a drop shadow.
Merge Visible both dunes.
Make your Eraser Tool active, hardness set to about 9 or so.
Erase alone the bottom edge of the dunes to give a sloppy faded look.

Add your embellishments. I used:
Starfish: Resize 60%
Grass: Resize 60% - position in front of the frame.
Grass again: Position behind the frame.
Summer Cutie: Resize 65%
Palm Tree - Position in front of the frame.
Palm Tree again: Mirror/Position behind the frame.
Bucket: Resize 25%/Free rotate Right 10 degrees
Seashell 2: Resize 25% and 40%

Highlight your white canvas.
New Raster layer.
Select All.
Copy and paste Paper 1 Into Selection.
Deselect.
Apply the mask.
Merge Group.
Duplicate

Copy and paste Sun as a new layer just above the mask layer.
Move into position near the top right corner of the mask layer.
Apply the mask.
Merge Group.
Duplicate/Merge Down.
Duplicate

Add your copyrights.

Add your name:
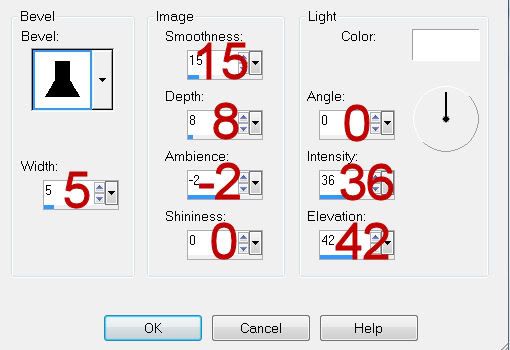
Give it a slight Inner Bevel:

Resize all layers 80%

I hope you enjoyed this tutorial.
I’d love to see your results and show it off in my gallery.
Email me!
Hugs,
Bev

Monday, April 25, 2011

Soul Keeper


Supplies

1 tube of choice and 1 image - I used the stunning artwork of Susan McKirvergan which can be purchased from Up Your Art. You must have a license to use.

Font of Choice - I used Pauls Esther here

Monti Circular mask here

“Damon” is a tagger size scrap kit created by Vella of Wench Designs and can be purchased from Stargazer Scraps. You can visit her blog here.
Thank you Vella for an awesome kit!

This tutorial was written assuming you have a working knowledge of PSP.

~♥~ Let’s get started ~♥~

Open a 700 x 700 blank canvas.
Flood fill white.

Copy and paste Frame 4 as a new layer.
Resize 60%
Move it up slightly on your canvas.
Click inside of it with your Magic Wand.
Selections/Modify/Expand by 6
New Raster layer below the frame.
Copy and paste Paper 12 Into Selection.
Deselect.

Copy and paste Frame 3 as a new layer.
Resize 75%
Click inside each square with your Magic Wand.
Selections/Modify/Expand by 4.
Copy and paste your image below the frame.
Move into position.
Selections/Invert
Tap the delete key.
Deselect.
Merge Visible the frame and image.
Position below the circle frame paper in your layers pallet.

Copy and paste your tube as a new layer.

Add your embellishments. I used:
Wings 1: Resize 70%
Butterfly 4: Resize 30%
Black Rose 1: Resize 25%/Free rotate right 80 degrees/Duplicate/Duplicate/Mirror
Duplicate the original rose/Resize 80%
Crow Feather 1: Resize 25% and 80%
Crow 1: Resize 25%

To get the same drop shadow effect on your tube and bird that I used:
Give it a drop shadow on its own layer.
Make your Pick Tool active and pull down on the shadow.

Highlight your white canvas.
New Raster layer.
Select All.
Copy and paste your image Into Selection.
Deselect.
Apply the mask.

Merge Group.

Add your copyrights.

Add your name:

In your Color Pallet:
Foreground: Black
Background: Null
Stroke: 2

Make your Ellipse Tool active set on circle.
Make a circle that’s slightly larger than the frame. If it’s too large you can always resize smaller.
Center it around the frame.

Color Pallet:
Foreground: #700505
Background: #363636
Stroke: 2

Move your curser along the circle until you see a Rocking A.
Click your mouse.
A text box will open.
Type your name.
Apply
In your layers pallet click on the plus sign.
Click on the eye of the New Ellipse layer.
Highlight Vector 1 layer.
Right click/Convert to Raster layer.

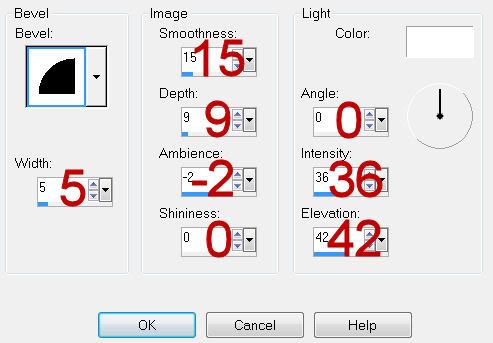
Give your name a slight Inner Bevel:


Resize all layers 80%

I hope you enjoyed this tutorial.
I’d love to see your results and show it off in my gallery.
Email me!
Hugs,
Bev