Tuesday, March 22, 2011

Magic of the Ocean


Clicking on the image will allow you to enlarge for bigger view.

Supplies

1 tube of choice - I used the artwork of Anna Marine which was purchased from CDO. You must use a license to use.
Font of Choice - I Brushtip-C here
Weescotlass Mask 249 here
“Seasons” is a massive collaboration put together by many many designers in the scrapping and tagging community to help with the devastation in New Zealand caused by the tragic earthquake. This collaboration is FTU after a donation of $10 USD to the Salavation Army of NZ is made. Please visit Taggers Together for New Zealand to read more on how these talented designers are helping with this cause and to make your donation. This portion of the collaboration was created by S.G. Rowe Designs. Please visit her blog here.

This tutorial was written assuming you have a working knowledge of PSP.

~♥~ Let’s get started ~♥~

Open up a 700 x 700 blank canvas.
Flood fill white,

Copy and paste Frame 2 as a new layer.
Free rotate Left 5 degrees
Click inside with your Magic Wand.
Selections/Modify/Expand by 4.
New Raster layer below the frame.
Copy and paste Paper 2 Into Selection.
Deselect.

Copy and paste your tube as a new layer.
Position in front of the frame.

Add your embellishments. I used:
Word art 1: Resize 70%
Flower 3: Duplicate
Flower 1: Resize 50%
Flower 2: Resize 40%
Deco 2: Free rotate Left 30 degrees
Shell 1: Resize 50%
Shell 3: Free rotate Right 70 degrees

Add your copyrights.

Add your name.
Foreground: Black
Background: Patten/Paper 1
Stroke: 1
Type your name.
Convert to Raster layer.
Select All/Float/Defloat
Selections/Modify/Contract by 1
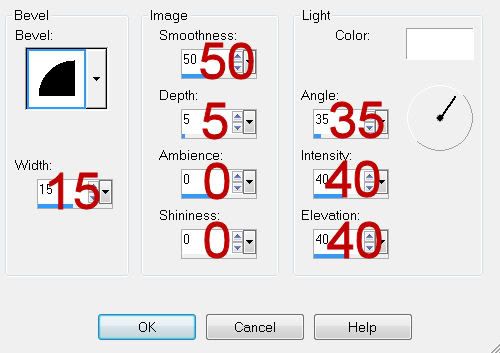
Give it a slight Inner bevel:

Apply DSB Flux - Bright Noise:
Intensity: 37
Mix checked
OK
Deselect.

Resize all layers 80%.

I hope you enjoyed this tutorial.
I’d love to see your results and show it off in my gallery.
Email me!
Hugs,
Bev

Sunday, March 20, 2011

My Funny Bunny

Clicking on the image will allow you to enlarge for bigger view.

Supplies

1 tube of choice - I used the artwork of Elias Chatzoudis which can now be purchased from PSP Tubes Emporium. You must obtain a license to use.
Font of Choice - I used Waterfalls here
Weescotlass Mask 297 here
Eyecandy 3.1 - Glow
Brush Strokes - Sprayed Strokes
“My Funny Bunny” is a TS scrap kit created by Pixie of KissedbyPix Designs and can be purchased from her store TKO Scraps. You can visit her blog here.
Thank you Pixie for such a precious Easter kit!

This tutorial was written assuming you have a working knowledge of PSP.

~♥~ Let’s get started ~♥~

Open up a 700 x 700 blank canvas.
Flood fill white.

Copy and paste Bead Frame 1 as a new layer.
Resize 80%
Rename Frame 1

Copy and paste Bead Frame 2 as a new layer.
Resize 60%
Rename Frame 2

Paste Bead Frame 2 again.
Resize 40%
Rename Frame 3

Move all 3 frames into position.
See my tag for reference.

Highlight Frame 1 layer.
Click inside of it with your Magic Wand.
Selections/Modify/Expand by 3.
New Raster layer below the frame.
Copy and paste Soft Paper 3 Into Selection.
Deselect.

Highlight Frame 2 layer.
Click inside of it with your Magic Wand.
Selections/Modify/Expand by 2.
New Raster layer below the frame.
Copy and paste Soft Paper 1 Into Selection.
Deselect.

Highlight Frame 3 layer.
Repeat the above step.

Copy and paste your tube as a new layer.
Position it in front of Frame 1.
Duplicate/Resize much larger.
Move below Frame 1
Change the Properties to Soft Light.
Position the tube where you want it.
Highlight the paper layer.
Click anywhere outside of it with your Magic Wand.
Highlight the duplicated tube layer.
Tap the delete key.
Deselect.

If you’re using the same tube as I did repeat the above step using the rabbit tube layer, positioning it in front of Frame 2.

If you didn’t -
Copy and paste Bunny 1 as a new layer.
Resize 50%
Repeat the above step.

Make your Selection Tool active set on Rectangle.
Highlight your white background.
New Raster layer.
Make a rectangle approximately 675 x 350 - it’s alright if it’s not centered at this time.
Copy and paste Soft Paper 4 Into Selection.
Deselect.
Apply Eyecandy 3.1 - Glow:
Width: 3
Opacity: 100
Opacity DropOff: Fat
Color: White
OK
Center the rectangle on your canvas.

New Raster layer.
Using your Selection Tool make another rectangle approximated 225 x 550.
Copy and paste Soft Paper 2 Into Selection.
Deselect.
Apply the same Glow effect.
Move into position behind the two smaller frames - see my tag for reference.

Copy and paste Band 4 as a new layer.
Resize 80%
Free rotate Left 90 degrees.
Move into position over the smaller rectangle - see my tag for reference.
Use your Pick Tool to pull it so that it fits exact within the rectangle, but not overlapping the glow the rectangle.
Duplicate - use your arrow key on your keyboard to move to the side.

Add your embellishments. I used:
Flutter 1 & 2: Resize 25% and 80%/Free rotate 25 degrees
Floppy Bow 3: Resize 25%
Pearls 7: Duplicate/Erase the center where both layers overlap
Egg Pile: Resize 30%
Flower Garland 2: Resize 60%
Doodles 7: Resize 60%/Duplicate/Mirror

Highlight your white background.
New Raster layer.
Select All.
Copy and paste Watercolor Paper 2 Into Selection.
Deselect.
Apply Brush Strokes - Sprayed Strokes:
Stroke Length: 12
Spray Radius: 12
Stroke Direction: Right Diag
Apply the mask.
Merge Group.

Add your copyrights.

Add your name.
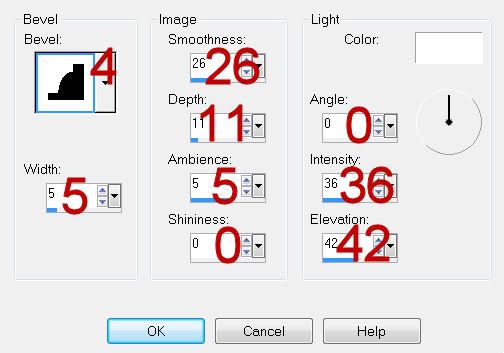
Give it a slight Inner Bevel:


Resize all layers 80%.

I hope you enjoyed this tutorial.
I’d love to see your results and show it off in my gallery.
Email me!
Hugs,
Bev