Monday, October 11, 2010

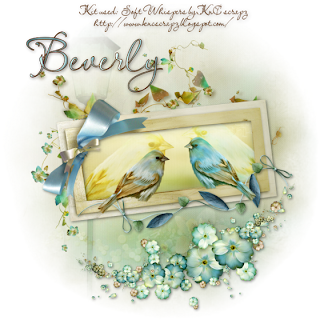
Soft Whispers

Clicking on the image will allow you enlarge for bigger view.

Supplies

Font of Choice - I used LavishlyYoursROB
Monti Circular Mask here
“Soft Whispers” is a PTU scrap kit available in both tagger and full size created by Kesha of KnC Designz and can be purchased from her store Lollipops n Gumdrops. You can visit her blog here.
Thank you Kesha, this kit was simply beautiful with such a fitting name!

This tutorial was written assuming you have a working knowledge of PSP.

~♥~ Let’s get started ~♥~

Open up a 700 x 700 blank canvas.
Flood fill white.

Copy and paste Frame as a new layer.
Click inside the frame with your Magic Wand.
New Raster layer below the frame.
Selections/Modify/Expand by 6.
Copy and paste a paper of choice Into Selection.
Deselect for now.

Copy and paste Bird as a new layer.
Resize 65%
Move beneath the frame in your layers pallet.

Copy and paste Bird 2 as a new layer.
Resize 65%
Move beneath the frame in your layers pallet.

Move both bird into exact position.
Highlight the paper layer.
Us your Magic Wand and click anywhere outside of the paper.
Highlight each of the bird layers and tap the delete key.
Deselect.
Merge Visible both bird layers.
Change the Properties to Soft Light
Close out your white background.
Merge Visible.
Reopen your white background.

Add your embellishments. I used:
Bird: Resize 35%
Bird 2: Resize 25%/Mirror
Leaf String: Resize 40%/Mirror
Branch: Resize 70%
Flower Swag: Resize 70%/Mirror

Highlight the white background.
New Raster layer.
Select All
Copy and paste a paper of choice Into Selection.
Deselect.
Apply the mask.
Merge Group.

Copy and paste Light Post as a new layer above the mask.
Resize 80%
Move it into exact position.
Apply the mask.
Merge Group.
Lower the Opacity to about 30 or so.

Copy and paste Stars as a new layer.
Resize 70%

Add your credits - if you only used the scrap kit to create your tag it would be super appreciated if you’d give credit to the kit designer.

Add your name.

Resize all layers 80%.

I hope you enjoyed this tutorial.
I’d love to see your results and show it off in my gallery.
Email me!
Hugs,
Bev

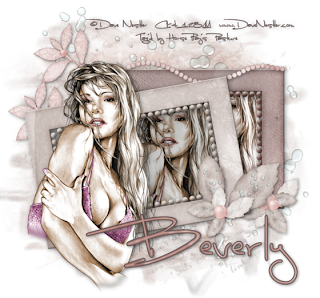
November Dreams

Clicking on the image will allow you to enlarge for bigger view.

Supplies

1 tube of your choice - I used the artwork of Dave Nestler and can be purchased from CILM.
Font of Choice - I used Luna Bar here
Gem Mask 103 here
“November Dreams” is a PTU Full size scrap kit created by Annette of AW Designs and can be purchased from Heartbeatz Creationz. You can visit her blog here.
Thank you Annette for such a sweet kit!

This tutorial was written assuming you have a working knowledge of PSP.

~♥~ Let’s get started ~♥~

Open up a 700 x 700 blank canvas.
Flood fill white.

Copy and paste Frame 2 as a new layer.
Resize 30%
Click inside the frame with your Magic Wand.
New Raster layer below the frame.
Selections/Modify/Expand by 6.
Copy and paste a paper of choice Into Selection.
Copy and paste your tube as a new layer below the frame - position it to the right in the frame.
Selections/Invert
Tap the delete key.
Deselect.
Change the Properties to Luminance.

Close out your white background.
Merge Visible.
Reopen your white background.

Copy and paste Frame 1 again as a new layer.
Resize 30%
Free rotate left 10 degrees.
Click inside the frame with your Magic Wand.
New Raster layer below the frame.
Selections/Modify/Expand by 6.
Copy and paste a paper of choice Into Selection.
Deselect.

Copy and paste your tube as a new layer.
Duplicate/Move it into position below the frame in your layers pallet - see my tag for reference.
Highlight the paper layer.
Use your Magic Wand and click anywhere outside of the paper.
Highlight the tube layer.
Tap the delete key.
Deselect.
Change the Properties to Multiply.

Close out your white background, merged layer, and the tube layer that‘s above your frame.
Merge Visible.
Reopen all layers and move both merged layers into position - see my tag for reference.

Add your embellishments. I used:
Band 1: Resize 25% & 70%
Drops 1: Resize 25% and 70%
Leave 7: Resize 25%
Leave 6: Resize 25% and 70%
Leave 4: Resize 25% and 70%/Free rotate right 35 degrees
Leave 5: Resize 25% and 60%
Kettle: Resize 25% and 50%/Free rotate left 60 degrees

Highlight the white background.
New Raster layer.
Select All
Copy and paste a paper of choice Into Selection.
Deselect.
Apply the mask.
Merge Group.

Add your credits.

Add your name.
Choose your foreground and background colors.
Stroke set at 2.
Add your name.
Convert to Raster layer.
Select All/Float/Defloat
Selections/Modify/Contract by 2
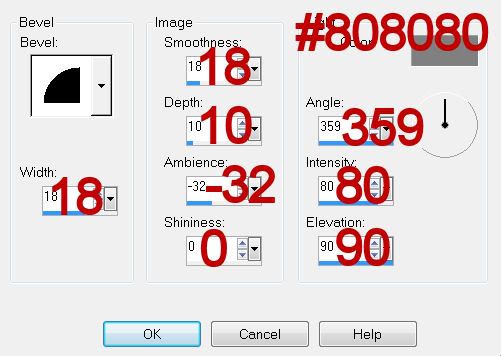
Give it an inner bevel:


Deselect.

Resize all layers 80%.

I hope you enjoyed this tutorial.
I’d love to see your results and show it off in my gallery.
Email me!
Hugs,
Bev