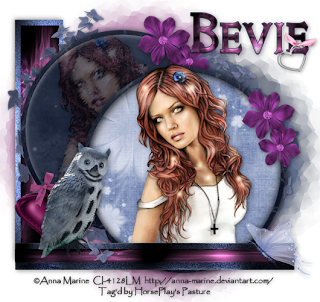
Clicking on the image will allow you to enlarge for bigger view.
Supplies
1 tube of choice - I’m using the artwork of Anna Marine at
CILMFont of Choice - I’m using Knight’s Quest
hereScrap Rebellion Template 30
hereGreg’s Factory Output Vol. II - Pool Shadow
Brush Strokes
“It‘s a Kind of Magic” is a tagger size scrap kit and part of a collaboration and was created by Jay of Bello Scarto. The collaboration can be purchased at
Heartbeatz Creationz. You can visit Jay’s blog
here.
This collaboration is sure to please with no disappointments...it's beautiful!
Thank you Jay for your portion - just gorgeous!
This tutorial was written assuming you have a working knowledge of PSP.
~♥~ Let’s get started ~♥~
Open up the template.
Shift +D.
Close out the original.
Delete the top 2 layers.
Image/Canvas Size
700 X 500
Flood fill the background layer white.
Highlight Blue Rectangle layer.
Use your Target Tool and change the color of it to dark blue.
(I used a blue shade from one of the papers)
Highlight Purple Thick Rec layer.
Click on it with your Magic Wand.
New Raster layer
Copy and paste Paper 5 Into Selection.
Deselect.
Apply Greg’s Factory Output Vol. II - Pool Shadow:
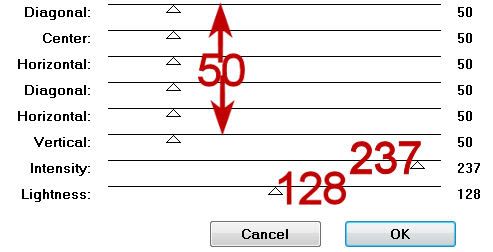
Apply the pool shadow effect again.
Delete the template layer.
Highlight Purp Circle layer.
Click on it with your Magic Wand.
New Raster layer.
Copy and paste Paper 12 Into Selection.
Copy and paste your tube as a new layer above the paper.
Selections/Invert
Tap the delete key.
Deselect.
Apply Brush Strokes:
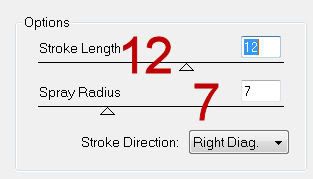
Change the Properties to Soft Light.
Highlight Frame layer.
Click on it with your Magic Wand.
New Raster layer.
Copy and paste Paper 11 Into Selection.
Deselect.
Delete the template layer.
Give it a slight Inner bevel:
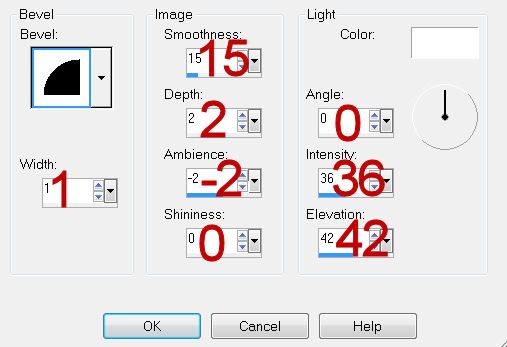
Give it a Drop Shadow with the color white and be Shadow on new layer is checked.
Use your Eraser Tool and erase the shadow on the outside of the frame.
Highlight the frame layer again.
Give it a drop shadow using the color black.
Use your Eraser Tool and erase along the inside of the frame.
Highlight Blue Circle layer.
Click on it with your Magic Wand.
New Raster layer.
Copy and paste Paper 3 Into Selection.
Deselect.
Copy and paste your tube as a new layer.
Highlight Frame 2 layer.
Repeat the same step used for Frame 1.
Highlight White Rectangle layer.
Click on it with your Magic Wand.
New Raster layer.
Copy and paste Paper 12 Into Selection.
Apply the Pool Shadow effect:
Same settings.
Delete the template layer.
Highlight Purp Rectangle layer.
Repeat the above step.
Highlight the Shower Door layer.
Make your Target Tool active -
Change the Pink portion of the layer to a purple color used in the kit.
Change the blue portion of the layer to a blue color used from the kit.
Duplicate and move it down a bit so it stick out from the lower portion of your tag.
Add your embellishments. I used:
Element 26 - duplicate as many times as you like
Element 21: Resize 50%
Element 28: Resize 75%
Element 9: Resize 25%
Element 16: Resize 30%
Element 15: Resize 30%
Add your copyrights.
Add your name.
Once you've changed it to a Raster layer:
Select All/Float/Defloat
Selections/Modify/Contract by 1
Apply the Pool Shadow Effect.
Give it a slight inner bevel 3 times.
Deselect.
Resize all layers 80%
I hope you enjoyed this tutorial.
I’d love to see your results and show it off in my gallery.
Email me!
Hugs,
Bev


