Wednesday, July 14, 2010

Seductive Nights

Clicking on the image will enlarge to full view.

Supplies
1 tube of choice - I’m using Summer Beauty - the artwork of KatNKDA which you can purchase here
Font of Choice - I’m using New York Deco Condensed - so sorry I can’t find a link
Weescotlass Mask 161 here
“Angel Dust” is a PTU art kit created by KatNKDA. It can be downloaded from her store NK Art Shop. You can visit Kat’s blog here.
Thank you Kat…this kit is amazing with endless possibilities!

This tutorial was written assuming you have a working knowledge of PSP.

~♥~ Let’s get started ~♥~

Open up a transparent 700 X 700 canvas.
Flood Fill white.

Copy and paste Element 5 as a new layer.
Resize 25%
Click inside with your Magic Wand.
Selections/Modify/Expand by 6
New Raster layer below the frame.
Copy and paste Paper 24 Into Selection.
Deselect.

Copy and paste Element 9as a new layer.
Resize 25% and 50%
Free rotate right 45 Degrees
Duplicate
Move both frames into position - see my tag for reference.

Highlight the top frame.
Click inside with your Magic Wand.
Selections/Modify/Expand by 3.
New Raster layer below the frame.
Copy and paste Paper 19 Into Selection.
Copy and paste your tube as a new layer - resize as needed.
Selections/Invert
Tap the delete key.
Copy and paste Element 10 as a new layer below your tube.
Resize 40%
Move into position.
Tap the delete key.
Deselect.

Repeat the above steps with the bottom frame using a different tube.

Add your embellishments. I used:
Element 19: Resize 25% and 50% Free rotate left 65 degrees/Mirror/Flip
Element 3: Resize 25%
Element 4: Resize 25% and 80%
Element 28: Resize 25%
Element 46: Resize 35%
Element 47: Resize 35% and 80%
Elements 49 & 51: Resize 25% and 60%
Element 56: Resize 25% and 40%

Highlight your white background.
New Raster layer.
Select All.
Copy and paste Paper 5 Into Selection.
Deselect.
Apply the mask.
Resize 125%
Merge Group.

Add your copyrights.

Add your name.
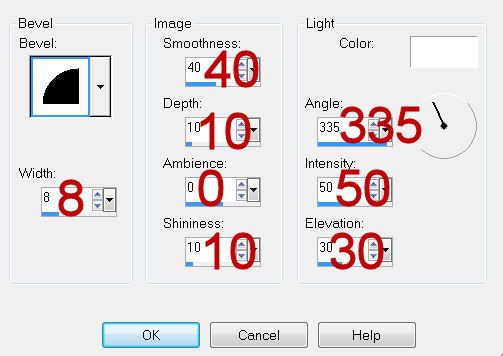
Give it a slight inner bevel:

I hope you enjoyed this tutorial.
I’d love to see your results and show it off in my gallery.
Email me!
Hugs,
Bev

Tuesday, July 13, 2010

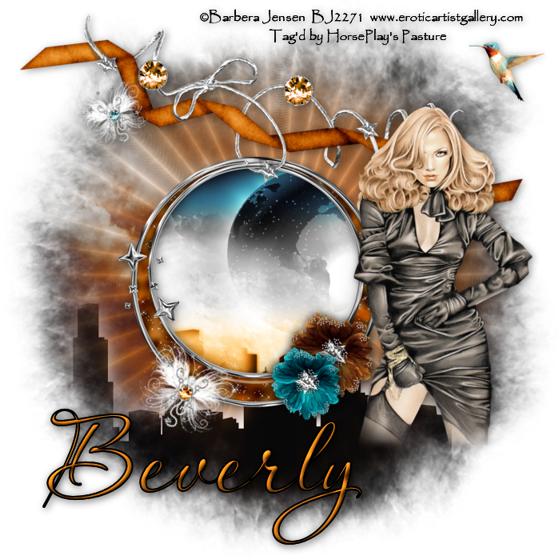
Into the City Night

I appologize - the tube used in the above image is no longer available for new sales.
I have used an alternative tube that I think works just as well below:


Supplies
1 tube of choice - In the top image I used Esmeralda - the artwork of KatNKDA which is no longer available. In the bottom image I used the beautiful artwork of Barbera Jensen which can be purchased here
Font of Choice - I’m using Aquarelle here
Vab’s Mask 111 here
“Angel Dust” is a PTU art kit created by KatNKDA. It can be downloaded from her store NK Art Shop. You can visit Kat’s blog here.
Thank you Kat for another beauty packed kit!

This tutorial was written assuming you have a working knowledge of PSP.

~♥~ Let’s get started ~♥~

Open up a transparent 700 X 700 canvas.
Flood Fill white.
Copy and paste Element 20 as a new layer.
Resize 25% and 60%
Move into position toward the top of your canvas.

Copy and paste Element 47 as a new layer.
Resize 35%
Mirror
Free rotate right 15 degrees
Move into position over Element 20
Duplicate
In your layers pallet move the duplicate below Element 47.
Highlight the top ribbon layer and use your Magic Eraser to erase parts of the ribbon to give the effect as if Element 20 is wrapped around it.

Close out your white background layer.
Merge Visible.
Reopen your white background layer.

Copy and paste Element 7 as a new layer.
Resize 25% and 60%
Move it into position so that it looks as if it’s hanging from Element 47.
See my tag for reference.
Duplicate and move the layer above your merged layer.
Highlight the original and click inside of it with your Magic Wand.
Selections/Modify/Expand by 6.
New Raster layer below the original.
Copy and paste Paper 24 Into Selection.
Deselect.
Highlight the Copy of Element 7 layer.
Use your Eraser tool to erase the part of the frame so that it looks as if the frame is hung from the merged layer.

Close out your white background.
Merge Visible.
Reopen your white background.

Copy and paste your tube as a new layer.
If you’re using the same tube I did then resize 45%

Add your embellishments. I used:
Element 4: Resize 25% and 60%
Element 3: Resize 25% and 50%
Element 27: Resize 25% and 40%/Free rotate right 25 degrees
Element 26: Resize 25% and 30% Free rotate left 25 degrees
Element 56: Resize 25% and 25%

Highlight your white background.
New Raster layer.
Select All.
Copy and paste a paper of choice Into Selection.
Deselect.
Apply the mask.
Merge Group.

Copy and paste Element 10 as a new layer.
Resize 40%
Move into position near the bottom of your mask.
Apply the mask.
Merge Group.
Select All/Float/Defloat
Selections/Modify/Feather
Number of Pixels:
30
OKSelections/Invert
Tap the delete key until the bottom of the element blends nicely with the mask layer.
Deselect.

Add your copyrights.

Add your name.
Give it a slight inner bevel:


I hope you enjoyed this tutorial.
I’d love to see your results and show it off in my gallery.
Email me!
Hugs,
Bev