Wednesday, June 16, 2010

Bella's Lullaby

Clicking on the image will enlarge to full view.

Supplies
Font of Choice - I used Caligraf W here
Gem’s Mask 166 here
“Bella’s Lullaby” is a FTU scrap kit created by Scraps with Attitude and can be downloaded here.
Please leave a thank you when downloading as it’s a small gesture for hard work given freely.
This tutorial was written assuming you have a working knowledge of PSP.

~♥~ Let’s get started ~♥~

Open up a 700 X 700 blank canvas.
Flood fill white.

Copy and paste Frame 1 as a new layer.
Resize 50%
Free rotate right 85 degrees.

Click inside of it with your Magic Wand.
Selections/Modify/Expand by 6.
New Raster layer below the frame.
Copy and paste a paper of choice Into Selection.
Deselect.

Copy and paste Ray of Light as a new layer.
Resize 50%Free rotate left 5 degrees
In your layers pallet move it just above the paper and position it in the upper left corner of the frame.

Copy and paste Silhouette Couple 1 as a new layer.
Resize 35%
Move into position below the frame.

Add your embellishments. I used:
Candle 1: Resize 60%
Round Notes: Resize 50%
Rose: Resize 35% Free rotate left 80 degrees Duplicate
Black Rose: Resize 25% Mirror Free rotate left 70 degrees
Branch 1: Resize 60%
Heart 1: Resize 25% Duplicate/Resize 70%
Render 1: Resize 40% Mirror/Duplicate

Crop your image.

Highlight your white background.
New Raster layer.
Select All.
Copy and paste a paper of choice Into Selection.
Deselect.
Apply the mask.
Merge Group.

Copy and paste Piano as a new layer above the mask layer.
Resize 80%
Apply the mask.
Merge Group.
Lower the Opacity to about 53 or so.

Add your copyrights.

Resize all layers 85%.

I hope you enjoyed this tutorial.
I’d love to see your results and show it off in my gallery.
Email me!
Hugs,
Bev


Believe


Clicking on the image will enlarge to full view.

Supplies
1 tube and 1 Image of choice - I used the wonderful artwork of Rachael Tallamy at Up Your Art
Font of Choice - I used Angelo DB here
Gem Mask 164 here
Divine Intentionz Template 323 here
“Believe” is a FTU scrap kit created by Karla Scrapz and can be downloaded from here.
Please leave a thank you when downloading as it’s a small gesture for hard work given freely.
This tutorial was written assuming you have a working knowledge of PSP.

~♥~ Let’s get started ~♥~

Open up the template.
Shift + D
Close out the original.
Image/Canvas Size
700 X 600
OK
Open up the background layer and flood fill white.
Delete the following layers:
Raster 1, Heart 4, Heart 3, I will steal your mans heart, Heart 2, Heart 1, and Rectangle 5.

Highlight Circle 1 layer.
Use your Magic Wand and click on it.
New Raster layer.
Copy and paste a paper of choice Into Selection.
Deselect.
Delete the template layer.

Highlight Rectangle 1 layer.
Repeat the above step using the same paper.

Highlight Rectangle 1 layer.
Repeat the above step accept use a different paper.

Highlight Rectangle 3 layer.
Repeat the above step using a different paper.

Highlight Rectangle 4 layer.
Repeat the above step using the same paper.

Highlight Circle 2 layer.
Use your Magic Wand and click on it.
New Raster layer.
Copy and paste your Image Into Selection.
Deselect.
Delete the template layer.

Copy and paste your tube as a new layer.
Move into position.

Copy and paste Believe 16 as a new layer.
Resize 25%, 25%, and 80%
Free rotate left 20 degrees.
Position it over Med Heart 2 layer.
Delete the template layer.

If you want to cover Med Heart 1 layer then duplicate your heart element and move into position.
Delete Med Heart 1 template layer.

Copy and paste Believe 6 as a new layer.
Resize 25% and 25%
In your layers pallete move it just below the circle and position it over the left side of the smaller rectangle - see my tag for reference.
Duplicate/Mirror

Add your embellishments. I used:
Believe 26 & 28: Resize 25% and 35%
Believe 29: Resize 25% and 50%
Believe 11: Resize 25%
Believe 9: Resize 25% and 45%
  
Highlight your white background.
New Raster layer.
Select All.
Copy and paste a paper of choice Into Selection.
Deselect.
Apply the mask.
Resize 110%
Merge Group.

Add your copyrights.

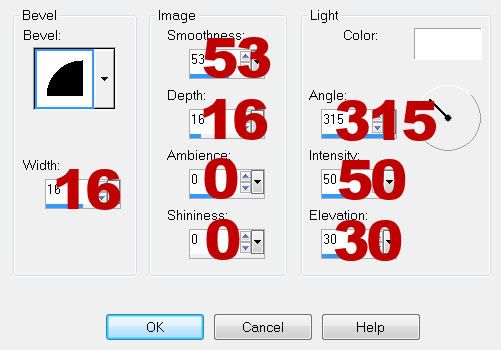
Add your name and give it an inner bevel:


Resize all layers 80%.

I hope you enjoyed this tutorial.
I’d love to see your results and show it off in my gallery.
Email me!
Hugs,
Bev