Sunday, October 18, 2009

Autumn Dreams

Clicking on the image will enlarge to full view.

Supplies
1 tube of choice - I used the wonderful artwork of PinUpToons which can be purchased here.
Font of Choice - I used Felt here
Weescotlass Mask 223 here
“Autumn Dream” is a PTU tagger size scrap kit created by Amanda of Bastelgalaxy and can be purchased from Twilight Scraps. You can visit her blog here.
Thank you Amanda for a truly amazing kit!

This tutorial was written assuming you have a working knowledge of PSP.

~♥~ Let’s get started ~♥~

Open up a transparent 700 X 700 image.
Flood fill white.

Copy and paste Heart Frame 3 as a new layer.
Use your Magic Wand and click inside the frame.
Selections/Modify/Expand by 6.
Copy and paste a paper of choice below the frame.
Selections/Invert
Tap the delete key.
Deselect.

Copy and paste your tube as a new layer.

Add your embellishments. I used:
Flower 11: Resize 50%
Flower 12: Resize 45%
Ornament 3
Doodle 3. Duplicate/Mirror/Flip
Butterfly 8: Resize 50%
Butterfly 9: Resize 40%
Bow 14: Resize 80%

Highlight your white canvas.
New Raster Layer.
Select All.
Copy and paste a paper of choice Into Selection.
Deselect.
Apply the mask.
Merge Group.
I moved my mask into a little bit better position behind the tag.

Add your copyrights.

Add your name.
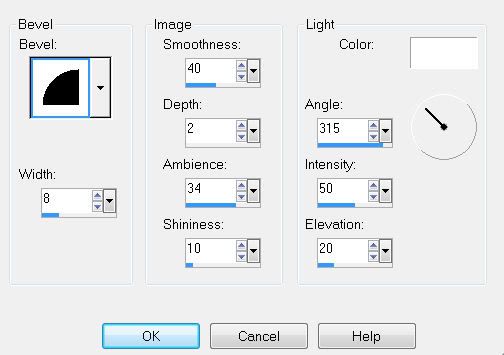
I gave mine a slight inner bevel:


Resize all layers 80%.

I hope you enjoyed this tutorial.
I’d love to see your results.
Email me!
Hugs,
Bev

Gothic Attitude

Clicking on the image will enlarge to full view.

Supplies
1 tube of choice - I used the wonderful artwork of PinUpToons which can be purchased here.
Font of Choice - I used Burton’s Nightmare here
Weescotlass Mask 297 here
Divine Intentions Template 179 here
“For the Love of Goth” is a PTU tagger size scrap kit created by Julie of Bits ’n Bobs and can be purchased at AMI. You can visit her blog here.
Thank you Julie for such an amazing kit!

This tutorial was written assuming you have a working knowledge of PSP.

~♥~ Let’s get started ~♥~

Open up the template.
Shift + D.
Close out the original.
Delete the credit layer.

Highlight Rectangle 1 layer.
Select All/Float/Defloat
New Raster layer.
Copy and paste a paper of choice Into Selection
Deselect.
Delete the template layer.
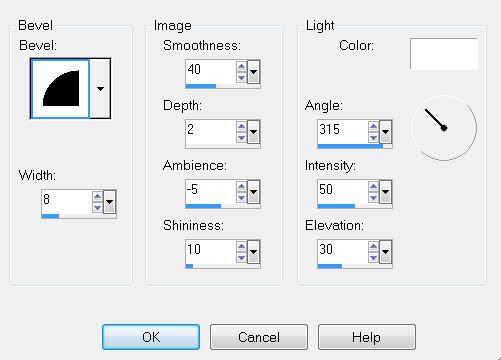
Give it a slight inner bevel:


Highlight Rectangle 2.
Repeat the above step using the same paper.

Highlight Rec Rac layer.
Select All/Float/Defloat
Copy and paste a paper of choice as a new layer.
Selections/Invert
Tap the delete key.
Deselect.
Delete the template layer.
Give it the same slight inner bevel.

Highlight the Circle layer.
Repeat the above step.

Use your Magic Wand and click inside the frame.
Selections/Modify/Expand by 6.
New Raster Layer below the frame.
Flood fill with a gradient of your choice.
DO NOT DESELECT

Copy and paste your tube below the frame.
Resize as needed.
Selections/Invert
Tap the delete key.
Change the Properties to Soft Light
DO NOT DESELECT

Copy and paste Element 8 as a new layer below your tube layer.
Tap the delete key.
Deselect.
Highlight the tube layer.
Select All/Float/Defloat
Highlight Element 8 layer.
Tap the delete key.
Deselect.

Copy and paste your tube as a new layer.

Add your embellishments. I used:
Element 20: Resize 50%
Element 54: Resize 50% Free rotate left 75 degrees
Element 25: Resize 50%
Element 27: Resize 45%
Element 13: Resize 40%
Element 12: Resize 25%

Highlight your white canvas.
New Raster Layer.
Select All.
Copy and paste a paper of choice Into Selection.
Deselect.
Apply the mask.
Merge Group.
Use your Pick Tool and pull the sides out slightly.

Add your copyrights.

Add your name.

Resize all layers 95%.

I hope you enjoyed this tutorial.
I’d love to see your results and show it off in my Show Arena.
Email me!
Hugs,
Bev