Sunday, October 16, 2016

Dance of Autumn

Supplies Needed

1 tube of choice – I used the artwork of Janna Prosvirina which can be purchased from Digital Art Heaven.

Font of choice – I used October Quotes here

Vix mask 451 here

“Dance of Autumn” is an Exclusive tagger size scrap kit created by me, Bev of HorsePlay’s Pasture and can be purchased only from Digital Art Heaven.  You can visit my blog here. 
  
This tutorial was written assuming you have a working knowledge of PSP. 

~~ Let’s get started ~~

Open up a 700 x 700 blank canvas.
Flood fill white.

Copy and paste EL 1 as a new layer.
Free rotate Left 90 degrees.
Resize 60%
Click inside of it with your Magic Wand.
Selections/Modify/Expand by 4.
New Raster layer below the frame.
Copy and paste Paper 5 Into Selection.
Deselect.
Give the frame a drop shadow.

Close out your white background.
Merge Visible.
Reopen your white background.
Duplicate the merged layer.
We’ll come back to these in a little bit.

Copy and paste EL 5 as a new layer.
Resize 70%.
Leave this element exactly where it is.
Click inside of it with your Magic Wand.
Selections/Modify/Expand by 4.
New Raster layer below the frame.
Copy and paste Paper 15 Into Selection.
Deselect.

Close out your white background and both merged layers.
Merge Visible.
Reopen all layers.
Move both rectangular merged layers into position beneath the round merged layer – see my tag for reference.

Copy and paste Paper 10 as a new layer.
Resize 25%.
Leave this exactly where it is.
Duplicate 2x’s for a total of 3 little brown square layers.
Move a square to the left and another to the right of the center square.

To each of the brown squares:
Highlight the square layer.
Click anywhere outside of it with your Magic Wand.
Selections/Invert
Selections/Modify/Contract by 5.
OK
New layer above the square.
Copy and paste Paper 5 Into Selection.
Deselect.

Copy and paste your tube as a new layer.
Move it into position in front of the center squares – see my tag for reference.

Duplicate your tube and move it into a position you like in front of the right square.
Change the Properties to Overlay
Duplicate/Mirror so the tube is now over the left square as well.
(Your tubes overhang the squares – we will clean that up in a bit.)
Copy and paste EL32 as a new layer.
Resize 40%
Move into position beside the tube on the left – see my tag for reference.
Change the Properties of this element to Burn and lower the Opacity to about 38.
You can see the chicken wire through the tube so we’ll fix that by highlighting the tube layer.
Click anywhere outside of it with your Magic Wand.
Selections/Invert
Highlight the chicken wire layer.
Tap the delete key.
Deselect.
Duplicate the chicken wire layer.
Mirror.

To clean up both left and right squares:
Highlight the paper layer that’s over the brown paper layer.
Click anywhere outside of it with your Magic Wand.
Highlight the tube layer.
Tap the delete key.
Highlight the chicken wire layer.
Tap the delete key.
Deselect.

Copy and paste EL 44
Resize 15%
Move to sit in the bottom left corner of the left square – see my tag for reference.
Duplicate/Free rotate Left 90 degrees and move into position to form an “L” at the bottom left corner of the square – see my tag for reference.
Merge Down.
Duplicate
Mirror
Flip
Move into position at the top right of the right square.

Add your elements.  I used:
EL 17:  Duplicate/Mirror
EL 48:  Resize 65%/Duplicate/Mirror
EL15:  Resize 45%
EL 34:  Resize 40%
EL 36:  Resize 15%/Duplicate as many times as you like
EL 18:  Resize 30%

Highlight your white background.
New Raster layer.
Select All.
Copy and Paste Paper 4 Into Selection.
Deselect.
Apply the mask.
Merge Group.

Add your copyrights.

Add your name.
Color Pallet:
Foreground: #5a3309
Background: #411105

Make your Text Tool active.
Set stroke width to 1.0
Type your name.
Give it a slight Inner Bevel:

I hope you enjoyed this tutorial.   
I’d love to see your results.
Email me!
Hugs,
Bev


Friday, October 7, 2016

Dark Halloween


Supplies Needed

1 tube of choice – I used the artwork of Janna Prosvirina which can be purchased from Digital Art Heaven.  You must have a license to use.

Font of choice – I used Keep It Simple Sally here

Becky Mask 22 here

Plug Ins used:
Brush Strokes – Crosshatch

“Dark Halloween” is a FTU tagger size scrap kit created by me, Bev, HorsePlay’s Pasture Designs and can be downloaded from my blog here.

This tutorial was written assuming you have working knowledge of PSP. 

~~ Let’s get started ~~

Open up a 700 x 700 blank canvas.
Flood fill white.

Make your Selection Tool active set on Rectangle.
Create a rectangle that’s 250 pixels wide x 600 pixels long.
New Raster layer.
Copy and paste Paper 3 Into Selection.
New Raster layer.
Copy and paste Paper 4 Into Selection.
Deselect.

To each paper layer apply Brush Strokes – Cross Hatch:
Use Default Settings
OK

Move each paper layer into position at the left side of your canvas –
See my tag for reference.

Copy and paste EL3 as a new layer.
Resize 60%
Duplicate
Move both frames into exact position – see my tag for reference.

To each frame:
Click inside of it with your Magic Wand.
Selections/Modify/Expand by 2.
New Raster layer below the frame.
Copy and paste Paper 4 Into Selection.
Deselect.

Copy and paste your tube as a new layer.
Move it into exact position in front of the lower frame.
Highlight the paper layer that’s below the frame.
Click anywhere outside of it with your Magic Wand.
Selection/Invert
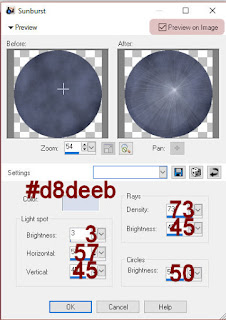
Effects/Illumination Effects/Sunburst
Be sure the little box next to “Preview on Image” is checked.
Using your mouse, move the + sign that’s in the “before” box to move the light beams where you want them to illuminate behind your tube.

Click OK.
Deselect.

Copy and paste your tube again and move into position below the upper frame.
Change the Properties of the tube to Soft Light and lower the Opacity to about 69.
Highlight the paper layer.
Click anywhere outside of it with your Magic Wand.
Selections/Invert
Highlight the tube layer.
Tap the delete key.
Do Not Deselect.
Duplicate the paper layer.
Highlight the paper layer that’s just below the tube in your layers pallet.
Effects/Illumination Effects/Sunburst:
Apply the sunburst effect like you did before (You will see the light beams thru the tube and that’s OK!  We’ll fix that in a bit).  This time you’ll need to lower each of the Brightness numbers so that the light isn’t quite so bright.
Click OK.  
Deselect.
Highlight the tube layer.
Click anywhere outside of it with your Magic Wand.
Selections/Invert
Selections/Modify/Contract by 2.
OK
Highlight the paper with the light beams and tap the delete key.
Deselect.
The light beams that you saw through your tube should now be gone. 

Add your elements.  I used:
EL 29:  Resize 15%/Duplicate enough times to go on each corner of the rectangle papers.
EL 25
EL 10
EL 11
EL 18: Duplicate
EL 26
EL 27
EL 43:  Resize 80%
EL 16:  Resize 80%
EL 15:  Resize 80% and 70%/Mirror

Highlight your white background.
New Raster layer.
Select All.
Copy and paste Paper 9 Into Selection.
Deselect.
Apply the mask.
Resize 105%
Merge Group.

Add your credit.

Add your name:
Foreground and Background: #000000
Type your name.
Convert to Raster layer.
Select All/Float/Defloat
New Raster layer below your name.
Flood fill with #efefef
Adjust/Add Remove Nosie/Add Noise:
Uniform and Monochrome checked
Nosie: 50%
OK
  
I’d love to see your results.
Email me!
Hugs,
Bev


Monday, September 26, 2016

Happy Autumn

Supplies Needed

1 tube of choice – I used the adorable artwork of Sally Gilroy which can be purchased from CDO here.  Better hurry, she’s retiring at the end of the month and has a sale going on right now!

Font of choice – I used Atelier du Machiniste here

“Autumn Sunset” is now a FTU tagger size scrap kit created by me, HorsePlay’s Pasture Designs and can be downloaded from my blog here. 
  
This tutorial was written assuming you have working knowledge of PSP. 

~~ Let’s get started ~~

Open up a 700 x 700 canvas.
Flood fill white.

Copy and paste the following elements on your canvas –
Don’t worry about placement yet:
EL 49:  Resize 70%
EL 31:  Resize 50%/Free rotate Left 90 degrees/Duplicate
EL 28:  Resize 60%/Make your Pick Tool active and pull the top down so that the frame takes on a more square shape.

Move the wheel into position at the left side of your canvas – see my tag for reference.

Move the frame (that you squared up) so that it’s centered over the wheel.

Move both green frames into position just behind the square frame – see my tag for reference.

To each of the green frames:
Highlight the frame layer.
Click inside of the frame with your Magic Wand.
Selections/Modify/Expand by 2.
New Raster layer below the frame.
Copy and paste Paper 9 Into Selection.
Image/Flip
Deselect.

To the Square frame:
Highlight the frame layer.
Click inside of it with your Magic Wand.
Selections/Modify/Expand by 2.
New Raster layer below the frame.
Copy and paste Paper 9 Into Selection.
Copy and paste EL 6 as a new layer above the paper.
Move into position – see my tag for reference.
Selections/Invert
Tap the delete key.
Copy and paste EL 20 as a new layer just below the frame.
Resize 70%/Duplicate
Move both into position across the bottom of the frame – see my tag for reference.
Highlight each frame layer and tap the delete key.
Deselect.

Copy and paste your tube as a new layer.
See my tag for placement.

Add your elements.  I used:
EL 63:  Resize 90%
EL 17: Duplicate/Free rotate Left 30 degrees
EL 17 again:  Resize 90%/Mirror
EL 58
EL 59
EL 40:  Resize 80%
EL 13:  Resize 50%
El 80: Duplicate 2x’s for a total of 3
EL 78: Duplicate 3 x’s for a total of 4

Add your copyrights.

Add your name.
Color Pallet:
Foreground: #600c07
Background: #db9b2c
Stroke set on 1.0

Type your name.
Convert to Raster layer.
Give it a slight Inner Bevel:

Make your Freehand Selection Tool active and section off the bottom half of your name – make the marching ant line a little wavy.
Ctrl + H – to open up the Feather Selection Box:
Number of Pixels:
20
OK
Shift + B – to open up the Brightness/Contrast Box:

OK
Deselect.

I’d love to see your results.
Email me!
Hugs,
Bev