

Clicking on the image will let you see it in full view
Supplies Needed
4 tubes of choice – I'm using the artwork of Dean Yeagle
which you can purchase here
Font of choice - I'm using Tom Bombadill
Template Created by Jill #13 here
Becky Mask 22 here
"Sweet Spring" scrap kit by Scraps by Danielle which can be found at Dazzling Scraps. Please visit her blog here.
This kit is gorgeous and shouts spring without a doubt!
Thank you, Danielle for another beautiful kit.
This tutorial was written assuming you have working knowledge of PSP.
~♥~ Let’s get started ~♥~
Open up the template. Shift +D. Close out the original. Delete the copyright layer.
Highlight Large Tag. Select All/Float/Defloat. Copy and paste a paper of choice as a new layer. Resize to your liking. Selections/Invert. Hit the delete key. Copy and paste your tube as a new layer. Hit the delete key. Deselect. Delete the template layer.
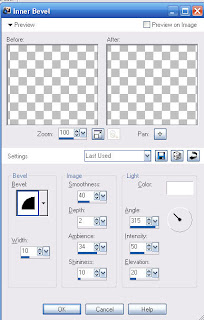
Highlight Large Frame Tag layer. Select All/Float/Defloat. New Raster Layer. Choose a complimentary color from your paper and flood fill. Deselect. Delete the template layer. Add an inner bevel to the frame:
Repeat the above for Stamp Frame 1, Stamp Frame 2, and Stamp Frame 3.
Highlight Stamp Frame 1 bg. Select All/Float/Defloat. Copy and paste a paper of choice, resizing to your liking. Selections/Invert. Hit the delete key. Copy and paste your tube beneath the frame layer. Merge visible the frame, tube, and background. Delete the template layer. Repeat for Layers Frame 2 bg and Frame 3 bg.
I figured out a way to “cheat” and make things easier on me when it comes to coloring the Diamond Tag Line layer. Select All/Float/Defloat.
Create a new 700 X 700 blank image. Flood fill it with the same color you used on the frames. Copy and then close it out. You don’t need it any more. Paste as a new layer on your working canvas just above the Diamond Tag Line Layer. Selections/Invert. Hit the delete key.
Add your elements. I used:
Bird 3: Resize 10% and 50%. I gave it a slight inner bevel.
Dragonfly: Resize 25% and another at 10%.
Silk Flowers: Resize 10% and 70%. Another I resized once again 80%.
Balloon: Resize 25% and 60%. Duplicate, resize 80%.
Button: Resize 25% and 70%.
Highlight your white canvas. New Raster Layer. Create a gradient using 2 colors from your paper or tubes. Flood fill the layer.
Adjust/Blur/Gaussian Blur
Radius: 20.00
OK
Apply your mask. Merge Group.
Add your copyrights.
Add your name.
I used stroke 2 of a dark color, and the fill I created a pattern from one of the papers.
Add a slight inner bevel.
I hope you enjoyed this tutorial.
I’d really love to see your results.
Email me!
Hugs,
Bev
4 tubes of choice – I'm using the artwork of Dean Yeagle
which you can purchase here
Font of choice - I'm using Tom Bombadill
Template Created by Jill #13 here
Becky Mask 22 here
"Sweet Spring" scrap kit by Scraps by Danielle which can be found at Dazzling Scraps. Please visit her blog here.
This kit is gorgeous and shouts spring without a doubt!
Thank you, Danielle for another beautiful kit.
This tutorial was written assuming you have working knowledge of PSP.
~♥~ Let’s get started ~♥~
Open up the template. Shift +D. Close out the original. Delete the copyright layer.
Highlight Large Tag. Select All/Float/Defloat. Copy and paste a paper of choice as a new layer. Resize to your liking. Selections/Invert. Hit the delete key. Copy and paste your tube as a new layer. Hit the delete key. Deselect. Delete the template layer.
Highlight Large Frame Tag layer. Select All/Float/Defloat. New Raster Layer. Choose a complimentary color from your paper and flood fill. Deselect. Delete the template layer. Add an inner bevel to the frame:
Repeat the above for Stamp Frame 1, Stamp Frame 2, and Stamp Frame 3.
Highlight Stamp Frame 1 bg. Select All/Float/Defloat. Copy and paste a paper of choice, resizing to your liking. Selections/Invert. Hit the delete key. Copy and paste your tube beneath the frame layer. Merge visible the frame, tube, and background. Delete the template layer. Repeat for Layers Frame 2 bg and Frame 3 bg.
I figured out a way to “cheat” and make things easier on me when it comes to coloring the Diamond Tag Line layer. Select All/Float/Defloat.
Create a new 700 X 700 blank image. Flood fill it with the same color you used on the frames. Copy and then close it out. You don’t need it any more. Paste as a new layer on your working canvas just above the Diamond Tag Line Layer. Selections/Invert. Hit the delete key.
Add your elements. I used:
Bird 3: Resize 10% and 50%. I gave it a slight inner bevel.
Dragonfly: Resize 25% and another at 10%.
Silk Flowers: Resize 10% and 70%. Another I resized once again 80%.
Balloon: Resize 25% and 60%. Duplicate, resize 80%.
Button: Resize 25% and 70%.
Highlight your white canvas. New Raster Layer. Create a gradient using 2 colors from your paper or tubes. Flood fill the layer.
Adjust/Blur/Gaussian Blur
Radius: 20.00
OK
Apply your mask. Merge Group.
Add your copyrights.
Add your name.
I used stroke 2 of a dark color, and the fill I created a pattern from one of the papers.
Add a slight inner bevel.
I hope you enjoyed this tutorial.
I’d really love to see your results.
Email me!
Hugs,
Bev
No comments:
Post a Comment