Friday, August 26, 2011

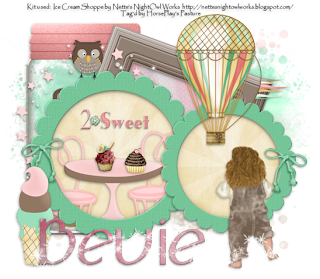
Ice Cream Shoppe


Supplies

Font of choice - Adolphus here

Vix Mask 431 here

“Ice Cream Shoppe” is a tagger size scrap created by Nette of Nette’s NightOwl Works and can be purchased from Butterfly Blush Designs. You can visit her blog here.
Thank you Nette for an absolutely wonderful kit!

This tutorial was written assuming you have a working knowledge of PSP.

~♥~ Let’s get started ~♥~

Open up a 700 x 700 blank canvas.
Flood fill white.

Copy and paste Frame 2 as a new layer.
Resize 40%
Free rotate Right 20 degrees.
Click inside of it with your Magic Wand.
Selections/Modify/Expand by 4.
New Raster layer below the frame.
Copy and paste Paper 12 Into Selection.
Deselect.
Don’t worry about placement right now.

Close out the background layer.
Merge Visible.
Reopen the background layer.

Copy and paste Frame 1 as a new layer.
Resize 40%
Duplicate/Resize 80%
Don’t worry about placement of these frames just yet.

Highlight the smaller frame.
Click inside of it with your Magic Wand.
Selections/Modify/Expand by 4.
New Raster layer below the frame.
Copy and paste Paper 11 Into Selection.
Deselect.
Highlight the frame layer.
Merge Down.

Highlight the larger round frame.
Click inside of it with your Magic Wand.
Selections/Modify/Expand by 4.
New Raster layer below the frame.
Copy and paste Paper 11 Into Selection.
Deselect for now.
Copy and paste Table as a new layer.
Resize 30%
Move into position - see my tag for reference.
Copy and paste Chair 2 as a new layer.
Resize 25%
Move into position
Duplicate/Mirror
Move into position.
Highlight the paper layer.
Click anywhere outside of it with your Magic Wand.
Highlight each element that sticks outside of the frame and tap the delete key.
Deselect.

Merge Visible the Paper, Frame, Table, and Chairs.

You can now move all 3 merged layers into position - see my tag for reference.

Copy and paste Candy Jar as a new layer.
Resize 60%
Move into position behind the brown frame.
Use your Pick Tool and pull the bottom of the jar up so that it’s even with the bottom of the round frame.

Add your embellishments. I used:
Circle Scatter: Resize 40%
Owl: Resize 25% and 50%
2Sweet: Resize 25% and 70%
Bowl Cream: Resize 30%
Cupcake: Resize 25% and 25%
Balloon: Resize 35% and 90%
Bow: Resize 25% and 50%
Barefoot Jenny: Resize 50%
Cone 3: Resize 25%
Sparkle

Highlight your white canvas.
New Raster layer.
Select All.
Copy and paste Paper 1 Into Selection.
Deselect.
Apply the mask.
Merge Group.

Add your copyrights.

Add your name:

Resize all layers 80%.

I hope you enjoyed this tutorial.
I’d love to see your results and show it off in my gallery.
Email me!
Hugs,
Bev

Thursday, August 25, 2011

Denim Days


Supplies

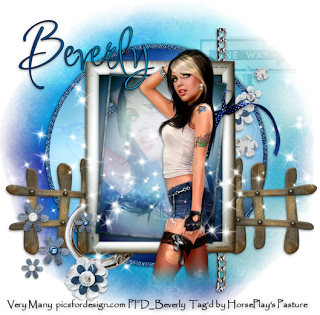
1 tube of choice - I used the artwork of Very Many which can be purchased from Pics for Design. You must generate a license to use.

Font of choice - I used Inspiration here. To the peep who left me the link in the comment section - thank you so very much for the link!

Monti Circular Mask here

“Denim Days” is a tagger size scrap kit available full, too, and was created by Kesha of KnC Scrapz and can be purchased from her store Lollipops n Gumdrops. You can visit her blog here.
Thank you Kesha for a really beautiful kit!

This tutorial was written assuming you have a working knowledge of PSP.

~♥~ Let’s get started ~♥~

Open up a 700 x 700 blank canvas.
Flood fill white.

Make your Selection Tool active set on Circle.
Make a circle approximately 500 pixels.
New Raster layer.
Copy and paste Paper 7 Into Selection.
Adjust/Add Remove Noise/Add Noise:
Uniform and Monochrome checked
Noise: 83%
OK
Selections/Modify/Contract by 10
New Raster layer.
Copy and paste Paper 4 Into Selection.
Deselect.

Copy and paste Frame 3 as a new layer.
Free rotate Left 90 degrees
Resize 50%
Click inside of it with your Magic Wand.
Selections/Movify/Expand by 4.
New Raster layer below the frame.
Copy and paste Paper 5 Into Selection.
DO NOT DESELECT.

Selections/Modify/Contract by 10
New Raster layer ABOVE the frame.
Copy and paste Paper 10 Into Selection.
Selections/Modify/Contract by 6
New Raster layer.
Copy and paste Paper 5 Into Selection.
Deselect.
Free rotate both of these paper Right 5 degrees.

Highlight the top rectangle.
Click anywhere outside of it with your Magic Wand.
Coy and paste your tube as a new layer above it.
Tap the delete key.
Deselect.
Change the Properties to Soft Light.

Give the bottom rectangle a slight Inner Bevel:


Copy and paste your tube as a new layer.

Add your embellishments. I used:
Bow 1: Resize 25% and 70%
Fence: Resize 40%/Duplicate/Mirror
Flowers: Resize 40%/Mirror
Chain: Resize 40%
Chain 2: Resize 40%/Free rotate Right 90 degrees
Flower 1: Resize 25% and 40%
Flower 3: Resize 25% and 70%/Duplciate/Resize 70%
Flower 2: Resize 25% and 70%/Duplicate/Resize 70%
Stars

Highlight your white canvas.
New Raster layer.
Select All.
Copy and paste Paper 3 Into Selection.
Deselect.
Apply the mask.
Merge Group.

Copy and paste Sign 2 as a new layer.
Resize 40%
Move into position - see my tag for reference.
Change the Properties to Soft Light.
Highlight the mask layer.
Select All/Float/Defloat
Selections/Modify/Inside Outside Feather
Both checked
Feather Amount 60
Ok
Highlight the sign layer.
Tap the delete key.
Deselect.

Add your copyrights.

Add your name:
Give it the same slight Inner Bevel.

Resize all layers 80%.

I hope you enjoyed this tutorial.
I’d love to see your results and show it off in my gallery.
Email me!
Hugs,
Bev

Sunday, August 21, 2011

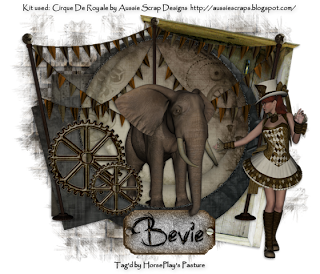
Cirque De Royale


Supplies

Font of choice - I used Jellyka Castle’s Queen here

Weescotlass Mask 297 here

Divine Intentionz Template 379 here

“Cirque De Royale” is a tagger size scrap kit created by Gail of Aussie Scrap Designs and can be purchased from her store Aussie Scrap Designs. You can visit her blog here.
Thank you Gail for a totally awesome kit!

This tutorial was written assuming you have a working knowledge of PSP.

~♥~ Let’s get started ~♥~

Open up the template.
Shift + D.
Close out the original.
Resize all layers 85%
Image/Canvas Size
700 x 600
OK
Open up Raster 1.
Flood fill white.
Delete the top 5 layers and Square layer.

Highlight Large Circle layer.
Click on it with your Magic Wand.
New Raster layer.
Copy and paste BG 2 Into Selection.
Deselect.
Delete the template layer.
Give it a slight Inner Bevel:


Highlight Square 1 layer.
Click on it with your Magic Wand.
New Raster layer.
Copy and paste BG 1 Into Selection.
Deselect.
Delete the template layer.
Give it the same slight Inner Bevel.

Highlight Square 2 layer.
Click on it with your Magic Wand.
New Raster layer.
Copy and paste BG 2 Into Selection.
Deselect.
Delete the template layer.
Give it the same slight Inner Bevel.

Highlight Large Circle 4 layer.
Click on it with your Magic Wand.
New Raster layer.
Copy and paste BG 2 Into Selection.
Adjust/Add Remove Noise/Add Noise:
Uniform and Monochrome checked
Noise: 43%
OK
Deselect.
Delete the template layer.

Highlight Large Circle 2 layer.
Click on it with your Magic Wand.
New Raster layer.
Copy and paste BG 3 Into Selection.
Deselect.
CLOSE OUT the template layer.

Highlight Large Circle 3 layer.
Repeat the above step.
Delete the template layer.

Copy and paste Circus Elephant as a new layer.
Resize 60%
Mirror
Move into position - see my tag for reference.
Highlight Large Circle 2 template layer.
Click anywhere outside of it with your Magic Wand.
Highlight the elephant layer.
Use your Eraser Tool to erase the feet at the bottom of the circle, but be careful and leave the trunk.
Deselect.
Delete the template layer.

Add your embellishments. I used:
Wooden Box: Resize 70%/Free rotate Right 10 degrees
Flags 2
Steam Cog(1): Duplicate/Resize 70%
Ring Master 5: Resize 40%/Mirror
Tag: Resize 40%

Highlight your white canvas.
New Raster layer.
Select All.
Copy and paste BG 4 Into Selection.
Deselect.
Apply the mask.
Merge Group.

Add your copyrights.

Add your name.

Resize all layers 80%.

I hope you enjoyed this tutorial.
I’d love to see your results and show it off in my gallery.
Email me!
Hugs,
Bev