Friday, February 17, 2012

Rendezvous

Supplies

1 tube of choice – I used the gorgeous artwork of Alena Lazareva which can be purchased from Up Your Art.  You must have a license to use.

Font of choice - I used Wretched here

Becky mask 9 here

Plug Ins used:
Greg’s Factory Output Vol. II – Pool Shadow
Eyecandy 3.1 – Glow
Mura’s Meister  - Copies

“Crush” is a tagger size scrap kit created by Pixie of KissedbyPix and can be purchased from her store TKOScraps.  You can visit her blog here.
Thank you Pixie for fantabulous kit!

This tutorial was written assuming you have a working knowledge of PSP.

~~ Lets get started ~~

Open up a 700 x 700 blank canvas.
Flood fill white.

Copy and paste Barbed Frame 1 as a new layer.
Resize 80%
Click inside of it with your Magic Wand – be sure to get the little spaces at each of the corners.
Selections/Modify/Expand by 3.
New Raster layer below the frame.
Copy and paste Paper 9c Into Selection.
Copy and paste your tube as a new layer below the frame.
Selections/Invert
Tap the delete key.
Deselect.

Close out your white canvas.
Merge Visible.
Reopen your white canvas.

Copy and paste Beaded Heart 1 as a new layer.
Resize 10%
Apply Mura’s Meister – Copies:
Wallpaper (Prospective)
OK
Move this layer just above your white canvas.

Add your elements.  I used:
Beaded Hrt Frame 1
Bow 3:  Resize 50%

Highlight your white canvas.
New Raster layer.
Select All.
Copy and paste Paper 5 Into Selection.
Deselect.
Apply the mask
Merge Group.
Duplicate/Mirror

Add your name.
Color Pallet:
Foreground and Background: #4a0000
Type your name.
Convert to Raster layer.
Apply Eyecandy 3.1 – Glow:
Width: 3
Opacity: 100%
Opacity Drop off:  Fat
Color: #e3c07b
Select All/Float/Defloat
Apply Greg’s Factory Output Vol. II – Pool Shadow:
Use default settings
Deselect.

Crop your image.

Resize all layers 80%.

I’d love to see your results.
Email me!
Hugs,
Bev

Erin's Blessing

Supplies

1 tube of choice – I used the beautiful artwork of Carrie Hall which can be purchased from Up Your Art.  You must have a license to use.

Font of choice - I used Stonehenge here

My mask 8 here

Plug Ins used:
Brush Strokes – Sprayed Strokes

“Erin’s Blessing” is a tagger size scrap kit created by Joy of Mystic Creations and can be purchased from Exquisite Scraps.  You can visit her blog here.
Thank you Joy for a really gorgeous St. Patty’s kit!

This tutorial was written assuming you have a working knowledge of PSP.

~~ Lets get started ~~

Open up a 700 x 700 blank canvas.
Flood fill white.

Copy and paste Shamrock Frame as a new layer.
Resize 60%
Click inside of it with your Magic Wand.
Selections/Modify/Expand by 4.
New Raster layer below the frame.
Copy and paste Paper 5 Into Selection.
Deselect.
Duplicate the paper layer.
Effects/Texture Effects/Mosaic Antique:
Use Default settings.
OK

Close out your white canvas.
Merge Visible.
Reopen your white canvas.

Don’t worry about placement of the merged layer.
We’ll take care of that in a bit.

Copy and paste Ribbon Frame as a new layer.
Resize 50%
Click inside of it with your Magic Wand.
Selections/Modify/Expand by 4.
New Raster layer below the frame.
Copy and paste Paper 9 Into Selection.
Deselect.
Duplicate the paper layer.
Effects/Texture Effects/Mosaic Antique:
Use Default settings.
OK
Apply Brush Strokes – Sprayed Strokes:
Stroke Length: 12
Spray Radius: 21
Stroke Directions:  Right Diagonal
OK

Close out your white canvas and merged layer.
Merge Visible.
Reopen all layers.
Don’t worry about placement of anything yet.

Copy and paste Frame 1 as a new layer.
Resize 25%
Duplicate
Move all layers into position – see my tag for reference.
Merge Visible both little square frames once they’re in position.

Highlight and click inside of both little square frames.
Selections/Modify/Expand by 4.
New Raster layer below the frame.
Copy and paste Paper 10 Into Selection.
Deselect.

Copy and paste your tube as a new layer.
Position it to the left of the little square frames.
Duplicate/Mirror
In your layers pallet move the duplicated tube layer below the little square frames.
Highlight and click on the duplicate tube layer and using the Right arrow key on your key pad move the duplicated tube layer to the right until it’s in a position you like below the frames.
Highlight and click on the paper layer below the duplicated tube layer.
Click anywhere outside of it with your Magic Wand.
Highlight the tube layer just above it.
Tap the delete key.
Deselect.
Change the Properties to Overlay.

Add your elements.  I used:
Bow 2:  Resize 35%
Horseshoe Trail:  Resize 85%/Duplicate/Mirror
Shamrock Chain 1:  Resize 70%
Cross:  Resize 40%
Shamrock:  Resize 20%
Anemone 2: Resize 50%
Anemone 1:  Resize 50%/Duplicate/Mirror/Resize 70%
Four Leaf Clover 2:  Resize 15%

Highlight your white canvas.
New Raster layer.
Select All.
Copy and paste Paper 12 Into Selection.
Deselect.
Apply the mask
Merge Group.

Add your name.
Color Pallet:
Foreground:  Gradient/Metal Brass
Angle: 52
Repeats: 2
Invert checked
Background:  #073c1c
Stroke Width:  1.0
Type your name.
Give it a slight Inner Bevel:

Crop your image.

Resize all layers 80%.

I’d love to see your results.
Email me!
Hugs,
Bev

Wednesday, February 15, 2012

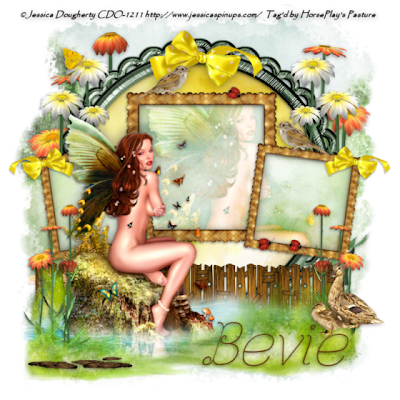
Busy is a Spring Day

Supplies

1 tube of choice – I used the beautiful artwork of Jessica Dougherty which can be purchased from CDO.  You must have a license to use.

Font of choice - I used Ferrica here

Becky mask 22 here

“Good Day for Ducks” is a tagger size scrap kit created by me, Bev of HorsePlay’s Pasture Designs and can be purchased from Lollipops n Gumdrops.  You can visit my designing blog here.

This tutorial was written assuming you have a working knowledge of PSP.

~~ Lets get started ~~

Open up a 700 x 700 blank canvas.
Flood fill white.

Copy and paste 26 as a new layer.
Resize 75%
Click inside of it with your Magic Wand.
Selections/Modify/Expand by 4.
New Raster layer below the frame.
Copy and paste Paper 4 Into Selection.
Deselect.

Merge Visible the frame and paper.
Move the merged layer up just a little on your canvas.

Copy and paste 23 as a new layer.
Resize 50%
Duplicate/Resize 70%/Free Rotate Left 8 degrees
Duplicate/Mirror
Move all 3 frames into position – see my tag for reference.

Copy and paste Paper 3 as a new layer just above the round frame in the layers pallet.
Resize 67%
Move the smaller frames inward if the paper doesn’t fill all of the center of it.

Highlight the largest square frame.
Click inside of it with your Magic Wand.
Selections/Modify/Expand by 4.
Highlight the paper layer.
Right Click/Promote Section to Layer
Deselect.

Highlight the left square frame.
Click inside of it with your Magic Wand.
Selections/Modify/Expand by 4.
Highlight the paper layer.
Right Click/Promote Section to Layer
Deselect.
Move this Promoted paper layer just below the left frame in the layers pallet.

Highlight the right square frame.
Repeat the above step.

You can delete Paper 3 as you won’t be using it any more.

Copy and paste your tube as a new layer just below the small right frame.
Move the tube into a position that will look good not only within the small frame but the big square frame as well.

Highlight the paper layer below the right frame.
Click anywhere outside of it with your Magic Wand.
Selections/Invert
Highlight the tube just below the frame.
Right Click/Promote Section to layer.
Deselect.

Highlight the paper layer below the big square frame.
Click anywhere outside of it with your Magic Wand.
Selections/Invert
Highlight the original tube layer.
Right Click/Promote Section to layer.
Deselect.
Move this promoted layer below the large square frame layer in the layers pallet.

Move the original tube layer to the very top of your layers pallet.
Position it in front of the left frame – see my tag for reference.

Copy and paste 59 as a new layer behind the tube layer.
Resize 90%
Move into position.

Copy and paste 39 as a new layer behind the tube layer.
Resize 80%
Move into position

Duplicate the Grass layer.
Mirror
Move above the tube layer in your layers pallet.

Highlight your tube layer.
Duplicate/Flip
Move just above the water layer and into position so it appears to be a reflection.
Highlight the water layer.
Click anywhere outside of it with your Magic Wand.
Highlight the flipped tube layer.
Tap the delete key.
Deselect.
Change the Properties to Overlay.

Highlight the water layer.
Click anywhere outside of it with your Magic Wand.
Selections/Modify/Inside Outside Feather
Both checked
Feather amount: 35
OK
Highlight the flipped tube layer.
Tap the delete key to feather the tube just a bit.
Deselect.

Add your elements.  I used:
7:  Resize 35%
7 again:  25% and 80%/Duplicate/Mirror
3:  Resize 20%
43:  Resize 80%/Position behind the merged round frame/Duplicate/Mirror/Erase the tallest flower
43 again:  Resize 40%/Duplicate/Mirror
42:  Resize 50%/Duplicate/Mirror/Duplicate/Resize 70%
Duplicate and mirror all white daisies
11:  Resize 25%/Duplicate 5x’s
4:  Resize 25%/Mirror
47:  Resize 25%
2:  Resize 10% and 70%/Duplicate twice/Use the Pick tool to turn them this way and that.
29:  Resize 15%

Highlight your white canvas.
New Raster layer.
Select All.
Copy and paste Paper 2 Into Selection.
Deselect.
Apply the mask
Merge Group.
Move it up slightly on your canvas.
Duplicate

Add your name.

Resize all layers 80%.

I’d love to see your results.
Email me!
Hugs,
Bev