

Clicking on the image will show full view.
Supplies Needed
1 tube of choice – I'm using the artwork of Jennifer Janesko
which you can purchase here
Font of choice - I'm using A & S Rhino
Becky Mask 19
"Grungeee Blu" PTU tagger size kit by Stitchy Angel Creationz which can be found here.
Supplies which include Font and Mask here.
This tutorial was written assuming you have working knowledge of PSP.
~♥~ Let’s get started ~♥~
Open up a 700 x 700 blank canvas. Flood fill white.
Copy and paste Bow Mirror as a new layer. Move slightly to the left side of your canvas. Using your Freehand Selection Tool, draw around the mirror, making the draw line only half way through the frame. Copy and paste a paper of choice below the frame layer. Selections/Invert. Hit the delete key.
Copy and paste your tube of choice as a new layer below the frame layer. Hit the delete key. Deselect. Close out your white canvas. Merge visible. Open all the layers back up.
Highlight the top layer and paste your tube as a new layer again. We’re going to feather it. Use your Freehand Selection Tool and trace around your tube in the shape you want it to be feathered. I did mine oval. Selections/Modify/Feather. Apply these settings:
Number of Pixels: 52
Ok
Selections/Invert. Tap the delete key until your image is feathered to your liking.
Copy and paste Blue Flowers as a new layer. Resize 50%. Move behind the frame layer and let the flowers peek out just a bit. Duplicate/Mirror. Duplicate once more and move it to peek out at the top of the frame. Merge visible the 3 flower layers.
Copy and paste Real Bouquet as a new layer. Resize 60%. Move beneath the Blue flowers layer, allowing these flowers to peek out from behind the blue flowers. Layer/duplicate. Duplicate and move it up toward the top middle of the frame. Layer/Duplicate. Merge visible all Real Bouquet layers. Open up all layers.
Add your elements. I used:
Butterfly 2: Resize 10%. Free rotate left 5 degrees.
Heart Tone: Resize 30% and again 60%. Free Rotate left 15 degrees.
Bag 2: Resize 30%.
Bag 1: Resize 20%.
Butterbow & Bow one: Resize 10%.
Highlight your white canvas. New Raster Layer. Select All. Copy and paste a paper of choice Into Selection. Deselect. Apply your mask. Merge Group. Move the mask slightly to the left.
Add your copyrights.
Add your name. I used
Foreground: #000000
Background: I made a pattern as follows:
Open up Bag 2. Use your Selection Tool and make a square on the light blue area. Edit/Copy. Edit/Paste as new image. Effects/Image Effects/Image Tiling. Use factory default settings. Hit ok.
Set your background color to Pattern (find the image you just created and click on it). Ok.
Now type your name. I gave mine an Inner Bevel:
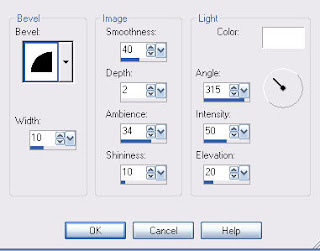
Add a heavy drop shadow.
Crop your image and save your tag.
I hope you enjoyed this tutorial.
I would love to see your results and put it into my gallery.
Email me!
Hugs,
Bev
No comments:
Post a Comment