

Clicking on the image will show it in full view.
Font of choice - I'm using Samarkan here
Weescotlass Mask 277 here
Template #54 here
Filters Unlimited 2 (optional)
"Pastel Dreams" PTU tagger size kit by Scraps by Danielle which can be found here.
Weescotlass Mask 277 here
Template #54 here
Filters Unlimited 2 (optional)
"Pastel Dreams" PTU tagger size kit by Scraps by Danielle which can be found here.
You can visit her blog here.
This tutorial was written assuming you have working knowledge of PSP.
~♥~ Let’s get started ~♥~
Open up the template. Shift + D. Close out the original. Delete the credit layer. Click on the bottom layer. New Raster Layer. Send to bottom. Flood Fill white. Make canvas 700 X 700.
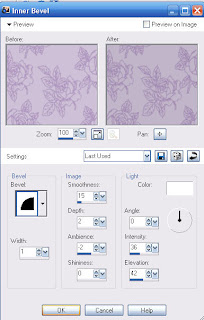
Highlight Black Shape layer. Select All/Float/Defloat. Copy and paste a paper of choice as a new layer. Selections/Invert. Hit the delete key. Delete the template layer. Add a slight Inner Bevel:
This tutorial was written assuming you have working knowledge of PSP.
~♥~ Let’s get started ~♥~
Open up the template. Shift + D. Close out the original. Delete the credit layer. Click on the bottom layer. New Raster Layer. Send to bottom. Flood Fill white. Make canvas 700 X 700.
Highlight Black Shape layer. Select All/Float/Defloat. Copy and paste a paper of choice as a new layer. Selections/Invert. Hit the delete key. Delete the template layer. Add a slight Inner Bevel:
Highlight Line 2. Select All/Float/Defloat. Copy and paste a paper of choice as a new layer. Selections/Invert. Hit the delete key. Delete the template layer. Add the same slight Inner Bevel. Effects/Filter Unlimited 2/Paper Texture/Papyrus. Use the factory settings. Ok.
Repeat the above step with Layer Line 1.
Highlight Shape 1. Select All/Float/Defloat. Copy and paste a paper of choice as a new layer. Selections/Invert. Hit the delete key. Delete the template layer. Add the same slight Inner Bevel.
Repeat this next step for Heart Layers 1 & 2.
Create a gradient that will match your papers.
Angle 45
Repeat 2
Invert checked
Highlight a heart. Select All/Float/Defloat. New Raster Layer. Flood fill with the gradient. Effects/3D Effects/Cutout with the following settings:
Vertical and Horizontal: 3
Opacity & Blur: 25
Color: Black
OK.
New Raster Layer. Repeat the Cutout Effect accept change the vertical and horizontal to -3. OK.
Copy and paste your tube above the heart layer. Selections/Invert. Hit the delete key. Delete the template layer. Merge visible (or merge down, whichever you find easier) the cutout effect layers, tube, and heart layer.
Highlight Heart 3. Select All/Float/Defloat. New Raster Layer. Invert your gradient and flood fill. Apply the same Cutout Effect. Copy and paste your tube as a new layer just above the heart layer. Merge visible (or merge down, whichever you find easier) the cutout effect layers, tube, and heart layer.
Apply the embellishments. I used:
Satin Flower 3: Resize 25%. Duplicate. Resize 80%.
Butterfly 3: Resize 25%. Duplicate. Resize 80%.
Hearts 2: Resize 50%.
Calla lilies 4: Resize 50%.
Chicken 2: Resize 40%.
Highlight you white canvas. New Raster Layer. Select All. Copy and paste a paper choice Into Selection. Apply the mask. Merge Group. Resize 90%. Crop your image. Be sure you don’t crop any of the mask off…hehehe
Add your copyrights.
Add your name. I used Filters Unlimited 2 on my name with the same settings as before. Gave it the same inner bevel. I also added a little fun to my name by making a catapiller crawl through one of the letters.
I hope you enjoyed this tutorial.
I would love to see your results and add them to my gallery.
Email me!
Hugs,
Bev
No comments:
Post a Comment