Saturday, April 23, 2011

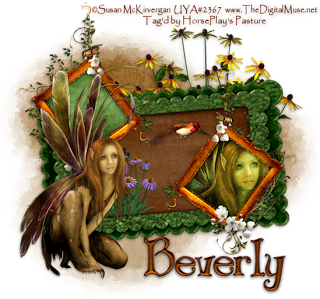
When Evening Nears


Supplies

1 tube of choice - I used the artwork of Susan McKirvergan which can be purchased from Up Your Art. You must have a license to use.

Font of Choice - I used Bibliotheque here

Vix mask 452 here

“Gaia” is a tagger size scrap kit created by Brianna of Gothic Witch Creations and can be purchased from Heartbeatz Creationz. You can visit her blog here.
Thank you Brianna for an awesome kit!

This tutorial was written assuming you have a working knowledge of PSP.

~♥~ Let’s get started ~♥~

Open a 700 x 700 blank canvas.
Flood fill white.

Copy and paste Frame 14 as a new layer.
Resize 85%
Free rotate Left 5 degrees.
Click inside of it with your Magic Wand.
Selections/Modify/Expand by 15
New Raster layer below the frame.
Copy and paste Paper 40 Into Selection.
Deselect.
Copy and paste Flower 1 as a new layer below the frame.
Resize 40%

Copy and paste Frame 4 as a new layer.
Resize 85%
Duplicate/Mirror
Move both frames into position - see my tag for reference.

Highlight the left frame.
Click inside of it with your Magic Wand.
Selections/Modify/Expand by 4.
New Raster layer below the frame.
Copy and paste Paper 60 Into Selection.
Deselect.

Highlight the frame on the right.
Click inside of it with your Magic Wand.
Selections/Modify/Expand by 4.
New Raster layer below the frame.
Copy and paste Paper 60 Into Selection.
Copy and paste your tube below the frame.
Selections/Invert
Tap the delete key.
Deselect.
Change the Properties to Hard Light.
Use your Eraser Tool and erase the tail of flowers and vines that hangs below the frame.

Copy and paste your tube as a new layer.
Move into position in front of the left frame.

Add your embellishments. I used:
Bird 3: Resize 35%
Flower 4: Resize 85%

Crop your Image.

Highlight your white canvas.
New Raster layer.
Select All.
Copy and paste Paper 28 Into Selection.
Deselect.
Apply the mask.
Use your Pick Tool to pull the top down and bottom up. You can also pull the sides outward slightly.
Merge Group.

Add your copyrights.

Add your name.
Give it a slight Inner Bevel:


Resize all layers 85%

I hope you enjoyed this tutorial.
I’d love to see your results and show it off in my gallery.
Email me!
Hugs,
Bev

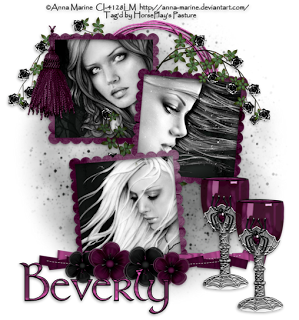
Mystic Night


Supplies

3 tubes of choice - I used the artwork of Anna Marine which can now be purchased from CDO. You must have a license to use.

Font of Choice - I used Stonehenge Regular here

Becky mask 9 here

Greg’s Factory Output Vol. II - Pool Shadow

“Mystic Night” is a tagger size scrap kit created by Lysiras Graphic World and can be purchased from Heartbeatz Creationz. You can visit her blog here.
Thank you Lysira for an awesome kit!

This tutorial was written assuming you have a working knowledge of PSP.

~♥~ Let’s get started ~♥~

Open a 700 x 700 blank canvas.
Flood fill white.

Copy and paste Old Paper Frame 1 as a new layer.
Resize 85%
Click inside of each frame with your Magic Wand.
Selections/Modify/Expand by 4.
New Raster layer below the frame.
Copy and paste Paper 8 Into Selection.
Apply Greg’s Factory Output Vol. II - Pool Shadow:
Use Default settings accept change the Intensity bar to 247.
Deselect.

Highlight the frame layer.
Click inside the top frame with your Magic Wand.
Selections/Modify/Expand by 4.
Copy and paste your tube below this frame.
Selections/Invert
Tap the delete key.
Deselect.
To change the tube to black and white:
Shift + L
Hue: 0
Saturation: 0
OK

Repeat the above step with the remaining 2 frames.

Add your embellishments. I used:
Rusty Wire Circle 2: Resize 45%
Rose 1: Duplicate/Mirror
Tassel 1: Resize 50%
Goblet 1: Resize 60%/Duplicate
Folded Ribbon 1 & 2: Resize 70%
Organza Flower 1 & 4: Resize 25%/Flip one of them. Duplicate each flower/Resize 80%

Crop your Image.

Highlight your white canvas.
New Raster layer.
Select All.
Copy and paste Paper 2 Into Selection.
Deselect.
Apply the mask.
Use your Pick Tool to pull all the sides out just a little.
Merge Group.

Add your copyrights.

Add your name.
Give it a slight Inner Bevel:


Select All/Float/Defloat
Apply the Pool Shadow effect again, this time changing the Intensity bar to 68.

Resize all layers 85%

I hope you enjoyed this tutorial.
I’d love to see your results and show it off in my gallery.
Email me!
Hugs,
Bev
Friday, April 22, 2011

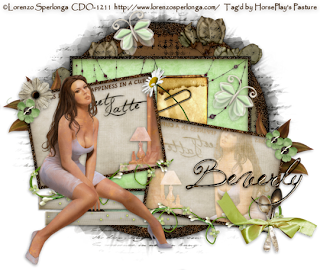
Sweet Latte


Supplies

1 tube of choice - I used the artwork of Lorenzo Sperlonga which can be purchased from CDO. You must have a license to use.

Font of Choice - I used Jellyka Western Princess here

Weesctolass mask 236 here

Divine Intentionz Template 310 here

“Sweet Latte” is a tagger size scrap kit created by Jessica of Gothic Inspirations and can be purchased from her store Gothic Inspirations. You can visit her blog here.
Thank you Jessica for a spectacular kit!

This tutorial was written assuming you have a working knowledge of PSP.

~♥~ Let’s get started ~♥~

Open a the template.
Shift + D.
Close out the original.
Delete the top 2 layers and Pump up the Volume layer.
Resize all layers 90%
Image/Canvas Size
700 x 600
OK
Open up the background layer and flood fill white.

Highlight Glittered Circle layer.
Click anywhere outside of it with your Magic Wand.
Selections/Invert
New Raster layer.
Copy and paste Paper 2 Into Selection.
Adjust/Add Remove Noise/Add Noise:
Uniform and Monochrome checked
Noise: 65%
OK
Deselect.
Delete the template layer.

Highlight Frame 1 layer.
Click on it with your Magic Wand.
New Raster layer.
Paste Paper 2 Into Selection.
Apply the same noise effect.
Deselect.
Delete the template layer.

Repeat the above step with Frame 2 and Frame 3 layers.

Highlight Circle layer.
Click on it with your Magic Wand.
New Raster layer.
Copy and paste Paper 8 Into Selection.
Deselect.
Delete the template layer.

Highlight Gradient Background.
Click anywhere outside of it with your Magic Wand.
Selections/Invert
New Raster layer.
Copy and paste Paper 9 Into Selection.
Copy and paste Beads as a new layer.
Resize 60%
Move into position over the paper.
Selections/Invert
Tap the delete key.
Deselect.
Delete the template layer.

Highlight Rectangle 1 layer.
Click on it with your Magic Wand.
New Raster layer.
Copy and paste Paper 7 Into Selection.
Copy and paste Border as a new layer over the paper.
Resize 60%
Move into position over the paper.
Selections/Invert
Tap the delete key.
Deselect.
Delete the template layer.
Give the paper a slight Inner Bevel:


Highlight Rectangle 2 layer.
Repeat the above step.

Highlight Frame 2 background layer.
Click anywhere outside of it with your Magic Wand.
Selections/Invert
New Raster layer.
Copy and paste Paper 7 Into Selection.
Deselect.

Highlight Frame 3 background layer.
Repeat the above step.

We’re going to add the elements beneath the left frame on your canvas:

Copy and paste Word Art 2 as a new layer.
Resize 50%
Free rotate Left 10 degrees
Move into position beneath the frame - lining the word art up with the frame edge - see my tag for reference.
Highlight the paper layer.
Click anywhere outside of it with your Magic Wand.
Highlight the Word Art layer.
Tap the delete key.
Deselect.

Copy and paste Word Art 1 as a new layer just above Word Art 2 layer.
Resize 35%
Free rotate Left 10 degrees.
Move into position.

Copy and paste your tube as a new layer.
Move into position in front of the left frame.

Once you have the elements and your tube in their exact positions, duplicate both word art layers and the tube layer.
Mirror them.
Move them into position beneath the frame on the right.
Change the Properties to Overlay of the word art and tube layer.
So you won’t see the elements through the tube layer, highlight the tube layer.
Click anywhere outside of it with your Magic Wand.
Selections/Invert
Highlight each of the word art layers and tap the delete key.
Deselect.

Add your embellishments. I used:
Butterfly: Resize 25% and 70%/Free rotate Right 25 degrees/Duplicate/Mirror
Flowers: Resize 60%/Duplicate
Leaves 2: Resize 35%/Duplicate/Mirror
Spoons: Resize 40%
Floral: Resize 50%/Duplicate/Mirror/Free Rotate Left 10 degrees
Daisy Cluster: Resize 25%
Flower 1: Resize 25% and 50%
Flower 2: Resize 25% and 60%/Duplicate/Mirror/Duplicate/Resize 80%
Button: Resize 10% and 50%/Duplicate twice and place over center of green flowers.

Highlight your white canvas.
New Raster layer.
Select All.
Copy and paste Paper 1 Into Selection.
Deselect.
Apply the mask.
Use your Pick Tool and pull the top up just a bit and the bottom down just a bit.
Merge Group.

Add your copyrights.

Add your name.
Give it a slight Inner Bevel:


Resize all layers 80%.

I hope you enjoyed this tutorial.
I’d love to see your results and show it off in my gallery.
Email me!
Hugs,
Bev
Thursday, April 21, 2011

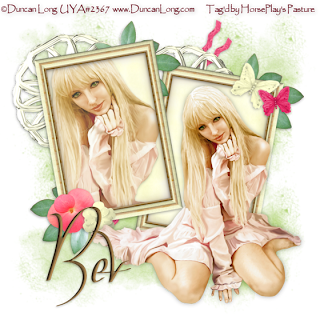
Changes


Supplies

1 tube of choice - I used the artwork of Duncan Long which can be purchased from Up Your Art. You must have a license to use.

Font of Choice - I used Oh Lara

Gem mask 161 here

“Changing This Day” is a Full size scrap kit created by Dana of Dana’s Creative Studio and can be purchased from Aussie Scrap Designs. You can visit her blog here.
Thank you Dana for such a beautiful kit!

This tutorial was written assuming you have a working knowledge of PSP.

~♥~ Let’s get started ~♥~

Open a 700 x 700 blank canvas.
Flood fill white.

Copy and paste Frame 3 as a new layer.
Resize 25% and 70%
Free rotate Left 100 degrees.
Duplicate/Mirror
Move both frames into approximate position - see my tag for reference.

Highlight the frame on the left.
Click inside of it with your Magic Wand.
Selections/Modify/Expand by 6.
New Raster layer below the frame.
Copy and paste Paper 5 Into Selection.
Copy and paste your tube below the frame.
Selections/Invert
Tap the delete key.
Deselect.

Close out your white canvas and duplicated frame layers.
Merge Visible.
Reopen your white canvas.

Highlight the frame on the right.
Click inside of it with your Magic Wand.
Selections/Modify/Expand by 6.
New Raster layer below the frame.
Copy and paste Paper 5 Into Selection.
Deselect.
Merge Visible the frame and paper.

Now you can move your frames into better position while adding your elements.

Copy and paste your tube as a new layer.
Position in front of the right frame.

Add your embellishments. I used:
Charme 3: Resize 25%/Duplicate
Ribbon 2: Resize 25% and 60%/Free rotate Left 45 Degrees/Duplicate/Use your Pick Tool to turn slightly.
Leave 3: Resize 25% and 50%/Duplicate/Mirror/Duplicate
Flower 4: Resize 25% and 40%
Flower 2: Resize 25% and 30%
Butterfly 3: Resize 25% and 50%
Butterfly 2: Resize 25% and 40%/Mirror

Highlight your white canvas.
New Raster layer.
Select All.
Copy and paste Paper 2 Into Selection.
Deselect.
Apply the mask.
Merge Group.
Duplicate

Add your copyrights.

Add your name.
Give it a slight Inner Bevel:


Resize all layers 80%.

I hope you enjoyed this tutorial.
I’d love to see your results and show it off in my gallery.
Email me!
Hugs,
Bev
Wednesday, April 20, 2011

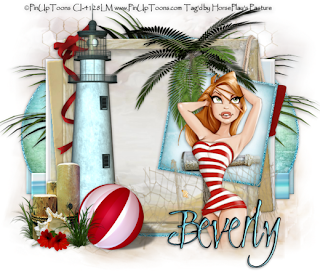
Seaside


Supplies

1 tube of choice - I used the artwork of PinUpToons which can now be purchased from CDO

Font of Choice - I used Clive Barker here

Divine Intentionz Template 380 here

Vaybs Mask 133 here

Dock of the Sea” is a tagger size scrap kit created by ZaZa of Scrap and Tubes and can be purchased from Butterfly Blush Designs. You can visit her blog here.
Thank you ZaZa for a gorgeous sea themed kit!

This tutorial was written assuming you have a working knowledge of PSP.

~♥~ Let’s get started ~♥~

Open up the template.
Shift + D.
Close out the original.
Resize all layers 85%
Image/Canvas Size
650 x 550
Flood fill the background layer white.
Delete the top 5 layers, Frame 1, and Frame Back 1, Square 2, Raster 2 Shadow 2.

Highlight Raster 2 layer.
Click on it with your Magic Wand.
New Raster layer.
Copy and paste Paper 2 Into Selection.
Deselect.
Delete the template layer.
Give it a slight Inner Bevel:


Highlight Oval Back layer.
Click anywhere outside of it with your Magic Wand.
New Raster layer.
Copy and paste Paper 2 Into Selection.
Deselect.
Delete the template layer.
Adjust/Add Remove Noise/Add Noise:
Random & Monochrome checked:
Noise: 45%
OK

Highlight Frame 2 layer.
Repeat the above step.

Highlight Oval layer.
Click on it with your Magic Wand.
New Raster layer.
Copy and paste Paper 10 Into Selection.
Deselect.
Delete the template layer.

Highlight Raster 1 layer.
Click on it with your Magic Wand.
New Raster layer.
Copy and paste Paper 1 Into Selection.
Deselect.
Delete the template layer.
Give it the same slight Inner Bevel.

Highlight Rectangle layer.
Click on it with your Magic Wand.
New Raster layer.
Copy and paste Paper 4 Into Selection.
Deselect.
Delete the template layer.
Give it the same slight Inner Bevel.

Highlight Square layer.
Click on it with your Magic Wand.
New Raster layer.
Copy and paste Paper 7 Into Selection.
Deselect.
Delete the template layer.
Give it the same slight Inner Bevel.

Highlight Glittered Square Back layer.
Click anywhere outside of it with your Magic Wand.
Selections/Invert
New Raster layer.
Copy and paste Paper 6 Into Selection.
Deselect.
Delete the template layer.
Apply the same slight Inner Bevel.

Highlight Frame Back 2 layer.
Click on it with your Magic Wand.
New Raster layer.
Copy and paste Paper 3 Into Selection.
Deselect.
Delete the template layer.

Add your embellishments. I used:
55
51: Resize 35%
1: Resize 70%
18: Resize 40%
19: Resize 40%
2: Resize 25% and 50%/Duplicate/Mirror
36: Resize 40%
40: Resize 35%
47: Resize 25%
42: Resize 40%
8: Resize 40%
17: Resize 55%

To get the same drop shadow effect on the beach ball that I have…
Give it a drop shadow on it’s own layer.
Make your Pick Tool active and push the top of the drop shadow down and move it slightly off to the side.

Highlight your white canvas.
New Raster layer.
Select All.
Copy and paste Paper 8 Into Selection.
Deselect.
Copy and paste Element 12 as a new layer.
Resize 60%
Merge Down.
Apply the mask.
Merge Group.

Add your copyrights.

Add your name.
Give it a slight Inner Bevel:


Resize all layers 80%.

I hope you enjoyed this tutorial.
I’d love to see your results and show it off in my gallery.
Email me!
Hugs,
Bev
Tuesday, April 19, 2011

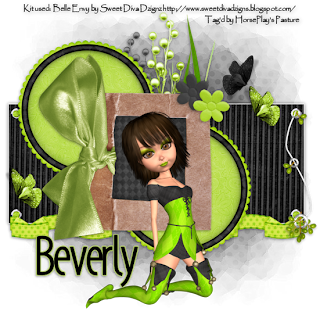
Belle Envy


Supplies

Font of Choice - I used Santana Regular here
My Mask 27 here
Eyecandy 3.1 - Glow
“Belle envy” is a tagger size scrap kit created by Brooke of Sweet Diva Dzignz and can be purchased from her store Butterfly Blush Designs. You can visit her blog here.
Thank you Brooke for an awesome kit!

This tutorial was written assuming you have a working knowledge of PSP.

~♥~ Let’s get started ~♥~

Open up a 700 x 700 blank canvas.
Flood fill white.

Make your Selection Tool active set to Rectangle.
Make a rectangle approximately 625 x 250 pixels.
New Rater layer.
Copy and paste Paper 11 Into Selection.
Deselect.
Apply Eyecandy 3.1 0 Glow:
Width: 3
Opacity: 100
Opacity Drop off: Fat
Color: White
Ok
Don’t worry about placement yet.

Copy and paste Frame 1 as a new layer.
Resize 50%
Click inside of it with your Magic Wand.
Selections/Modify/Expand by 4.
New Raster layer below the frame.
Copy and paste Paper 8 Into Selection.
Deselect.
Merge Visible the frame and paper.
Duplicate
Don’t worry about placement yet.

Copy and paste Cardboard Frame 2 as a new layer.

Move all elements into their positions - see my tag for reference.

Add your embellishments. I used:
Belle 2: Resize 50%
Beaded Branch 1: Resize 60%/Mirror
Beaded Branch 2: Resize 70%
Butterfly 1: Resize 40%
Butterfly 2: Resize 40%/Mirror/Duplicate
Puffy Flower 1 & 2: Resize 40%
Gem Brad 2; Resize 40%/Duplciate 3 times for a total of 4
Folded Ribbon 2: Resize 60%/Duplicate/Mirror
Foliage 3
Foliage 1: Resize 70%

Highlight your white canvas.
New Raster layer.
Select All.
Copy and paste Paper 6 Into Selection.
Deselect.
Apply the mask.
Merge Group.

Add your copyrights.

Add your name.
Apply the same glow effect accept change the color to #bcde58.

Crop your image.

Resize all layers 80%.

I hope you enjoyed this tutorial.
I’d love to see your results and show it off in my gallery.
Email me!
Hugs,
Bev
Monday, April 18, 2011

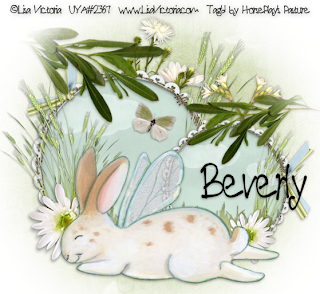
Beneath the Bushes....Easter Sweetness


Supplies

1 tube of choice - I used the wonderful artwork of Lisa Victoria at Up Your Art. You must obtain a license to use.
Font of Choice - I used PaulMaul here
My Mask 20 here and Monti Circular mask here
“Carefree” is a FTU scrap kit created by Cora’s Creations and can be downloaded from her blog here.
Please leave a thank you when downloading. It’s a small gesture for hard work and generosity given freely.

This tutorial was written assuming you have a working knowledge of PSP.

~♥~ Let’s get started ~♥~

Open up a 700 x 700 blank canvas.
Flood fill white.

Copy and paste Frame 3 as a new layer.
Resize 70%
Duplicate/Resize 70%
Move both frames into position - see my tag for reference.

Copy and paste Stitching 1 as a new layer.
Resize 65%
Duplicate/Resize 70%
Position each over a frame.

Highlight the larger frame.
Click inside of it with your Magic Wand.
Selections/Modify/Expand by 4.
New Raster layer below the frame.
Copy and paste Paper 2 Into Selection.
Copy and paste Grass as a new layer just below the frame.
Selections/Invert
Tap the delete key.
Deselect.

Highlight the smaller frame.
Repeat the above step.

Copy and paste Cloud 1 as a new layer below the larger frame.
Resize 40%
Move into position.
Highlight the paper layer.
Click anywhere outside of it with your Magic Wand.
Highlight the cloud layer.
Tap the delete key.
Deselect.

Paste the cloud below the smaller frame.
Resize 25%
Duplicate/Mirror
Move both clouds into position - merge down.
Highlight the paper layer.
Click anywhere outside of it with your Magic Wand.
Highlight the merged cloud layer.
Tap the delete key.
Deselect.

Copy and paste your tube as a new layer.

Add your embellishments. I used:
Flower 3
Greens 5: Resize 60% - position behind the frames and in front of the larger frame.
Green 5 again: Resize 40% - Duplicate twice/mirroring one of them - position in front of the frames
Flower 5: Resize 50%
Flower 1 - Duplicate/Mirror
Flower 4: Resize 60%/Mirror
Flower 4 again: Resize 60%/Flip/Resize 70%
Butterfly: Resize 25%/Free rotate Right 25 degrees
Ribbon 3: Resize 50%/Free rotate Right 90 degrees/Duplicate/Mirror/Free rotate Right 40 degrees

Copy and paste Greens as a new layer at the top of your layers pallet.
Resize 70%
Free rotate Left 80 degrees
Move into position - see my tag for reference.
Apply Monti Circular Mask.
Merge Group.
Tip: If too much of your branch is missing the simply undo the mask. Move the branch closer to the middle of your canvas and reapply the mask. Then move your branch wherever you like.

Paste the Greens again.
Resize 60%
Mirror
Free rotate Right 80 degrees.
Apply the mask just as you did to the other greens layer.

Highlight your white canvas.
New Raster layer.
Select All.
Copy and paste Paper 11 Into Selection.
Deselect.
Apply the mask.
Resize 120%
Merge Group.

Add your copyrights.

Add your name.

Resize all layers 80%.

I hope you enjoyed this tutorial.
I’d love to see your results and show it off in my gallery.
Email me!
Hugs,
Bev
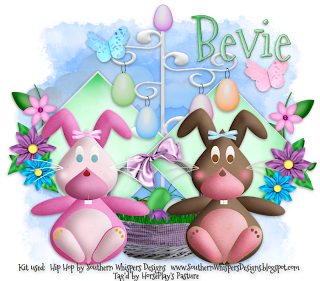
Hip Hop


Supplies

Font of Choice - I used Mountains of Christmas here
Becky Mask 22 here
Eyecandy 3.1 - Glow
“Hip Hop” is a FTU scrap kit created by Me, Southern Whispers Designs and can be downloaded from my design blog here.
Don’t forget to leave some ♥. It’ll be much appreciated.

This tutorial was written assuming you have a working knowledge of PSP.

~♥~ Let’s get started ~♥~

Open up a 700 x 700 blank canvas.
Flood fill white.

Copy and paste Paper 7 as a new layer.
Resize 30%
Free rotate Left 45 degrees
Apply Eyecandy 3.1 - Glow
Width: 3
Opacity: 100
Opacity Dropoff: Fat
Color: White
OK

Duplicate/Mirror
Move both into position - see my tag for reference.

Add your embellishments. I used:
Egg Tree
Basket: Resize 80%
Bunny 1 & 2: Resize 70%
Leaves and Flower 1: Resize 40%/Free rotate Right 90 degrees
Flower 4: Resize 25%
Flower 6: Resize 25% and 80%
Butterfly 1: Resize 25%
Butterfly 2: Resize 25%/Mirror

Highlight your white canvas.
New Raster layer.
Select All.
Copy and paste Paper 5 Into Selection.
Deselect.
Adjust/Blur/Gaussian Blur:
Radius: 10
OK
Apply the mask.
Merge Group.

Copy and paste Cloud as a new layer.
Change the Properties to Soft Light.

Add your copyrights.

Add your name.
Give it an Inner Bevel:


Resize all layers 80%.

I hope you enjoyed this tutorial.
I’d love to see your results and show it off in my gallery.
Email me!
Hugs,
Bev