Saturday, July 25, 2009

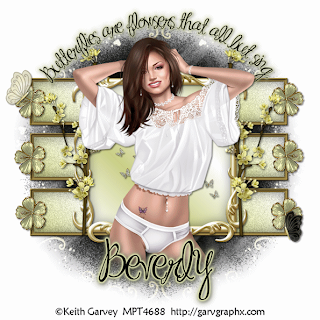
Madame Butterfly


Clicking on the above image will enlarge to full view.
Image below shows the animation.


Supplies
1 tube of choice - I’m using the artwork of Keith Garvey here.
Font of Choice - Ma Sexy here
Weescotlass Mask 119 here
Eyecandy 5: Impact - Gradient Glow
DSB Flux - Bright Noise
Animation Shop
“Marissa” is a PTU tagger size scrap kit created by Lynne of Baby Cakes Scraps and can be purchased at Scraps With Attitude. You can visit her blog here.
Thank you Lynne for this beautiful kit!

This tutorial was written assuming you have working knowledge of PSP.

~♥~ Let’s get started ~♥~

Open up a transparent image
700 x 700
Flood fill white.

In your color pallet:
Foreground: Off
Background: #bfac78
Using your Rectangle tool make a rectangle approximately 520 X 100.
Convert to Rater Layer. Rename Gold.
Select All/Float/Defloat
Selections/Modify/Contract by 8

In your color pallet make a gradient:
Foreground: #bfac78
Background: #d3d6a7
Angle: 45
Repeat: 2
Invert checked
OK

New Raster Layer. Rename Gradient
Flood fill with the gradient.
New Rater Layer
Effects/3D Effects/Cutout


New Raster Layer
Repeat the above cutout accept change the horizontal and vertical numbers to -3.

Highlight the Gold layer.
Give it an inner bevel:


Highlight the Gradient Layer.
Select All/Float/Defloat
Give it a Drop Shadow

Apply it again accept change the horizontal and vertical numbers to -1.

Close out your white canvas and Merge Visible.
Reopen your canvas.

Duplicate the merged layer twice for a total of 3.
Position them evenly and centered on your canvas.
Close out your white canvas.
Merge Visible.
Reopen your white canvas.

Copy and paste the Square Frame as a new layer.
Use your Magic Wand and click inside of it.
Selections/Modify/Expand by 4
New Raster layer below the frame.
Flood fill with your gradient accept UNcheck Invert in the gradient pallet.
Apply the same cutout as above
Deselect.

Add your embellishments. I used:
Scatter: Resize 40%
Branch: Resize 40%
Flower 3: Resize 20%

Copy and paste your tube as a new layer.
Highlight your white canvas.
New Raster layer.
Select All.
Copy and paste a paper of choice Into Selection.
Deselect.
Apply the mask.
Merge Group.

Now we’re going to write on a curve.
In your color pallet close out your background.
Change the foreground color to black.
Click on your Ellipse tool set on circle.
Width set on 2.
Make a large circle on your pallet.
Objects/Align/Center in Canvas
TIP: It’s alright if the circle is too large. You can always go to Image/Resize and make it smaller.
Highlight your Text tool.
Move your cursor along the center top of the circle until you see a rocking A. Then click your mouse. A text box will appear.
Type:
Butterflies are flowers that all but sing.
OK
In your layers pallet click on the + sign beside the circle.
Click on the eye in the New Ellipse layer.
Highlight Vector 1 layer.
Convert to Raster layer.
Use Eyecandy 5: Impact - Gradient Glow


Add your name.

Add your copyrights.

Highlight the merged rectangles layer.
Duplicate twice for a total of 3 layers.
Rename Rec 1, 2, and 3

Highlight Rec 1 layer.
Using your Selection Tool, outline the gradient center of the rectangle.
Apply DSB Flux - Bright Noise

Highlight Rec 2 Layer.
Apply the same Bright Noise accept hit the mix button twice.

Highlight Rec 3 Layer.
Apply the same Bright Noise accept his the mix button 3 times.

Close out Rec 2 and 3 layers.

Resize all layers 85%

Time to animate:
Copy Merge and carry into Animation Shop.
Edit/Paste/As New Animation.

Go back into PSP.
Close out Rec 1 and open Red 2.
Copy Merge and carry into AS.
Edit/Paste/After Current Frame.

Go back into PSP.
Close out Red 2 and open Red 3.
Copy Merge and carry into AS.
Edit/Paste/After Current Frame.

View your animation.
If you’re happy with it then save.

I hope you enjoyed this tutorial.
I’d love to see your results and show it off in my Show Arena.
Email me!
Hugs,
Bev

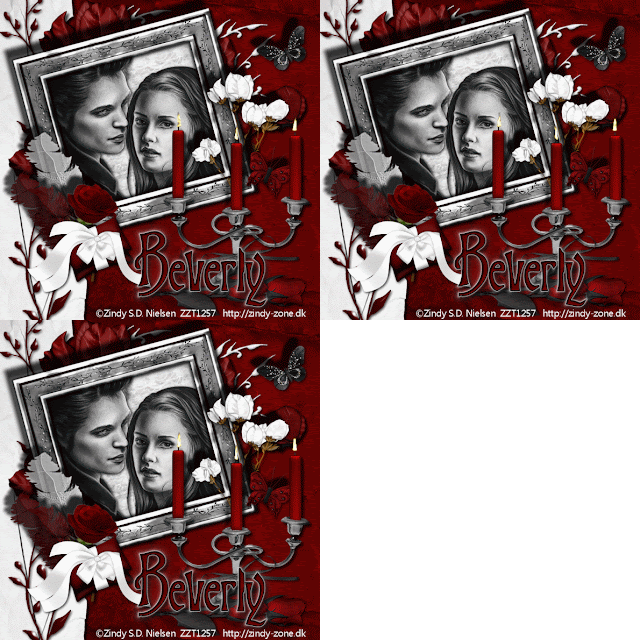
Forbidden Love

Clicking on the image will enlarge to full view.
 
Supplies
1 tube of choice - I’m using the artwork of Zindy S.D. Nielsen here.
Font of Choice - Burton’s Nightmare here
Eyecandy 5: Impact - Gradient Glow
Eyecandy 5: Nature - Fire
Animation Shop
“Yarrow/Grunge & Glitter” is a PTU tagger size scrap kit created by Brandi of Grunge and Glitter Scraps and can be purchased at her store Digital Chaos Scraps. You can visit both of her blogs here and here.
Thank you Brandi for this stunning kit!
The richness of it is awesome!

This tutorial was written assuming you have working knowledge of PSP.

~♥~ Let’s get started ~♥~

Unless otherwise stated, we’ll be working out of the kit
“Forbidden Love GG”

Open up a transparent image
700 x 700
Select All.
Copy and paste Paper 5 Into Selection.
Deselect.

Copy and paste Fold Paper 3 as a new layer.
Resize 90% and move to the left side of your canvas.
See mine for reference.

Copy and paste Doodle 2 as a new layer.
Free rotate Right 90 degrees
Resize 80%
Position over the Fold Paper.

Copy and paste Frame 2 as a new layer.
Resize 50%.
Click inside with your Magic Wand.
Selections/Modify/Expand by 7
New Raster layer below the frame.
Copy and paste a paper of choice Into Selection.
Copy and paste your tube below the frame.
Selections/Invert.
Tap the delete key.
Deselect.
Merge visible the frame, tube, and paper.

Free rotate left 15 degrees and move toward the upper left portion of your canvas.
See mine for reference.

Add your embellishments. I used:
Flower Branch 2
Flower Branch 3: Resize 50%
Feather 2: 70%
Feather 3: 80%
Pillow 2: Resize 50%
Doodle 3: Resize 40%
Candelabra: Resize 50%

Open up Forbidden Love Yarrow kit
Bow 4: Resize 40%
Rose Stem: Resize 50%
Butterfly 3 & 4: Resize 40%

Highlight the Candelabra layer.
Duplicate twice for a total of three layers.
Rename them Candelabra 1, 2, and 3.

Highlight Candelabra 1.
Use your Selection Tool and make an outline of a flame above ach of the candles. It doesn’t have to be perfect!!
Apply Eyecandy 5: Nature - Fire


Highlight Candelabra 2.
Apply the same Fire effect accept hit the Random Seed Button once.

Highlight Candelabra 3.
Apply the same Fire effect accept hit the Random Seed Button once.

Close out Candelabra layers 2 & 3.

Add your copyrights.

Add your name.
I used Eyecandy 5 - Impact - Gradient Glow


Time to animate:

Copy Merge and carry into Animation Shop.
Edit/Paste/As New Animation.

Go back into PSP.
Close out Candelabra 1 and open Candelabra 2.
Copy Merge and carry into AS.
Edit/Paste/After Current Frame

Go back into PSP.
Close out Candelabra 2 and open Candelabra 3.
Copy Merge and carry into AS.
Edit/Paste/After Current Frame

Animation/Frame Properties
Change the Display time to 18

View your animation.
If you’re happy with it then save.

I hope you enjoyed this tutorial.
I’d love to see your results and show it off in my Show Arena.
Email me!
Hugs,
Bev

Friday, July 24, 2009

Loving Memories

Clicking on the image will enlarge to full view.

Supplies
1 tube of choice - I’m using the artwork of Jennifer Janesko here.
Font of Choice - Kingthings Wrote here
Eyecandy 5: Impact - Gradient Glow
Alien Skin Xenofex 1: Shower Door
Alien Skin Xenofex 2: Burnt Edges
Xero: Porcelain
“Remembering La La” is a PTU tagger size scrap kit created by Shani of Wicked Princess Scraps and can be purchased at Paradise4Scrappers. You can visit Shani's blogs here and here.
Thank you Shani for this truly beautiful kit!

This tutorial was written assuming you have working knowledge of PSP.

~♥~ Let’s get started ~♥~

Open up a paper of your choice.
Promote to Background.
Apply Alien Skin Xenofex 2: Burnt Edges

Copy and paste your tube as a new layer.
Resize - I resized mine 200%
Highlight your burnt paper.
Select All/Float/Defloat
Selections/Invert
Highlight your tube layer
Tap the delete key
DO NOT DESELECT YET.

Selections/Modify/Feather
Number of Pixels: 53
OK
Tap the delete key until you have a nice feathered look to your tube.
Minimize this canvas for now.

Open up a transparent image
700 x 700
Flood fill white.

Highlight your burnt/tube canvas.
Copy Merge.

Paste as new layer onto your white canvas.
Resize 80%, 80%, and then 85%
Free rotate right 15 degrees.
Duplicate.
Highlight the original.
Adjust/Blur/Gaussian Blur
Radius: 20
OK
Apply Alien Skin Xenofex 1: Shower Door
Dot Size: 25
Random Seed: 40

Move the Shower Door layer up and to the left a little.
Duplciate and move that layer down and to the right a little.
Highlight the top layer (should be the burnt/tube layer)
Apply Xero Porcelain


Now apply Eyecandy 5: Impact - Gradient Glow


Add your embellishments. I used:
Greenery 1: Resize 80%
Greenery 2
Moon 3 - I applied Noise as follows:
Uniform checked
Noise: 25%
OK
Rose 1 & 3: Resize 50%
Rose 2: Resize 45%
Charm 2: (Copy Merge this element)
Resize: 40%
Bow 1: Resize 50%
Butterfly 1 & 2: Resize 40% Free rotate 25 degrees

Add your copyrights.

Add your name.

Crop your image.

Resize all layers 85%.

I hope you enjoyed this tutorial.
I’d love to see your results and show it off in my Show Arena.
Email me!
Hugs,
Bev

Thursday, July 23, 2009

Full Moon Night

Clicking on the image will enlarge to full view.
 
Supplies
Font of Choice - Fabulous Fifties here
Weescotlass Mask 241 here
Dezignes by Ali Template 79 here
“Moonlit Night” is a PTU tagger size scrap kit created by Lori of. Crazy Lady Scraps and can be purchased at The Scrap Asylum. You can visit Lori’s blog here.
Thank you Lori for such an awesome kit!
This tutorial was written assuming you have working knowledge of PSP.

~♥~ Let’s get started ~♥~

Open up the template.
Shift + D. Close out the original.
Delete the copyright.
Image/Canvas Size
700 X 700
New Raster layer.
Send to bottom.
Flood fill white.

Highlight the Circle layer.
Select All/Float/Defloat
New Raster Layer
Copy and paste the Moon Into Selection.
Deselect.
Delete the template layer.

Merge Visible Shape 2, Shape, 3, and Shape 4 layers.
Select All/Float/Defloat
New Raster Layer
Flood fill with #2e2e5d (or a color of your choice)
DO NOT DESELECT

Copy and paste Element 41 as a new layer.
Resize 90%
Position over the top half of the merged layer.
Selections/Invert
Hit the delete key.
Paste and resize again.
Move to the lower half of the merged layer.
Tap the delete key.
Deselect.

Highlight the Frame layer.
Select All/Float/Defloat
Copy and paste a paper of choice as a new layer.
Selections/Invert
Hit the delete key.
Delete the template layer.

Highlight Shape 1 layer.
Select All/Float/Defloat
Flood fill with a gradient made with
Foreground: #000000
Background: #2e2e5d
Angle: 45
Repeats 2
Invert NOT checked
DO NOT DESELECT YET.

Copy and paste Element 41 again.
Resize 50%
Tap the delete key.
Deselect.

Copy and paste Element 5 as a new layer.
Resize 50%
Move into position - see my tag for reference.

Copy and paste Element 38 as a new layer.
Resize 30%.
Duplicate and move to the right to create a grass affect across the inside bottom of the frame.
Erase any that overhangs.

Add your embellishments. I used:
Element 6: Resize 50%
Element 24: Resize 40%
Element 13: Resize 20%
Element 22: Resize 20%
Element 36: Resize 25%
Element 4: Resize 20%

Highlight your white canvas.
New Raster Layer.
Flood fill with a gradient made with:
Foreground: #2e2e5d
Background: #2e8dbf
Angle 45
Repeats 2
Invert NOT checked.
Apply the mask.
Merge Group.

Add your copyrights.

Add your name.

Crop your image.

Resize all layers 85%.

I hope you enjoyed this tutorial.
I’d love to see your results and show it off in my Show Arena.
Email me!
Hugs,
Bev

Monday, July 20, 2009

Seashore Seduction

Clicking on the image will enlarge to full view.

Supplies
1 tube of choice - I’m using the artwork of Gennadiy Koufay here.
Font of Choice - Bambino here
Weescotlass Mask 249 here
“A Day at the Beach” is a PTU tagger size scrap kit created by Designs by Ali and can be purchased at Paradise4Scrappers here. You can visit Ali’s blog here.
Thank you Ali for such a wonderful kit!
I could almost hear the seagulls screeching in this one!!

This tutorial was written assuming you have working knowledge of PSP.

~♥~ Let’s get started ~♥~

Open up a 700 X 700 transparent image.
Flood fill white.

Copy and paste Frame 5 as a new layer.
Resize 75%.
Use your Freehand Selection tool and outline the ribbon.
Selections/Invert.
Copy and paste a paper of choice below the frame.
Tap the delete key.
Deselect.
Close out your white canvas.
Merge Visible.

Copy and paste your tube as a new layer.

Add your embellishments. I used:
Palm Tree 1: Resize 85%
Flower 2: Resize 90%
Grass 2: Resize 30%
Flower 3, 4, and 5: Resize 30%

Highlight your white canvas.
New Raster Layer.
Select All.
Copy and paste a paper of choice Into Selection.
Deselect.
Apply the mask.
Merge Group.
Resize 110%.

Add your copyrights.

Add your name.

Crop your image.

Resize all layers 85%.

I hope you enjoyed this tutorial.
I’d love to see your results and show it off in my Show Arena.
Email me!
Hugs,
Bev

Sunday, July 19, 2009

Secret Desires

Clicking on the above image will enlarge to full view.

 
Supplies
3 tubes of choice - I’m using the artwork of Jennifer Janesko here.
Font of Choice - Pendulim here
Weescotlass Mask 249 here
jbs2designs Template 27 here
Animation Shop
“Subtle Gifts” is a PTU tagger size scrap kit, also available in full size and was created by Lynn of Designs by Moo and can be purchased at The Scrappindivaz Designz here.
Thank you Lynn for such a beautiful kit!

This tutorial was written assuming you have working knowledge of PSP.

~♥~ Let’s get started ~♥~

Open up the template.
Shift + D. Close out the original.
Delete the copyright.
Resize all layers 120%
Highlight Rater 1
Image/Canvas Size
700 X 700
Flood fill white.

Highlight the Shape layer.
Select All/Float/Defloat
Copy and paste a paper of choice as a new layer.
Selections/Invert
Hit the delete button.
Deselect.
Delete the template layer.
Give it a slight inner bevel:


Highlight Ribbon 1 layer.
Select All/Float/Defloat
New Raster layer.
Create a gradient and flood fill.
DO NOT DESELECT.

Copy and paste Ivy with Flowers as a new layer.
Resize 70%.
Position over the ribbon layer.
Selections/Invert
Tap the delete button.
Deselect.
Merge Down.
Give it the same inner bevel.
Delete the template layer.

Repeat the above steps with Ribbon 2 and Ribbon 3 layers.

Highlight the Top Circle Frame Layer.
Select All/Float/Defloat
Copy and paste a paper of choice as a new layer.
Selections/Invert
Hit the delete button.
Deselect.
Give it the same inner bevel.
Delete the template layer.

Highlight the Top Circle Layer.
Select All/Float/Defloat.
Flood fill with a gradient.
DO NOT DESELECT.

New Raster Layer.
Effects/3D Effects/Cutout
Vertical and Horizontal: 10
Opacity: 25
Blur: 35
Color: Black
OK
New Raster layer.
Apply the same cutout accept change Horizontal & Vertical numbers to -10.
DO NOT DESELECT YET.

Copy and paste your tube as a new layer below the Cutout layers. Selections/Invert
Hit the delete button.
Deselect.

Repeat the above steps with the Bottom Circle Frame Layer and Bottom Circle layer.

Copy and paste your tube as a new layer.

Add your embellishments. I used:
Ivy with Flower: Resize 50%
Butterfly 2: Resize 25% & 80%. Duplicate/Mirror: Resize 70%
Pretty Flower: Resize 25%

Copy and paste the Doodle as a new layer just aboev your white canvas.
Resize 70%
Colorize to match your tag if you like.
Flip and move into position at the bottom left of your tag.
See mine for positioning.
Duplicate/Mirror, Flip.
Merge Down.
Duplicate twice for a total of e of these layers.
Rename Doodle 1, Doodle 2, and Doodle 3.

Highlight Doodle 1
Adjust/Add Remove Noise/Add Noise
Apply the following:


Highlight Doodle 2.
Add the same noise accept change the noise level to 40.

Highlight Doodle 3.
Add the same noise accept change the noise level to 50.

Be sure to close out Doodle 2 and Doodle 3 layers.

Highlight your white canvas.
New Raster Layer.
Select All.
Copy and paste a paper of choice Into Selection.
Deselect.
Apply the mask.
Merge Group.

Add your copyrights.

Add your name.
I gave mine the same inner bevel.

Crop your image.

Resize all layers 85%.

Time to Animate:

Copy Merge and carry into Animation Shop.
Edit/Paste/As New Animation

Go back into PSP.
Close out Doodle 1 layer and open up Doodle 2 layer.
Copy Merge and carry into Animation Shop.
Edit/Paste/After Current Frame.

Go back into PSP.
Close out Doodle 2 layer and open up Doodle 3 layer.
Copy Merge and carry into Animation Shop.
Edit/Paste/After Current Frame.

View your animation. If you’re happy with it then save.

I hope you enjoyed this tutorial.
I’d love to see your results and show it off in my Show Arena.
Email me!
Hugs,
Bev