

Supplies Needed
Font of choice – I used Papyrus (came with my program)
Plug Ins used:
Mura’s Meister – Copies
Xero - Porcelain
“Miss Spring” is a PTU scrap
kit created by TootyPup Scraps and can be purchased from any of her stores here.
Thank you Susan for such a beautiful kit!!
Gorgeous work as always.
This tutorial was written
assuming you have a working knowledge of PSP.
~♥~ Let’s
get started ~♥~
Open the template.
Shift + D to duplicate.
Close out the original.
Highlight and open the
background layer.
Image/Canvas Size:
700 x 700
OK
Flood fill white.
Delete the top 2 layers.
Highlight 1.
Click on it with your
Magic Wand.
New Raster layer.
Copy and Paste Background
Paper 04 Into Selection.
Deselect.
Delete the template
layer.
Give the paper a slight
Inner Bevel:
Highlight 2.
Click on it with your
Magic Wand.
New Raster layer.
Copy and paste Background
Paper 011 Into Selection.
Resize 65%
Move the paper so the far
right side of the paper covers the template.
In your layers pallet
right click on the paper.
Choose “Promote Section
to Layer”
Duplicate/Flip
Deselect.
Delete the original paper
layer.
Make your Selection Tool
active, set on Rectangle.
Section off the top half of
the paper you flipped.
Tap the delete key.
Deselect.
Merge Visible both paper
layers.
Delete the template
layer.
Give the paper the same
slight Inner Bevel.
Highlight 3.
Click on it with your
Magic Wand.
Copy and paste Background
Paper 01 as a new layer.
Resize 70%
Move into a position you
like over the template layer.
Right click on the paper
layer in your layers pallet.
Choose “Promote Section
to Layer”
Delete the Original paper
layer.
Deselect for now.
Add the elements to the
circle - copy and paste the following (see my tag for reference, and don’t
worry about what overhangs, we’ll clean that up in a bit)
Old Log Rail Fence
02: Resize 70% - position so there’s a
gap in between the bottom of the element and the bottom area of the circle.
Ground 01: Position so the gap under the fence is
covered and you can no longer see the circle
Tree 01a: Resize 40%/Duplicate/Resize 60%
Highlight the circle
template layer.
Click anywhere outside of
it with your Magic Wand.
Highlight each element
and tap the delete key.
Deselect.
Delete the template
layer.
Copy and paste Daisy
Bloom 01a as a new layer.
Resize 30%
Apply Mura’s Mesiter –
Copies:
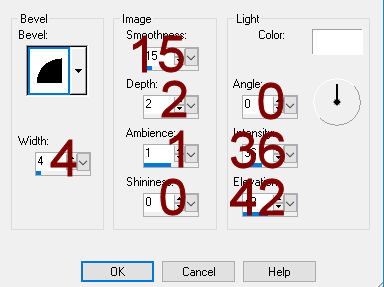
Change your settings to
match mine:

Highlight 4.
Click on it with your
Magic Wand.
New Raster layer.
Copy and paste Background
Paper 04 Into Selection.
Adjust/Add Remove
Noise/Add Noise:
Gaussian checked
Noise: 35%
OK
Deselect.
Delete the template
layer.
Highlight 5.
Click on it with your
Magic Wand.
New Raster layer.
Copy and paste Background
Paper 02 Into Selection.
Deselect.
Delete the template
layer.
Highlight 6.
Click on it with your Magic
Wand.
Copy and paste Background
Paper 01 as a new layer.
Resize the paper 50% and
move into a position over the template that you like.
Right click on the paper
in your layers pallet.
Choose “Promote Section
to Layer”.
Delete the original paper
layer.
Deselect for now.
We’ll come back to this
in a bit.
Copy and paste Old Tree Stump 01b as a new layer.
Copy and paste Old Tree Stump 01b as a new layer.
Resize 55%
Copy and paste your tube
as a new layer.
Resize as you like.
Make your Selection Tool
active set on Square.
Section out the area on
your canvas that captures your tube:

Copy Merge.
Deselect.
Edit/Paste as new layer (over
the small square cloud paper).
Resize the image 130%
Highlight the cloud
paper.
Click anywhere outside of
it with your Magic Wand.
Selections/Invert
Tap the delete key.
Ctrl + H (to open the
Feather Selection box)
Number of Pixels: 30
OK
Tap the delete key 5
times.
Deselect.
Apply Xero – Porcelain 2
times using default settings.
Copy and paste Ribbon 01
as a new layer.
Resize 20%
Move into position over
the image layer – see my tag for reference.
Highlight the bottom
square layer in your layers pallet.
Click anywhere outside of
it with your Magic Wand.
Highlight the Ribbon
layer.
Use your Eraser Tool and erase
the sides that overhang the frame.
Deselect.
Make your Lighten/Darken
Tool active and just touch the sides of the ribbon near the edge to darken it
up just a little to give it that “wrapped” appearance.
Add your
elements. I used:
Sign 00: Resize 45%
Wild Grass 01a: Resize 45%/Duplicate as many times as you
like
Shroom 04a: Resize 15% & 70%
Ground 01: Resize 50%
Flower Deco 03a: Resize 65%
Dragonfly 01: Resize 40%/Duplicate/Mirror
Highlight your white
background.
New Raster layer.
Select All.
Copy and paste Background
Paper 11 Into Selection.
Deselect.
Apply the mask.
Resize 110%
Merge Group.
Duplicate and lower the
Opacity to about 53.
Add your copyrights.
Add your name.
Color Pallet:
Foreground and Background:
#faf5e0
Make your Text Tool
active and type your name.
Use the box around the
name to turn and fit on the wood sign element.
Right click on it in your
layers pallet and choose “Convert to Raster layer”.
Close out your white background.
Save your tag as a PNG.
I hope you enjoyed this
tutorial.
I’d love to see your
results.
Hugs,
Bev