Friday, July 6, 2012

Summer Spell


Supplies

1 tube of choice – I used the beautiful artwork of Joanne Schempp which can be purchased from CDO.  You must have a license to use.

Font of choice - I used Al Sandra here

Weescotlass Mask 208 here

My template 149 here

Plugs Ins used:
Eyecandy 3.1 – Glow

“Summer Spell” is a tagger size collaboration scrap kit created by the very talented artists at PSP Tube Stop: Lisa Cree, Constanza Ehrenhaus, and Katerina Koukiotis.
Thank you all for such a fun summer scrap kit!

This tutorial was written assuming you have a working knowledge of PSP.

~~ Lets get started ~~

Open up the template.
Shift + D.
Close out the original.
Image/Canvas Size:
700 x 700
OK
Highlight the background layer.
Flood fill white.
Delete the credit layer and stars layer.

Highlight Circle layer.
Click on it with your Magic Wand.
New Raster layer.
Copy and paste Water Background Into Selection.
Deselect.
Delete the template layer.
Apply Eyecandy 3.1 – Glow:
Width: 3
Opacity: 100%
Opacity Drop off: Fat
Color: white
OK

Highlight Rec 1 layer.
Click on it with your Magic Wand.
New Raster layer.
Copy and paste Sunshine Background Into Selection.
Deselect.
Delete the template layer.
Give it a slight Inner Bevel:

Highlight Rec 3 layer.
Merge Down.
Both white rectangles should be on the same layer.
Click on both rectangles with your Magic Wand.
New Raster layer.
Copy and paste Beach Background Into Selection.
Deselect.
Give it a slight Inner Bevel.
Copy and paste Yellow Palm tree as a new layer.
Mirror
Move into position over the paper – see my tag for reference.
Highlight the merged template layer.
Click anywhere outside of it with your Magic Wand.
Highlight the Palm tree layer.
Use your Eraser and erase any part of the tree you don’t want to overhang the rectangles.
Deselect.
Delete the template layer.

Highlight Rec 4 layer.
Click on it with your Magic Wand.
New Raster layer.
Copy and paste Sunshine Background Into Selection.
Copy and paste your tube as a new layer over the paper layer.
Change the Properties to Overlay.
Selections/Invert
Tap the delete key.
Deselect.
Delete the template layer.
Give the paper the same slight Inner Bevel.

Highlight Strip 3.
Merge Down.
Merge Down again.
All 3 strips should be on the same layer.
Use your Magic Wand and click on each of them.
Open up the Beach Background paper.
Use your Selection Tool set on Rectangle and section off the bottom sand area of the image.
Copy.
Highlight your working canvas.
Paste Into Selection.
Deselect.
Delete the template layer.
Give it the same slight Inner Bevel.

Copy and paste your tube as a new layer.

                                                     Add your elements.  I used:
Orange Palm Tree: Mirror
Starfish Orange:  Resize 20%/Duplicate/Flip
Starfish 4:  Resize 20%
Starfish Yellow:  Resize 20%/Mirror
Starfish 3:  Resize 20%
Pink Sunglasses:  Resize 20%
Dollar Sand:  Resize 10%
Sunflower 02:  Resize 20%
Sunflower Orange:  Resize 20%/Mirror
Sunflower Pink:  Resize 20%
Shell Pearls:  Resize 40%

Highlight your white background.
New Raster layer.
Select All.
Copy and paste Deck Chair paper Into Selection.
Deselect.
Adjust/Blur/Gaussian Blur:
Radius: 30
OK
Apply the mask.
Resize 120%
Merge Group.

Add your credits.

Add your name.
Foreground & Background: #0e72aa
Type your name.
Apply Eyecandy 3.1 – Glow:
Use same settings.

Resize all layers 80%.

I’d love to see your results.
Email me!
Hugs,
Bev

Punk Kitty Rocks


Supplies

1 tube of choice and 1 close up image – I used the artwork of Verymany which can be purchased from Pics for Design.  You must have a license to use.

Font of choice - I used RealToyz here

Weescotlass Mask 236 here

My template 144 here

Plugs Ins used:
DSB Flux – Bright Noise
Greg’s Factory Output Vol II – Pool Shadow
Eyecandy 3.1 – Glow

“Punk Kitty Rocks” is a tagger size scrap kit created AmyMarie’s Kits and can be purchased from Inspirations of Scrap Friends.  You can visit her blog here.
Thank you for such an awesome kit.

This tutorial was written assuming you have a working knowledge of PSP.

~~ Lets get started ~~

Open up the template.
Shift + D.
Close out the original.
Delete the credit layer.

Highlight Glitter Rectangle 1 layer.
Click anywhere outside of it with your Magic Wand.
Selections/Invert
New Raster layer.
Flood fill with #e6356e
Apply DSB Flux – Bright Noise:
Intensity: 40
Mix checked
OK
Deselect.
Delete the template layer.

Repeat the above step with Glitter Rectangle 2 layer.

Highlight Rectangle 1 layer.
Click on it with your Magic Wand.
New Raster layer.
Copy and paste Paper 16 Into Selection.
Apply Greg’s Factory Output Vol. II – Pool Shadow:
Use default settings accept lower the Intensity bar to 79.
Deselect.
Delete the template layer.

Repeat the above step with Rectangle 2 layer.

Highlight Circle layer.
Click on it with your Magic Wand.
New Raster layer.
Copy and paste Disc 3 Into Selection.
Deselect.
Delete the template layer.

Highlight Glitter Rectangle 3 layer.
Click anywhere outside of it with your Magic Wand.
Selections/Invert
New Raster layer.
Flood fill with #442959
Apply DSB Flux – Bright Noise:
Same settings.
Deselect.
Delete the template layer.

Color Pallet:
Foreground: #794c9b
Background: #d82660
Set on Gradient:
Style: Linear
Angle and Repeat: 0
Invert checked

Highlight Rectangle 3 layer.
Click on it with your Magic Wand.
New Raster layer.
Flood fill with the gradient.
Copy and paste your close up image as a new layer.
Selections/Invert
Tap the delete key.
Deselect.
Change the Properties to Screen.
Delete the template layer.

Color Pallet:
Foreground: #808080
Background: #d82660

Highlight Slats 1 layer.
Make your Color Replacer Tool active.
Hold your mouse directly over the slats and double right click your mouse.
Apply DSB Flux – Bright Noise:
Use same settings.

Highlight Slats 2 layer.
Repeat the above step.

Copy and paste your tube as a new layer.


Add your elements.  I used:
EMOGB-08
Chair:  Resize 70%
Discoball Chain:  Resize 60%
Winged Skull: Resize 60%
Cross Ribs:  Resize 50%/Duplicate
Skull Chain 1:  Resize 70%
Clawed Heart:  Resize 25%/Free rotate Left 8 degrees
Show 1:  Resize 30%/Duplicate
Sparkles 2

Highlight your white background.
New Raster layer.
Select All.
Copy and Paper 20 Selection.
Deselect.
Apply the mask.
Resize 110%
Merge Group.

Add your credits.

Add your name.
Foreground & Background: #000000
Type your name.
Convert to Raster layer.
Apply Eyecandy 3.1 – Glow:
Width: 3
Opacity: 100%
Opacity Drop off: Fat
Color: #f5a7c1
OK

Resize all layers 80%.

I’d love to see your results.Email me!
Hugs,
Bev

Sunday, July 1, 2012

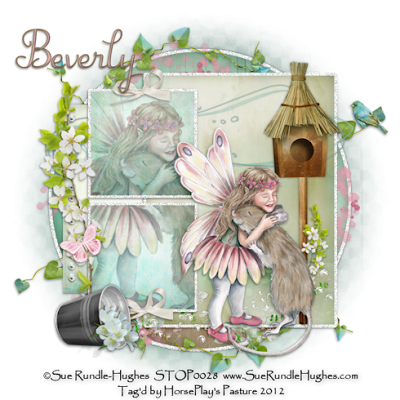
The Bestest of Friends

Supplies

1 tube of choice – I used the beautiful artwork of Sue Rundle-Hughes which can be purchased from PSP TubeStop.  You must have a license to use.

Font of choice - I used Suilly la Tour here

Weescotlass Mask 208 here

My template 143 here

“Summer Fresh” is a tagger size scrap kit (also available in Full size too) created by Kesha of KnC Scrapz and can be purchased from her store Lollipops n Gumdrops.   You can visit her blog here.
Thank you Kesha for another really beautiful kit.

This tutorial was written assuming you have a working knowledge of PSP.

~~ Lets get started ~~

Open up the template.
Shift + D.
Close out the original.
Image/Canvas Size:
700 x 700
OK
Highlight the background layer.
Flood fill white.
Delete the credit layer.

Highlight the Circle layer.
Click on it with your Magic Wand.
New Raster layer.
Copy and paste Paper 10 Into Selection.
Deselect.
Delete the template layer.

Highlight Rectangle 1 layer.
Click on it with your Magic Wand.
New Raster layer.
Copy and paste Paper 5 Into Selection.
Deselect.
Delete the template layer.
Give it a slight Inner Bevel:

Highlight Rectangle 2 layer.
Click on it with your Magic Wand.
New Raster layer.
Copy and paste Paper 4 Into Selection.
Deselect.
Delete the template layer.

Highlight Top Square layer.
Click on it with your Magic Wand.
New Raster layer.
Copy and paste Paper 8 Into Selection.
Deselect.
Delete the template layer.

Highlight Bottom Square layer.
Repeat the above step.

Copy and paste your tube as a new layer.
Move this into position over both square layers – resize the tube larger if you need to.

Highlight the top square paper layer.
Click anywhere outside of it with your Magic Wand.
Selections/Invert
Highlight the tube layer.
Right click your mouse over the layer.
Promote Section to layer.
Deselect.

Highlight the bottom square paper layer.
Repeat the above step.

Delete the original tube layer.

To both promoted layers:
Change the Properties to Multiply
Lower the Opacity to about 53.

Add your elements.  I used:
Birdhouse:  Resize 40%
Bow 2:  Resize 20% and 70%/Duplicate
Branch:  Resize 30%/Free rotate Right 70 degrees/Duplicate/Mirror/Resize 50%
Element 4:  Resize 25%
Bucket:  Resize 15%
Butterfly:  Resize 20% and 70%/Use your Target Tool to change to a color chosen from your tube.
Doodle:  Resize 70%
Element 6:  Resize 80%/Erase the vine area that sticks out too far/Duplicate/Flip/Mirror
Bird:  Resize 15%
Element 8:  Resize 40%/Use Target Tool and change to the same color you did the butterfly.

Highlight your white background.
New Raster layer.
Select All.
Copy and paste Paper 7 Into Selection.
Apply the mask.
Resize 105%
Merge Group.

Add your credits.

Add your name.
Foreground: #8f785c
Background: #e4b3b4
Stroke: 1
Type your name.
Apply a slight Inner Bevel:

Resize all layers 80%.

I’d love to see your results.
Email me!
Hugs,
Bev