Supplies
1 tube of choice - I used the artwork of Dean yeagle which can now be purchased from
CDO. You must have a license to use.
Font of choice - I used Pauls Esther
hereBecky Mask 22
hereDivine Intentionz Template 326
hereXerox - Porcelain
“Raindrops Keep Falling ” is a mini tagger size scrap kit created by Wilma of Wilma4Ever and can be purchased from her store
Wilma4Ever. You can visit her blog
here. Thank you Wilma for a fabulous kit that has endless possibilities!
This tutorial was written assuming you have a working knowledge of PSP.
~♥~ Let’s get started ~♥~
Open up the template.
Shift + d.
Close out the original.
Image/Canvas Size:
700 x 650
OK
Open up the background layer.
Flood fill white.
Delete the top 4 layers, Heat 2 and Heart 1 layers.
Highlight Medium Circle 1 layer.
Click on it with your Magic Wand.
New Raster layer.
Copy and paste Paper 2 Into Selection.
Deselect.
Delete the template layer.
Highlight Medium Circle 2 layer.
Click on it with your Magic Wand.
New Raster layer.
Copy and paste Paper 2 Into Selection.
Copy and paste EL03 as a new layer above the paper layer.
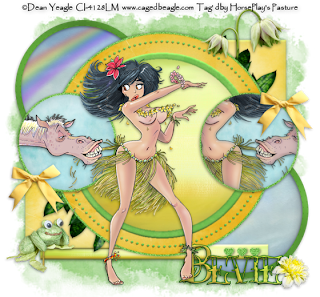
Move into position - see my tag for reference.
Selections/Invert
Tap the delete key.
Deselect.
Delete the template layer.
Highlight Thin Rectangle layer.
Click on it with your Magic Wand.
New Raster layer.
Copy and paste Paper 4 Into Selection.
Deselect.
Delete the template layer.
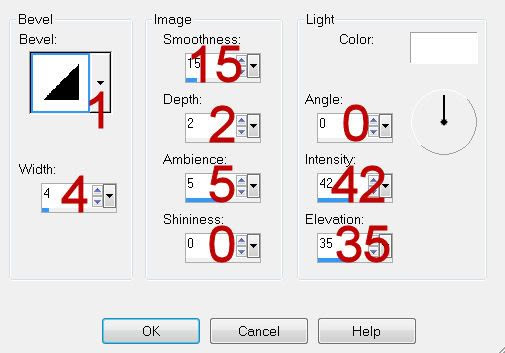
Give it a slight Inner Bevel:
Highlight Small Heart 3 layer.
Merge Down.
Merge Down.
All 3 little glittered hearts should now be on one layer.
Select All/Float/Defloat
New Raster layer.
Copy and paste Paper 6 Into Selection.
Deselect.
Delete the template layer.
Adjust/Add Remove Noise/Add Noise:
Uniform and Gaussian checked.
Noise: 43%
OK
Repeat the above step with Circle 1 layer, Small Glittered Circle 1 layer, and Small Glittered Circle 2 layer.
Highlight Circle 3 layer.
Click on it with your Magic Wand.
New Raster layer.
Paste Paper 6 Into Selection.
Deselect.
Delete the template layer.
Give it the same slight inner bevel.
Highlight Dotted Circle layer.
Select All/Float/Defloat
New Raster layer.
Paste Paper 6 Into Selection.
Deselect.
Delete the template layer.
Give it the same slight Inner Bevel.
Highlight Rectangle 1 layer.
Click on it with your Magic Wand.
New Raster layer.
Copy and paste Paper 5 Into Selection.
Deselect.
Delete the template layer.
Give it the same slight Inner Bevel.
Highlight Rectangle 2 layer.
Repeat the above step.
Highlight Circle 2 layer.
Click on it with your Magic Wand.
New Raster layer.
Copy and paste Paper 5 Into Selection.
Duplicate/Change the Properties to Multiply.
Deselect.
Delete the template layer.
Highlight Circle 4 layer.
Click on it with your Magic Wand.
New Raster layer.
Copy and paste Paper 4 Into Selection.
Deselect.
Delete the template layer.
Highlight Small Circle 1 layer.
Click on it with your Magic Wand.
New Raster layer.
Copy and paste Paper 1 Into Selection.
Deselect.
Delete the template layer.
DO NOT GIVE THIS CIRCLE LAYER A DROP SHADOW - YET.
Highlight Small Circle 2 layer.
Repeat the above step.
Copy and paste your tube as a new layer.
If you’re using the same tube as I did, move the tube into position over the left small circle.
Highlight the small circle paper layer.
Click anywhere outside of it with your Magic Wand.
Highlight the tube layer.
Use your Eraser tool and erase whatever is hanging over the paper that you don’t want.
Deselect.
Duplicate the tube layer.
Mirror
Click on the tube on your canvas and then press down on the right arrow key until you have the tube into position over the right circle paper layer.
Highlight the circle paper layer.
Click anywhere outside of it with your Magic Wand.
Highlight the tube layer and tap the delete key.
Deselect.
To this tube layer apply Xero - Porcelain:
Use Default settings accept move the blue channel button all the way to Zero.
You can now give the circle layers a drop shadow if you choose.
Add your embellishments. I used:
EL19: Resize 35%/Duplicate
EL14: Duplicate/Mirror/Resize 70%
EL16: Resize 40%/Free rotate Right 30 degrees/Duplicate/Mirror/Flip
EL: 24: Resize 30%
EL15: Resize 25%/Mirror
EL9: Reisze 35%
Highlight your white canvas.
New Raster layer.
Select All.
Copy and paste 6 Into Selection.
Deselect.
Apply the mask.
Resize 105%
Merge Group.
Add your copyrights.
Add your name:
Give it the same slight Inner Bevel.
Resize all layers 80%.
I hope you enjoyed this tutorial.
I’d love to see your results and show it off in my gallery.
Email me!
Hugs,
Bev


