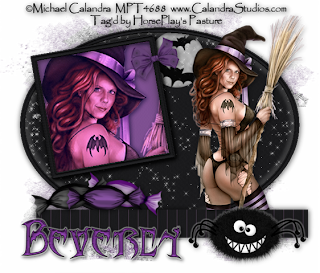
Clicking on the image will allow you to enlarge for bigger view.
Supplies
1 tube of your choice - I used the artwork of Michael Calandra and can be purchased from MPT.
Font of Choice - I used Bats & Dragons
Scrap Rebellion Template 24 here
Becky Mask 36 here
Xenofex 2 - Constellation
“You Scare Me” is a FTU tagger size scrap kit created by Tina’s Magical Scrap World and can be downloaded from her blog here. Please leave a thank you when downloading as it’s a small gesture for hard work given feely.
Thank you Tina for an adorable spook kit! Eek!
This tutorial was written assuming you have a working knowledge of PSP.
~♥~ Let’s get started ~♥~
Open up the template.
Shift + D.
Close out the original.
Delete the top 4 layers and Tag Backing layer.
Highlight Oval layer.
Use your Magic Wand and click on it.
New Raster layer.
Copy and paste Paper 34 Into Selection.
Apply Xenofex 2 - Constellation:
DO NOT DESELECT.
Selections/Invert
Apply Eyecandy 4000 - Gradient Glow:
Color Tab:
White
OK
Deselect.
Delete the template layer.
Highlight Frame 1 layer.
Click on it with your Magic Wand.
New Raster layer.
Copy and paste the same paper Into Selection.
Deselect.
Delete the template layer.
Give it a slight inner bevel:
Highlight Square layer.
Click on it with your Magic Wand.
New Raster layer.
Copy and paste Paper 32 Into Selection.
Copy and paste your tube as a new layer below the frame.
Selections/Invert
Tap the delete key.
Deselect.
Delete the template layer.
Change the Properties to Overlay.
Highlight Frame 2 layer.
Click on it with your Magic Wand.
New Raster layer.
Copy and paste Paper 34 Into Selection.
Deselect.
Delete the template layer.
Give it the same Inner bevel.
To Drop Shadow the square so it’ll stand out a little bit from the black background:
Give it a very heavy drop shadow on it’s own layer.
Duplicate the drop shadow layer.
Merge down.
Highlight the frame layer.
Click inside the frame with your Magic Wand.
Highlight the merged drop shadow layer
Tap the delete key.
Deselect.
Use your Eraser tool and erase the drop shadow that’s on the outside of the frame but only the part that you can see on the white background.
Highlight the frame layer.
Now you can highlight your frame and give whatever shadow you choose.
Highlight Rectanglet layer.
Click on it with your Magic Wand.
New Raster layer.
Copy and paste Paper 1 Into Selection.
Deselect.
Delete the template layer.
Copy and paste your tube as a new layer.
Add your embellishments. I used:
Bow 2: Resize 25%
Moon with Bats 1: Resize 25%
Funny Spider 2: Resize 60%
Bonbon 3: Resize 45%/Free rotate left 15 degrees
Bonbon 1: Resize 45%/Free rotate right 15 degrees
Bonbon 2: Resize 45%
Highlight the white background.
New Raster layer.
Select All
Copy and paste a paper of choice Into Selection.
Deselect.
Apply the mask.
Merge Group.
Add your credits.
Add your name.
Give the same slight inner bevel.
Apply Eyecandy 4000 - Gradient Glow:
Just change the glow width to 3.00
OK
Apply it once more.
Resize all layers 85%.
I hope you enjoyed this tutorial.
I’d love to see your results and show it off in my gallery.
Email me!
Hugs,
Bev

No comments:
Post a Comment