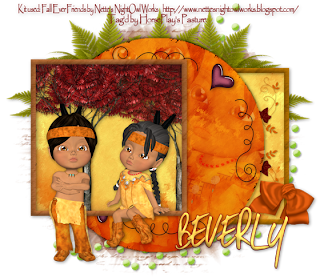
Clicking on the image will allow you to enlarge for bigger view.
Supplies
Font of Choice - I used Same Same But Different here
Blissfully Beth Template 175 here
Weescotlass Mask 236 here
Xerox - Porcelain
Brush Stroke - Sprayed Strokes
“Fall Ever Friends” is a PTU tagger size scrap kit created by Nette of Nette’s NightOwl Works and can be purchased from Lollipops n Gumdrops. You can visit her blog here.
Thank you Nette for a very festive kit!!
This tutorial was written assuming you have a working knowledge of PSP.
~♥~ Let’s get started ~♥~
Open up the template.
Shift + D.
Close out the original.
Delete the top 3 layers.
Image/Canvas Size
700 x 650
OK
New Raster layer.
Send to bottom.
Flood fill white.
Highlight Raster 1 layer.
Use your Magic Wand and click on it.
New Raster layer.
Copy and paste PP 10 Into Selection.
Deselect.
Delete the template layer.
Highlight Pink Square 2 layer.
Click on it with your Magic Wand.
New Raster layer.
Copy and paste Paper 18 Into Selection.
Deselect.
Delete the template layer.
Highlight White Frame 2 layer.
Click on it with your Magic Wand.
New Raster layer.
Copy and paste Paper 5 Into Selection.
Deselect.
Delete the template layer.
Give it a slight inner bevel:
Highlight Black Circle layer.
Click on it with your Magic Wand.
New Raster layer.
Copy and paste Paper 17 Into Selection.
Copy and paste Little Indian Boy 2 as a new layer.
Position it over the circle - see my tag for reference.
Copy and paste Little Indian Girl 5 as a new layer.
Position it over the circle - see my tag for reference.
Change the Properties of both elements to Soft Light.
Highlight the circle layer.
Click anywhere outside of it with your Magic Wand.
Highlight each of the elements and tap the delete key.
Deselect.
Delete the template layer.
To each of the elements apply Zero - Porcelain:
Default Settings.
To the Paper layer apply Brush Strokes - Sprayed Strokes:
Default Settings.
Repeat the Brush strokes effect.
Highlight Pink Square layer.
Click on it with your Magic Wand.
Copy and paste Paper 18 as a new layer.
Move into position over the square.
Selections/Invert
Tap the delete key.
Deselect.
Delete the template layer.
Apply Brush Strokes - Sprayed Strokes:
Default settings.
Repeat the Brush Strokes effect.
Copy and paste Tree as a new layer over the square layer.
Resize 60% - move toward the left side of the square.
Paste the Tree again.
Resize 50%/Mirror - move toward the right side of the square.
Highlight the square layer.
Click anywhere outside of it with your Magic Wand.
Highlight each of the tree layers and tap the delete key.
Highlight White Frame layer.
Click on it with your Magic Wand.
New Raster layer.
Copy and paste Paper 5 Into Selection.
Deselect.
Delete the template layer.
Give it the same inner bevel.
Add your embellishments. I used:
Autumn Doodle: Resize 25%/Duplicate/Flip
Bow 2: Resize 25% and 70%
Corner 4: Resize 35%/Flip/Duplicate/Mirror/Flip
Little Indian Boy 2: Resize 40%
Little Indian Girl 5: Resize 35%
Fairy Dots: Resize 65%
Fern: Resize 60%
Crop your image.
Highlight the white background.
New Raster layer.
Select All
Copy and paste Paper 2 Into Selection.
Deselect.
Adjust/Blur/Gaussian Blur:
Radius: 5
OK
Apply Brush Strokes - Sprayed Strokes:
Default Setting.
Repeat the effect.
Apply the mask.
Merge Group.
Add your credits.
Add your name.
Give it the same slight inner bevel twice.
Resize all layers 80%.
I hope you enjoyed this tutorial.
I’d love to see your results and show it off in my gallery.
Email me!
Hugs,
Bev

No comments:
Post a Comment