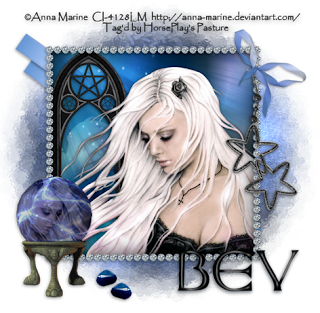
Clicking on the image will allow you to enlarge for bigger view.
Supplies
1 tube of choice - I used the artwork of Anna Marine at CILM
Font of Choice - I used Anglo Saxon here
Vix Mask 451 here
Greg’s Factory Output Vol. II - Pool Shadow
This tutorial was created with Bello Scarto’s Sampler portion of the Stargazing collaboration kit. This kit is available for FREE with an $8 purchase at the store, or it may be purchased outright for the same price.
It is available EXCLUSIVELY at Stargazer Scraps. You can visit her blog here.
This tutorial was written assuming you have a working knowledge of PSP.
~♥~ Let’s get started ~♥~
Open up a 700 x 700 blank canvas.
Flood fill white.
Copy and paste Element 4 as a new layer.
Resize 70%
Click inside of it with your Magic Wand.
Selections/Modify/Expand by 1.
New Rater layer below the frame.
Copy and paste Paper 5 Into Selection.
Copy and paste your tube as a new layer below the frame.
Selections/Invert
Tap the delete key.
Copy and paste Element 10 as a new layer below the tube layer in your layers pallet.
Resize 60% - it should fit nicely within the frame.
Move into position - see my tag for reference.
Copy and paste Element 70 as a new layer just above the paper layer.
Resize 70%
Move into position - see my tag for reference.
Tap the delete key.
Deselect.
Copy and paste Element 6 as a new layer.
Resize 50%
Move into exact position - see my tag for reference.
Copy and paste your tube as a new layer above the glass ball in your layers pallet. You’ll want it to be facing your other tube so mirror this tube layer if you have to.
Resize so that it fits within the glass ball - change the Properties to Soft Light now so that you can see how it’ll look and then you’ll know where to place it.
Highlight the glass ball layer.
Click anywhere outside of it with your Magic Wand.
Highlight the tube layer.
Tap the delete key.
Deselect.
Use your Freehand Selection Tool and outline the base that holds the glass ball.
Selection/Invert
Highlight the tube layer.
Tap the delete key.
Deselect.
Add your embellishments. I used:
Element 9: Resize 40%
Element 7: Resize 40%/Mirror
Element 8: Resize 50%/Free rotate Right 35 degrees/Duplicate
Element 14: Resize 25% and 60%/Duplicate/Mirror
Highlight your white background.
Select All.
New Raster layer.
Copy and paste Paper 3 Into Selection.
Deselect.
Apply Greg’s Factory Output Vol. II - Pool Shadow:
Use Default settings.
Apply the mask.
Merge Group.
Add your credits.
Add your name.
Give it a slight Inner Bevel:

Resize all layers 80%.
I hope you enjoyed this tutorial.
I’d love to see your results and show it off in my gallery.
Email me!
Hugs,
Bev
Supplies
1 tube of choice - I used the artwork of Anna Marine at CILM
Font of Choice - I used Anglo Saxon here
Vix Mask 451 here
Greg’s Factory Output Vol. II - Pool Shadow
This tutorial was created with Bello Scarto’s Sampler portion of the Stargazing collaboration kit. This kit is available for FREE with an $8 purchase at the store, or it may be purchased outright for the same price.
It is available EXCLUSIVELY at Stargazer Scraps. You can visit her blog here.
This tutorial was written assuming you have a working knowledge of PSP.
~♥~ Let’s get started ~♥~
Open up a 700 x 700 blank canvas.
Flood fill white.
Copy and paste Element 4 as a new layer.
Resize 70%
Click inside of it with your Magic Wand.
Selections/Modify/Expand by 1.
New Rater layer below the frame.
Copy and paste Paper 5 Into Selection.
Copy and paste your tube as a new layer below the frame.
Selections/Invert
Tap the delete key.
Copy and paste Element 10 as a new layer below the tube layer in your layers pallet.
Resize 60% - it should fit nicely within the frame.
Move into position - see my tag for reference.
Copy and paste Element 70 as a new layer just above the paper layer.
Resize 70%
Move into position - see my tag for reference.
Tap the delete key.
Deselect.
Copy and paste Element 6 as a new layer.
Resize 50%
Move into exact position - see my tag for reference.
Copy and paste your tube as a new layer above the glass ball in your layers pallet. You’ll want it to be facing your other tube so mirror this tube layer if you have to.
Resize so that it fits within the glass ball - change the Properties to Soft Light now so that you can see how it’ll look and then you’ll know where to place it.
Highlight the glass ball layer.
Click anywhere outside of it with your Magic Wand.
Highlight the tube layer.
Tap the delete key.
Deselect.
Use your Freehand Selection Tool and outline the base that holds the glass ball.
Selection/Invert
Highlight the tube layer.
Tap the delete key.
Deselect.
Add your embellishments. I used:
Element 9: Resize 40%
Element 7: Resize 40%/Mirror
Element 8: Resize 50%/Free rotate Right 35 degrees/Duplicate
Element 14: Resize 25% and 60%/Duplicate/Mirror
Highlight your white background.
Select All.
New Raster layer.
Copy and paste Paper 3 Into Selection.
Deselect.
Apply Greg’s Factory Output Vol. II - Pool Shadow:
Use Default settings.
Apply the mask.
Merge Group.
Add your credits.
Add your name.
Give it a slight Inner Bevel:
Resize all layers 80%.
I hope you enjoyed this tutorial.
I’d love to see your results and show it off in my gallery.
Email me!
Hugs,
Bev

No comments:
Post a Comment